Help / Examples / XSLT
Summary
This article talks about Agile Documents XSLT functionality and builds on what we learned in Word Basics - Start Here, Word Basics - Templates and Word Basics - Find and Insert. XSLT is a way to transform XML data into other formats.
Agile Documents provides multiple ways to control the selection of content, its assembly and the generation of new documents. As we previously discussed, you may create a template for Agile Document that defines its structure and style; you may drag content from SharePoint Explorer and drop it anywhere within your Agile Document; you may filter the selection of content such as selecting a range of cells in an Excel file; and then you may also save your document to several different output types. However, sometimes you may desire additional functionality and customization. It is because of these cases that we have integrated XSLT into our processes.
Many of the files Agile Document's interacts with--such as Microsoft Word, Excel, PowerPoint, and InDesign--are actually a ZIP file that houses many XML files. So, you can change the extension of a .DOCX file to .ZIP and browse it with WinZip, 7-Zip, or WinRAR or your favorite ZIP editor to see the underlying data. When you leverage the XSLT processes within Agile Documents you can read and update files within this ZIP archive. Really, the sky is the limit in terms of what you can do with XSLT and your files. You could reformat Word tables, you could copy data from several different worksheets in an Excel table and insert it as a completely reformatted Word table and you could also integrate Word or Excel data into an Adboe InDesign document.
You may wish to review the technical discussion of XSLT processing within Agile Documents.
Please note that the examples described here are easily installed onto your SharePoint site. That installation procedure is described in Installing Examples.
Example 1: Modifying a Word Document via XSLT
In this example, we eliminate empty table cells. With Agile Document's XSLT functionality this is a simple task.
Similar to previous examples, ensure that the folder XSLT/EX1 exists within your document library. Then create a new Agile Document through SharePoint Explorer. Go back into SharePoint and rename it EX1.AgileDocument.xml. Then, create the Word document detailed in Figure 1 and create the XSLT file shown in Figure 2.
Next, edit the Agile Document as shown in Figure 3 to pair the XSLT file with the Word file. Make sure you add the Word file first, then go to the code pane and then drop the XSLT file from SharePoint Explorer to the Drag files from SharePoint Explorer and drop them here rectangular box. Also, ensure you set the Agile Document output type to DOCX. Save, build and then review Figure 4.

Figure 1: Unstyled Word Document
<?xml version="1.0" encoding="utf-8"?>
<?bc-agiledocuments zipsource="word/document.xml" zipdestination="word/document.xml" ?>
<xsl:stylesheet version="1.0"
    xmlns:xsl="http://www.w3.org/1999/XSL/Transform"
    xmlns:msxsl="urn:schemas-microsoft-com:xslt"
    xmlns:w="http://schemas.openxmlformats.org/wordprocessingml/2006/main"
    exclude-result-prefixes="msxsl"
>

  <xsl:output method="xml" indent="yes"/>

  <xsl:template match="@* | node()">
      <xsl:copy>
          <xsl:apply-templates select="@* | node()" />
      </xsl:copy>
  </xsl:template>

  <!-- When we are removing cells, set the table to autosize to full width of the document -->
  <xsl:template match="w:tblW">
    <xsl:choose>
      <xsl:when test="../../w:tr/w:tc/w:p[not(w:r)]">
        <w:tblW w:w="5000" w:type="pct"/>
      </xsl:when>
      <xsl:otherwise>
        <xsl:copy>
          <xsl:apply-templates select="@* | node()" />
        </xsl:copy>
      </xsl:otherwise>
    </xsl:choose>
  </xsl:template>

  <!-- Remove any empty cells. These are defined as have a w:tbl/w:tr/w:tc/w:p element WITHOUT a w:r child -->
  <xsl:template match="w:tr">
    <xsl:choose>
      <xsl:when test="w:tc/w:p/w:r">
        <xsl:copy>
          <xsl:apply-templates select="@* | node()" />
        </xsl:copy>
      </xsl:when>
      <xsl:otherwise>
        <w:tr>
          <w:tc>
            <w:p>
              <w:r>
                <w:t> </w:t>
              </w:r>
            </w:p>
          </w:tc>
        </w:tr>
      </xsl:otherwise>
    </xsl:choose>
  </xsl:template>

  <xsl:template match="w:tc">
    <xsl:if test="w:p/w:r">
      <xsl:copy>
        <xsl:apply-templates select="@* | node()" />
      </xsl:copy>
    </xsl:if>
  </xsl:template>

</xsl:stylesheet>
Figure 2: XSLT to Remove empty table cells
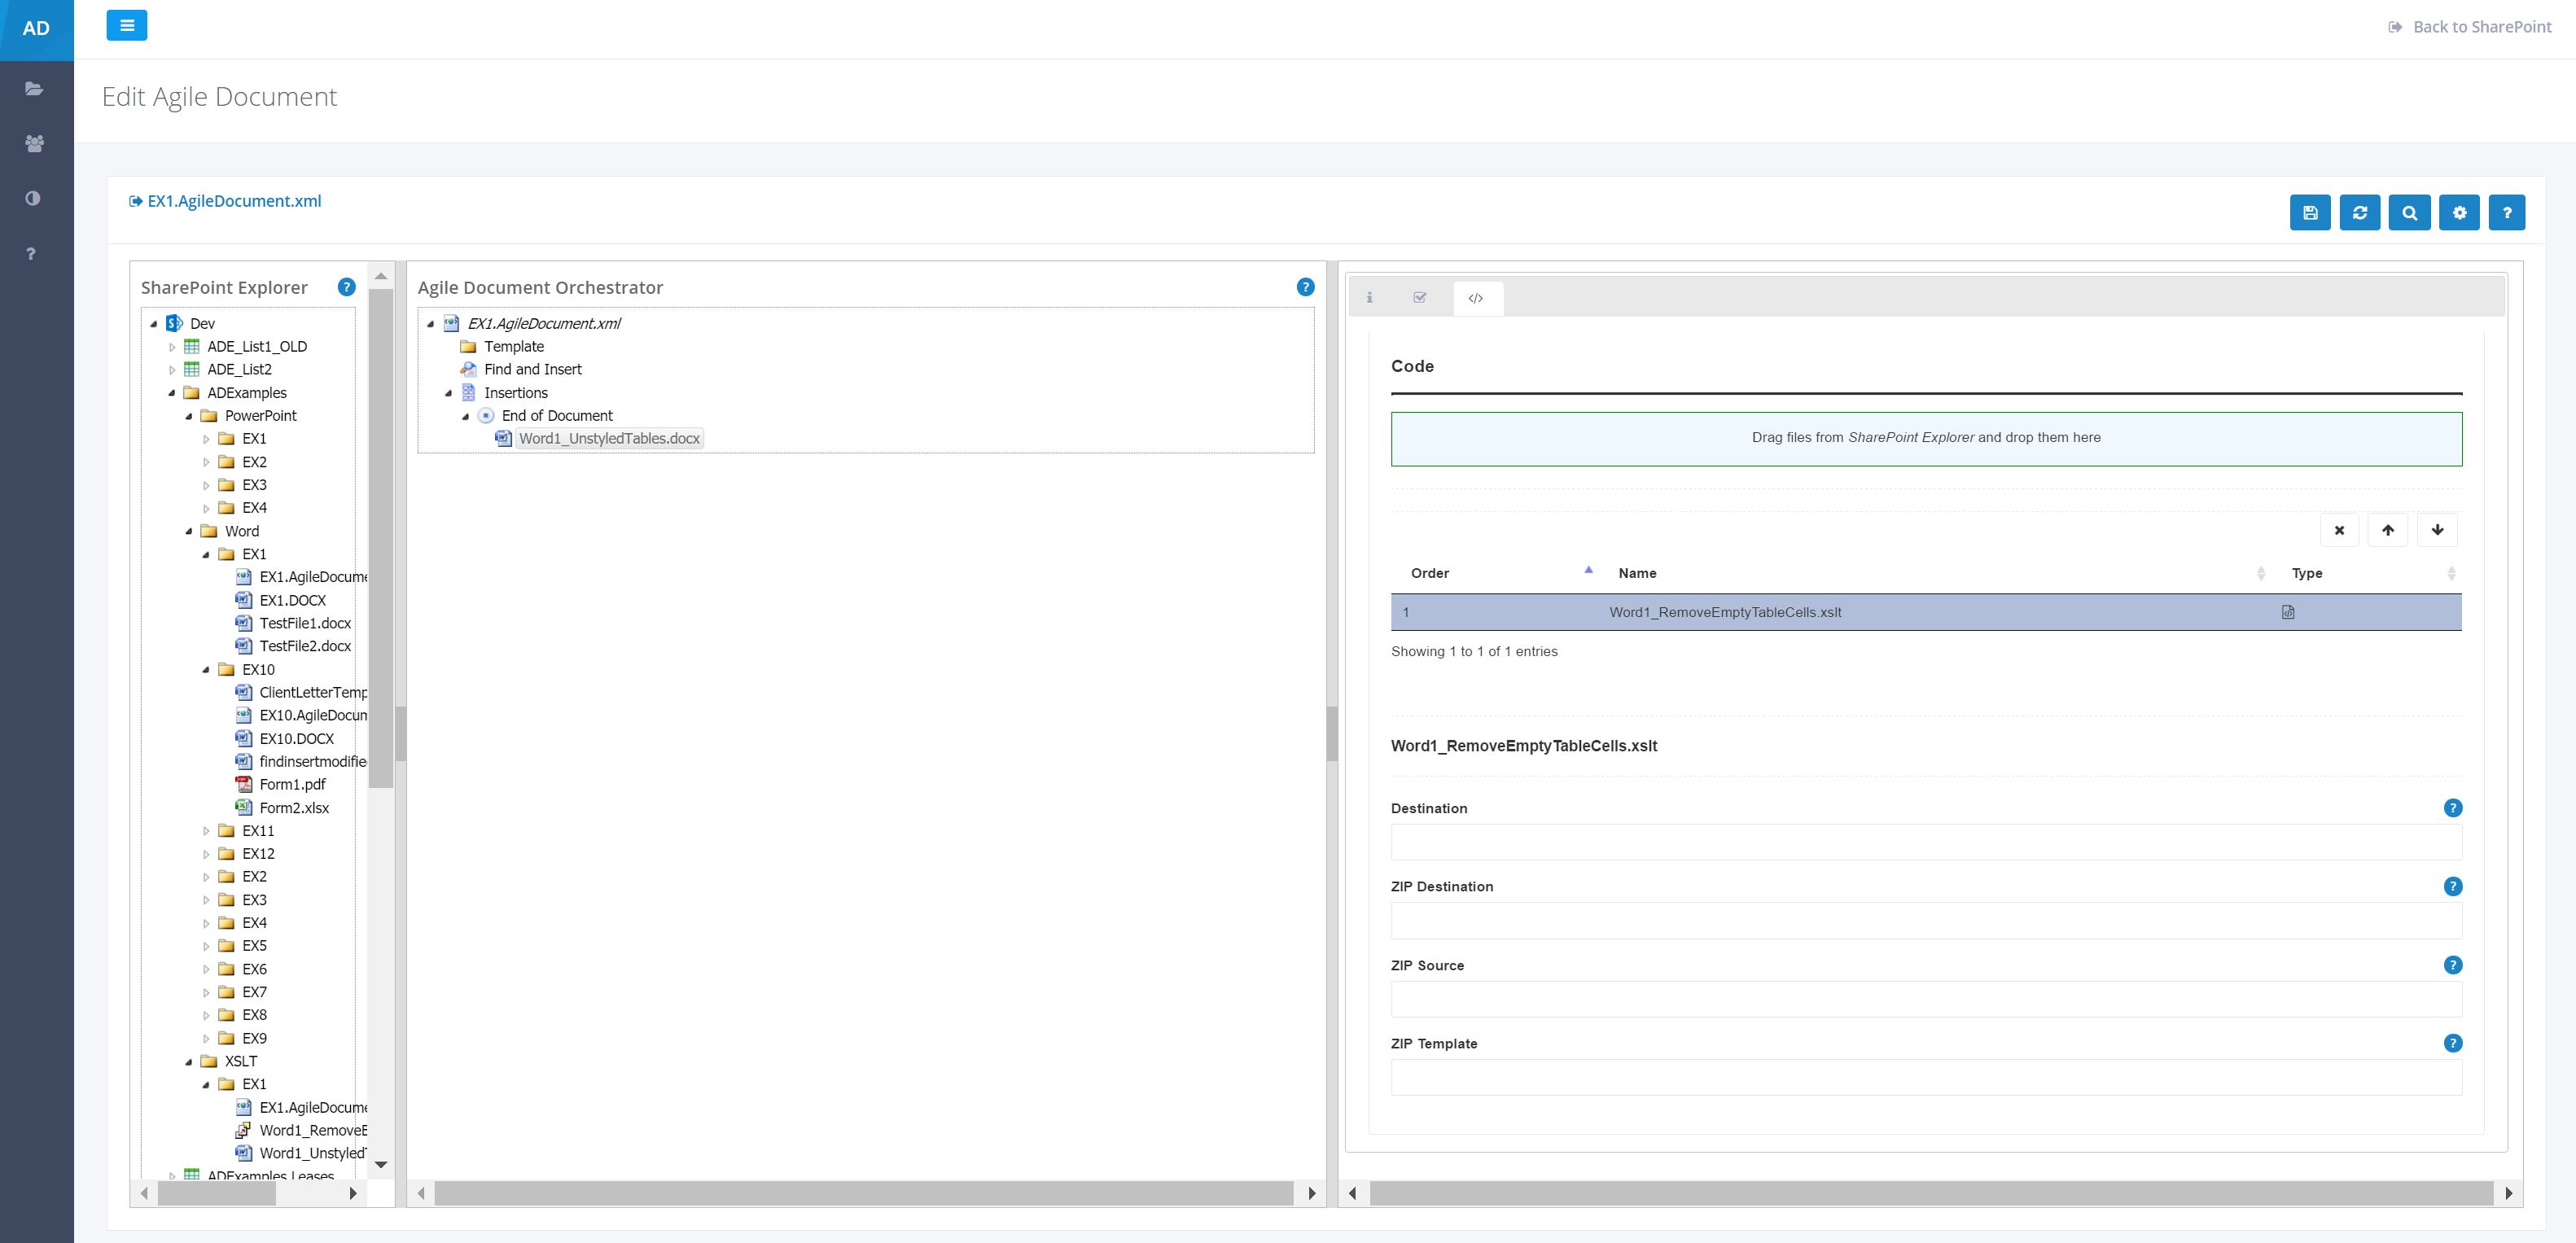
Figure 3: Agile Document
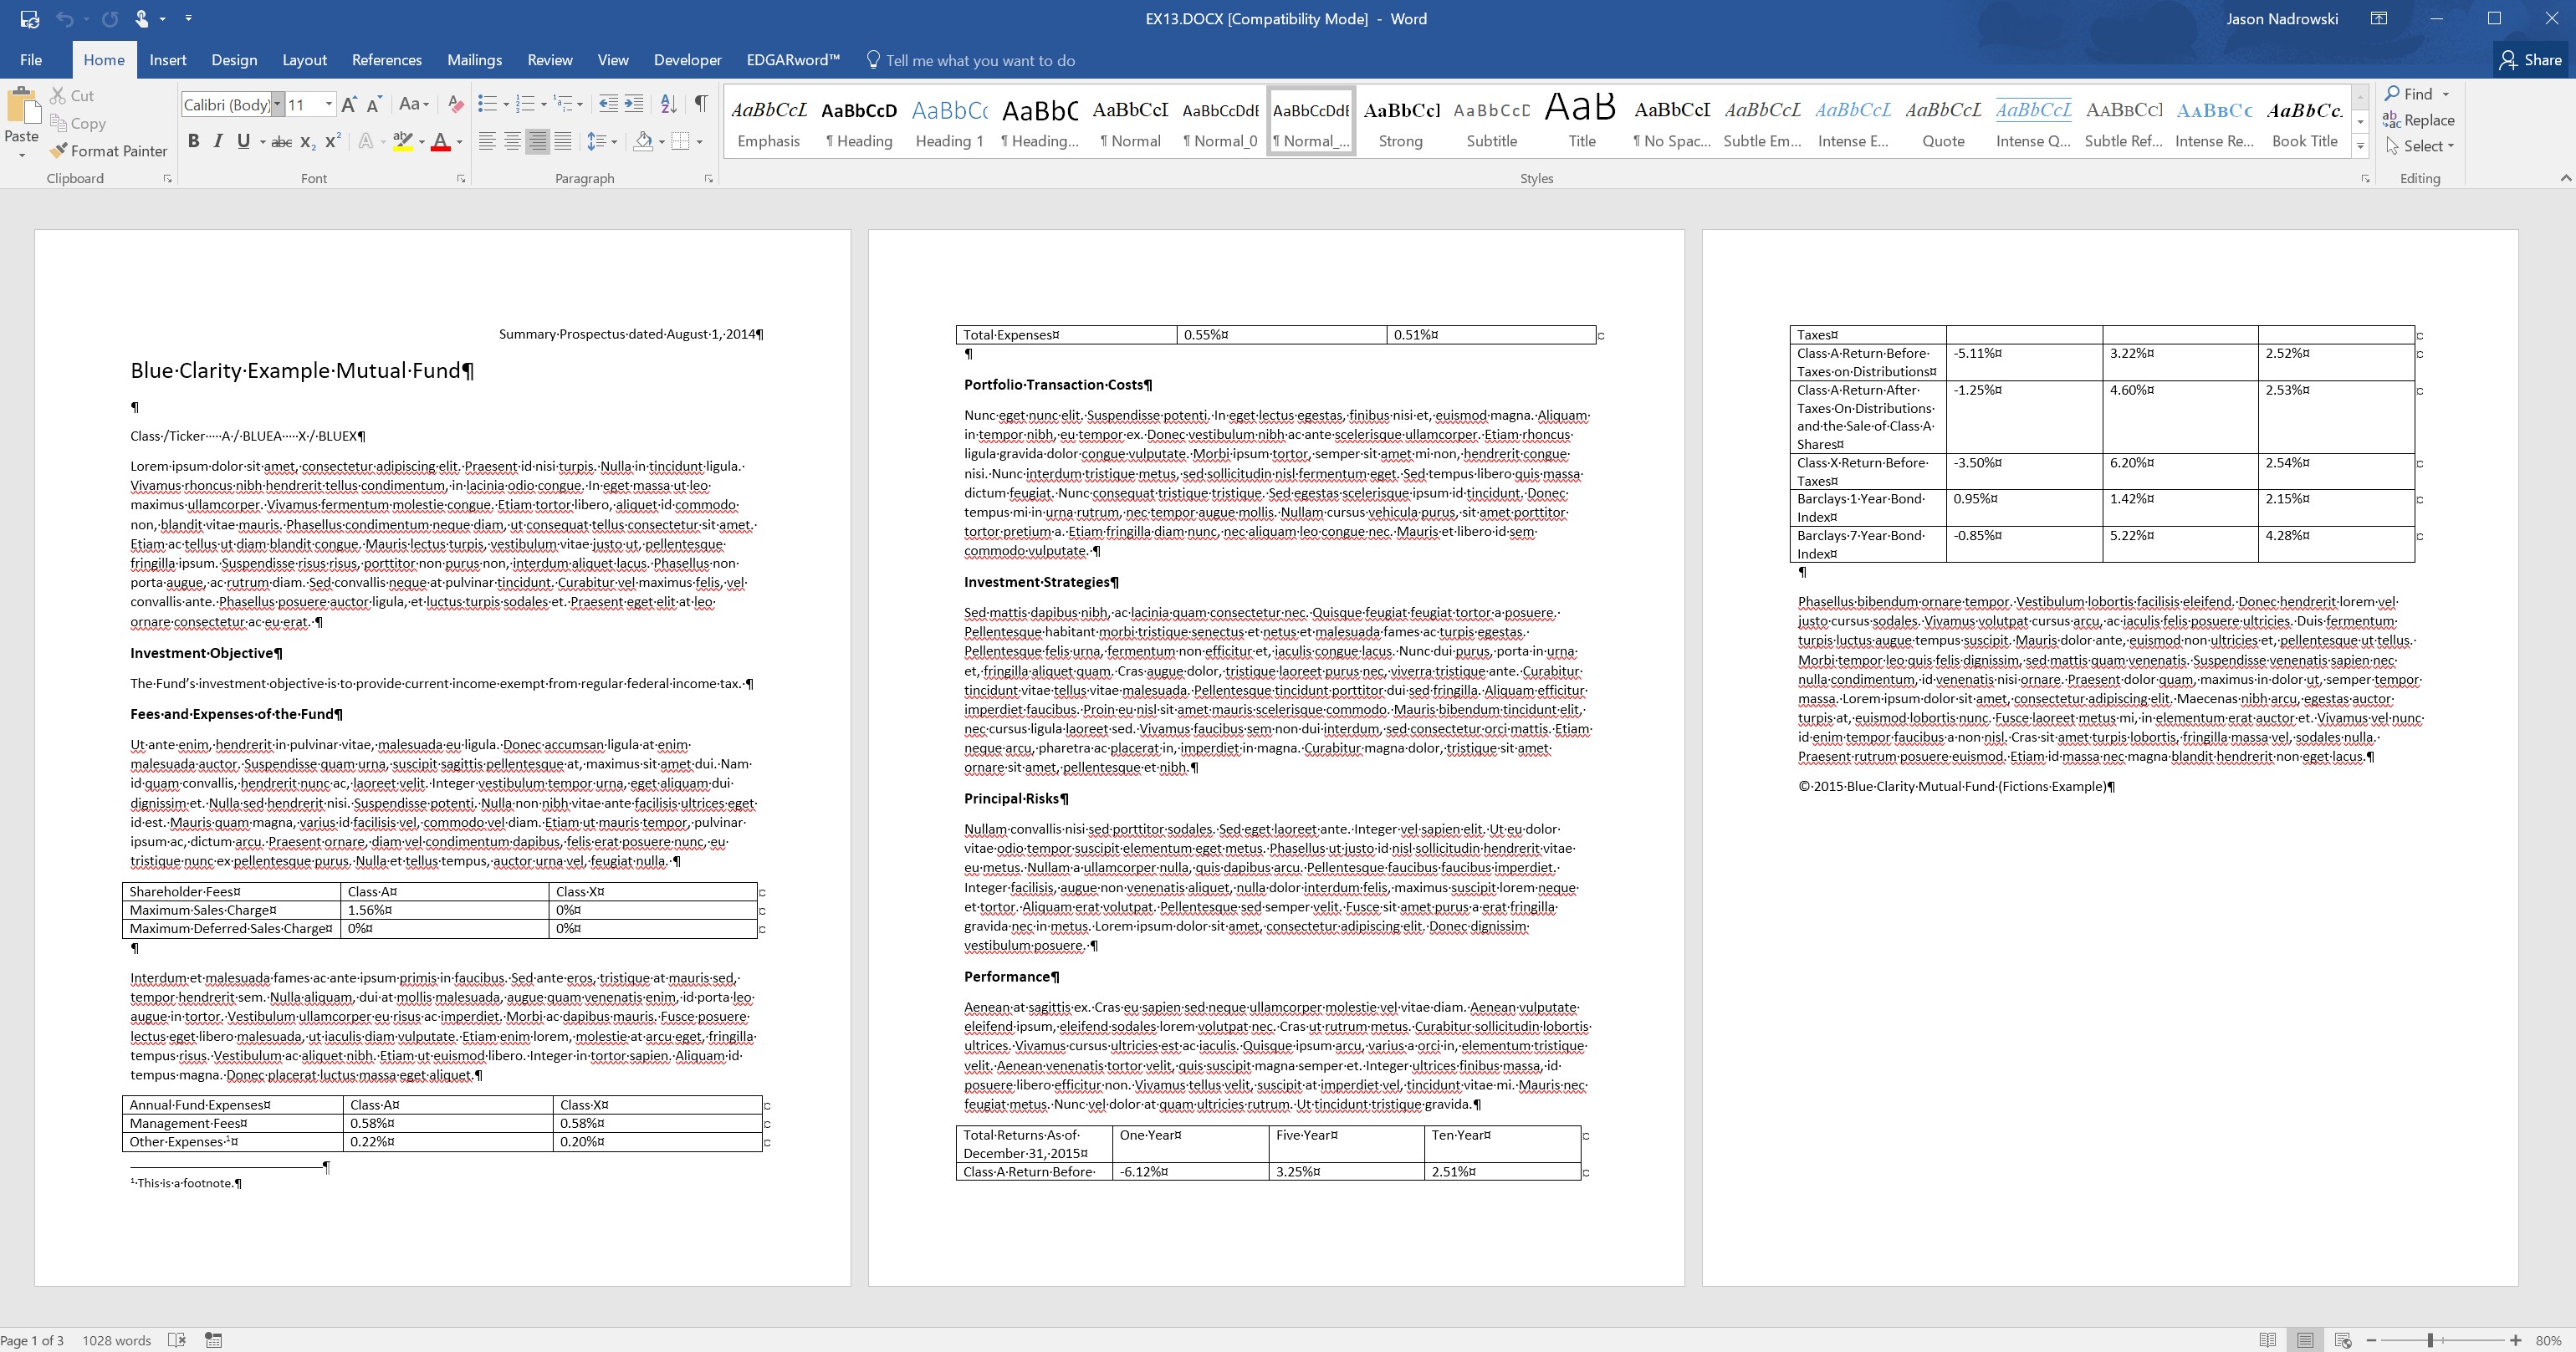
Figure 4: XSLT Modified Word Document
In this example we applyied an XSLT file (Figure 2) to a Microsoft Word (DOCX) file to modify its content. Specificially, empty table cells were removed from the last table on Page 1 of the document.
The exact application of the XSLT is detailed in Line 3 of Figure 2. That processing instruction dictates that Agile Documents is to interact with the DOCX (aka ZIP) file by appling the XSLT to the word/document.xml (zipsource) and store its result to word/document.xml (zipdestination). The bc-agiledocuments Processing Instruction is further detailed in the Configuring Agile Document's processing of XSLT files section of XSLT documentation.
As you can see from Figure 2, the XSLT is rather short and straight forward. The important take away is that you can build-up a library XSLTs that could be applied for all sorts of circumstances. For instance, you could apply a "branding" XSLT that ensures, among other things, that all tables are shaded blue.
Example 2: Styling Word Tables
In Example 2, we apply a blue table style to all tables in the document. Through Agile Document's XSLT functionality, we are able to quickly and consistently automate what used to be a manual process. Thus, we avoided the time and error prone nature of manual processes.
Similar to previous examples, ensure that the folder XSLT/EX2 exists within your document library. Then create a new Agile Document through SharePoint Explorer. Go back into SharePoint and rename it EX2.AgileDocument.xml. Copy, the Word document you created in Example 1 (Figure 1) to our XSLT/EX2 folder. Create an empty Word document Template1.docx. Also, create the XSLT file shown in Figure 5.
Next, edit the Agile Document as shown in Figure 6 to pair the XSLT file with the Word file. Make sure you add the Word file first, then go to the code pane and then drop the XSLT file from SharePoint Explorer to the Drag files from SharePoint Explorer and drop them here rectangular box. Also, ensure you set the Agile Document output type to DOCX. Save, build and then review Figure 7.
<?xml version="1.0" encoding="utf-8"?>
<?bc-agiledocuments
    zipsource="word/document.xml"
    zipdestination="word/document.xml"
    ziptemplate="Template1.docx" ?>
<xsl:stylesheet version="1.0"
    xmlns:xsl="http://www.w3.org/1999/XSL/Transform"
    xmlns:msxsl="urn:schemas-microsoft-com:xslt"
    xmlns:w="http://schemas.openxmlformats.org/wordprocessingml/2006/main"
    exclude-result-prefixes="msxsl"
>

  <xsl:output method="xml" indent="yes"/>
  <xsl:param name="paramTableStyle" select="'GridTable4-Accent5'" >
    <!--
    The table style. Chose a table style defined in Word minus any spaces. Examples include:
    'GridTable1Light', 'GridTable1Light-Accent1', and 'GridTable5Dark-Accent2'. Remember, no accent is
    a dark gray, Accent1 is light blue, Accent2 is red orange, Accent 3 is light gray, Accent 4
    is yellow-orange, Accent 5 is dark blue, Accent 6 is green.
    -->
  </xsl:param>

  <xsl:template match="@* | node()">
      <xsl:copy>
          <xsl:apply-templates select="@* | node()" />
      </xsl:copy>
  </xsl:template>
  <!-- Force Every Table to GridTable4-Accent5 -->
  <xsl:template match="w:tblStyle/@w:val">
    <xsl:attribute name="w:val">
      <!--<xsl:value-of select="'GridTable4-Accent5'" />-->
      <xsl:value-of select="$paramTableStyle" />
    </xsl:attribute>
  </xsl:template>

</xsl:stylesheet>
Figure 5: XSLT to apply table format
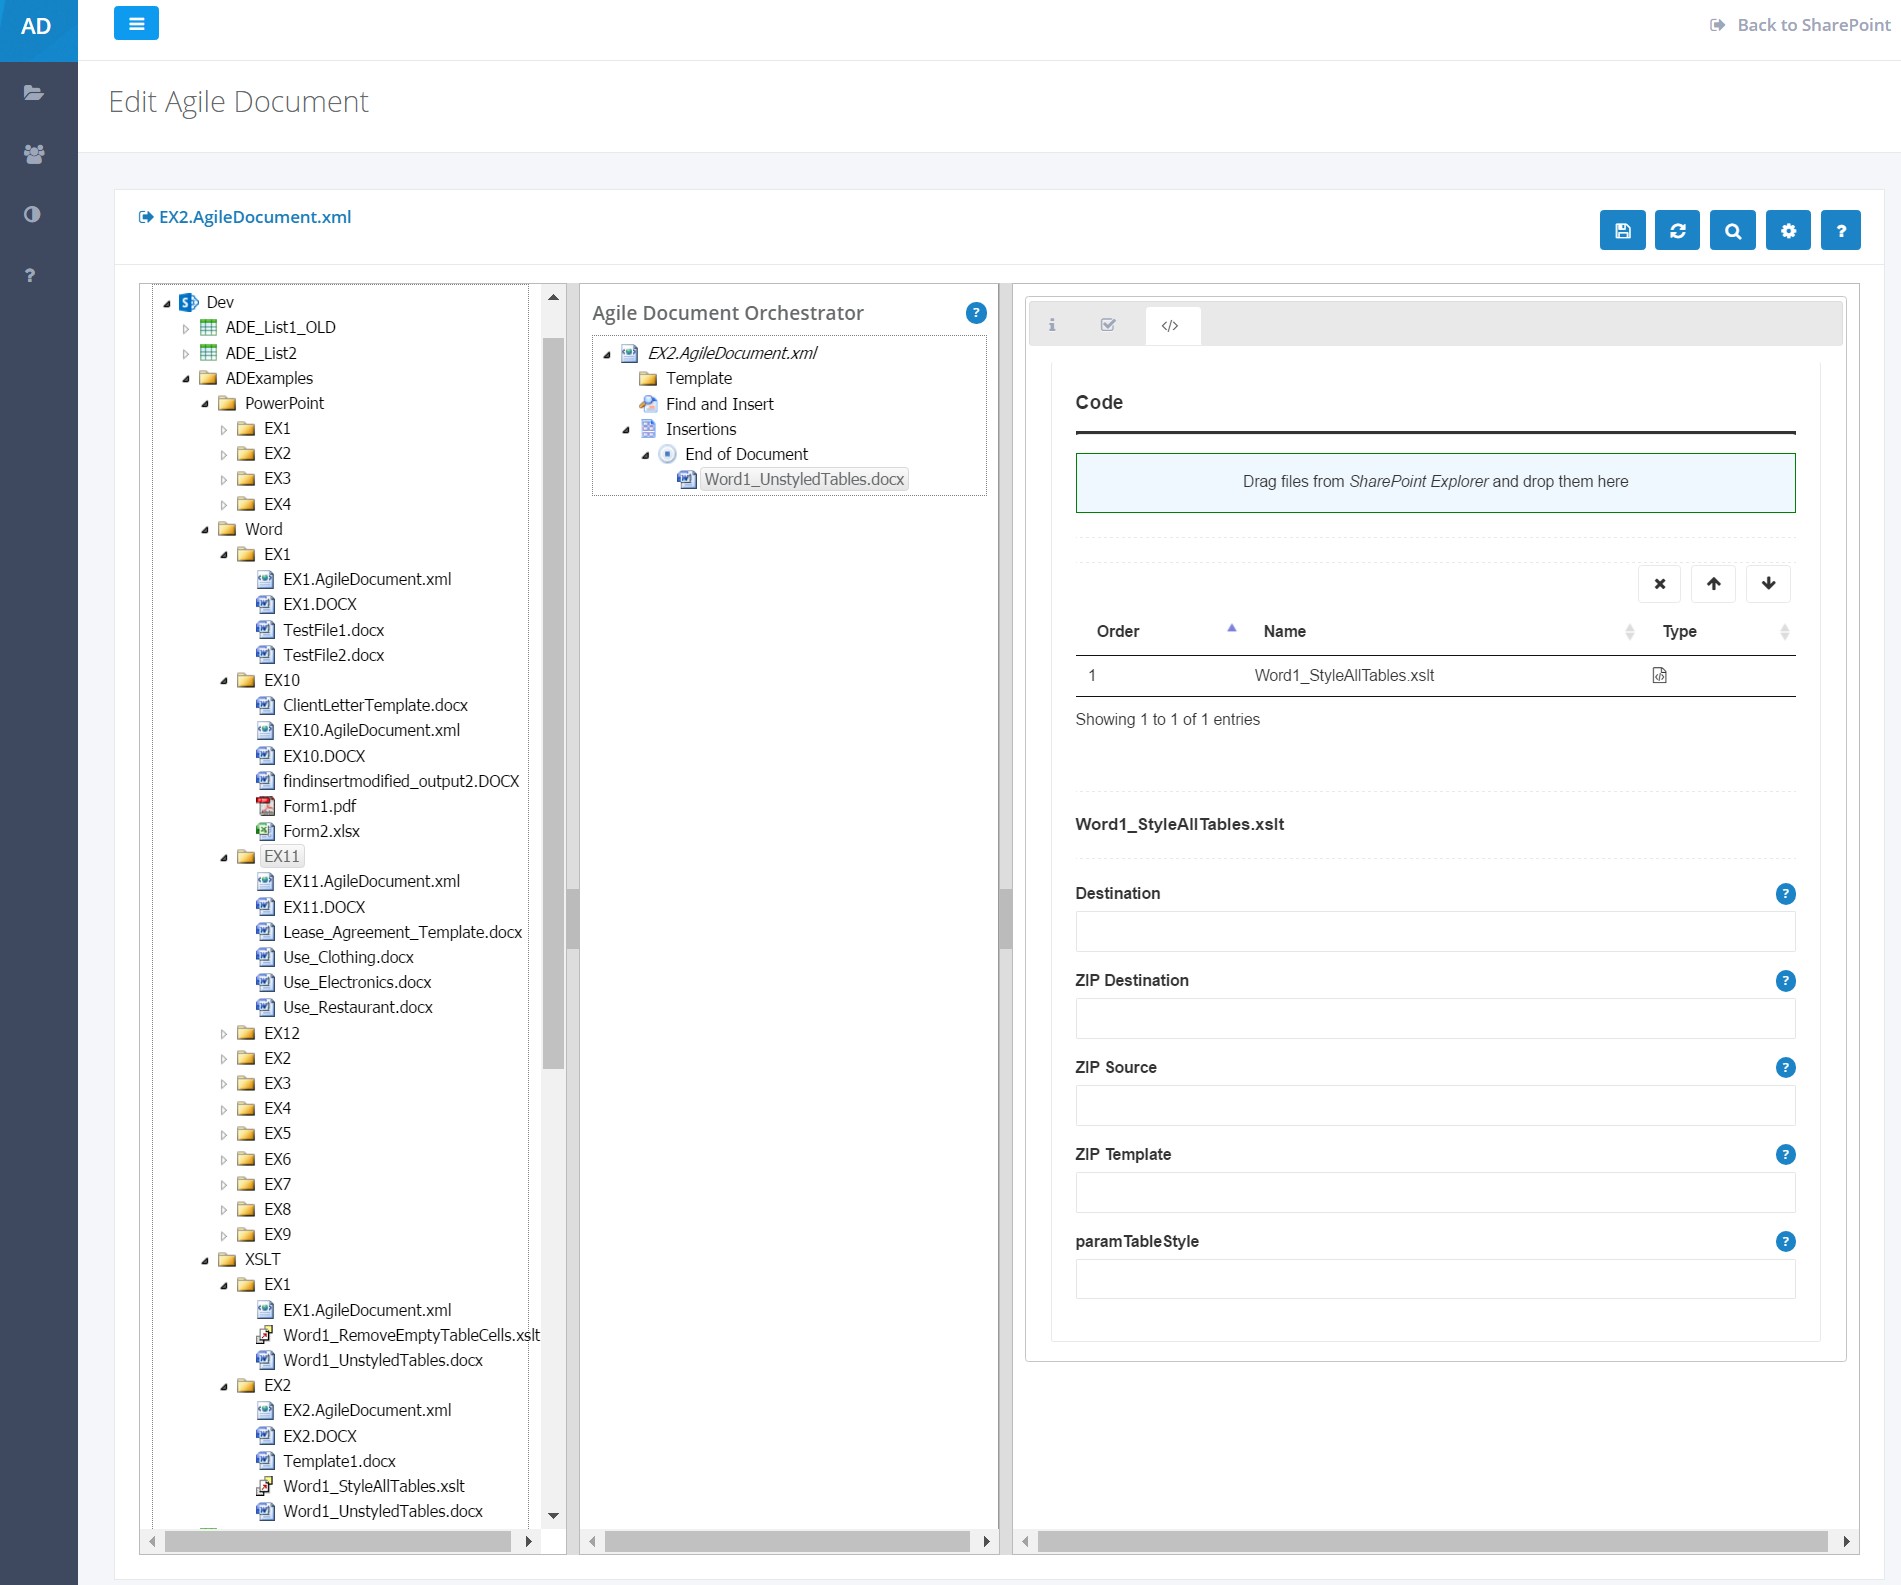
Figure 6: Agile Document
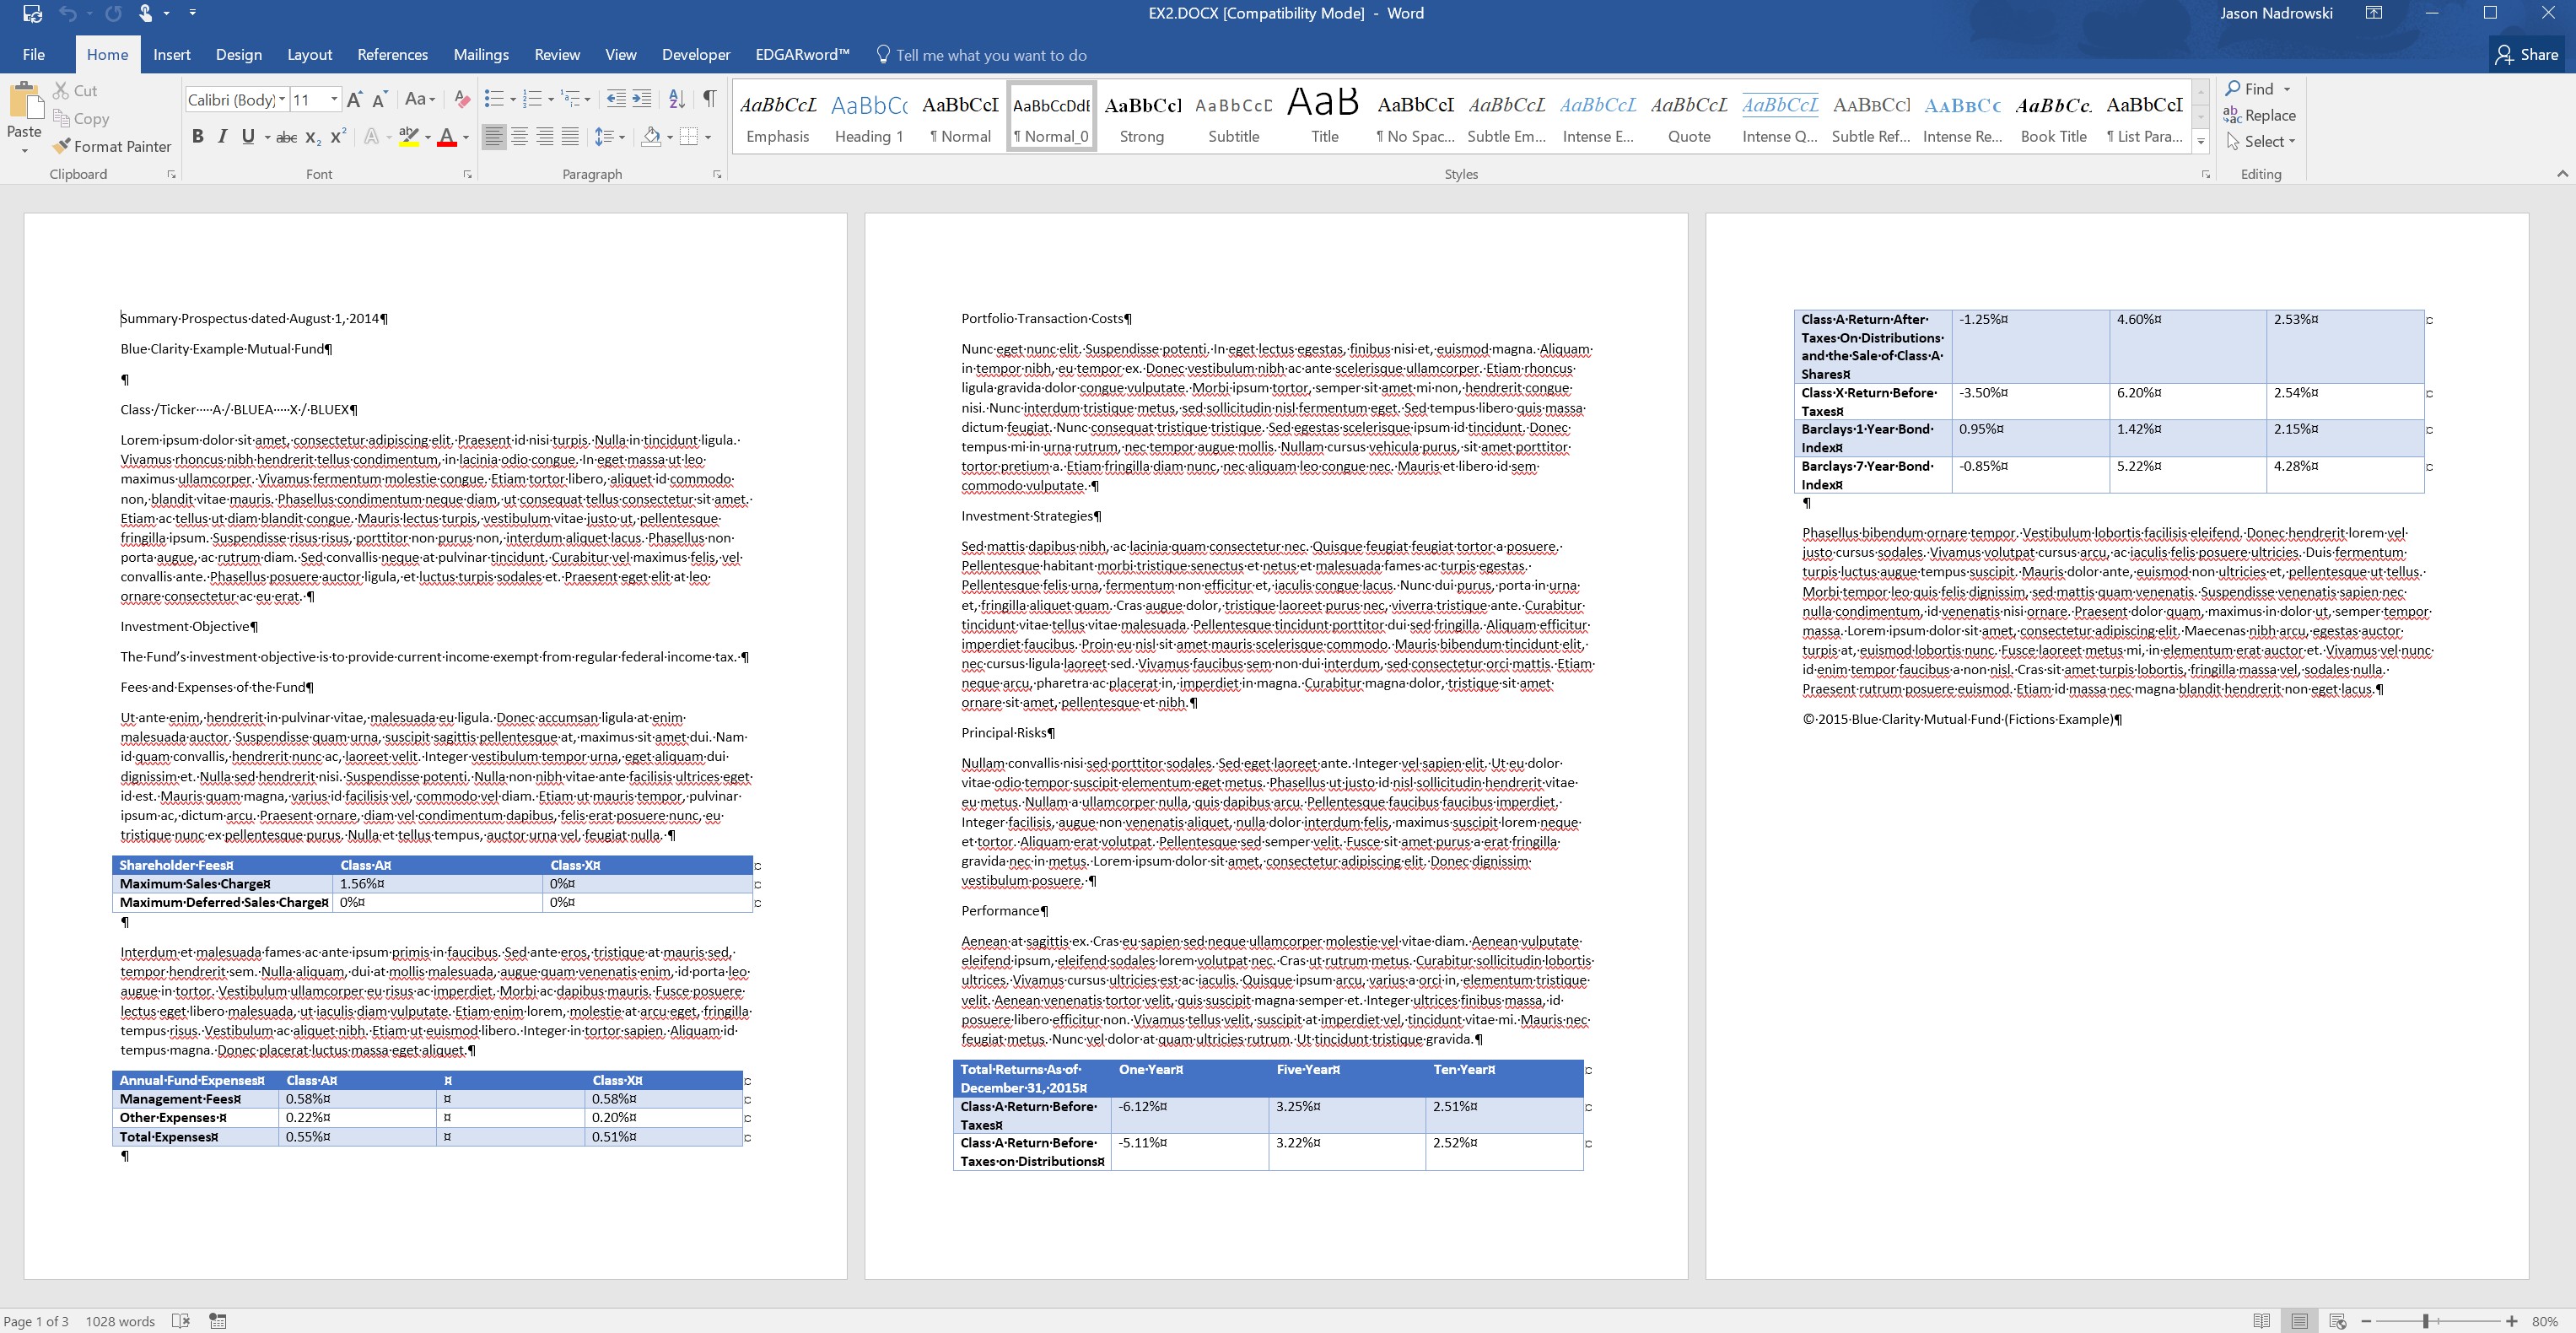
Figure 7: Output
This example applied an even smaller XSLT file (Figure 5) to the same Microsoft Word (DOCX) in Example 1 to have an even more substantial impact. As you verified in Figure 7, we applied a blue table format to all the tables.
In Figure 6, you've probably also noticed that when you select the XSLT in the Agile Document Editor, its paramTableStyle parameter is editable. When XSLT files have paramaters, those XSL params will be listed below the processing instruction overrides.
The exact application of the XSLT is detailed in Lines 3 - 6 of Figure 5. This processing instruction tells Agile Document's is to interact with the Figure 1 DOCX file by appling the XSLT to the word/document.xml (zipsource) and store its result to word/document.xml (zipdestination) within the Template1.DOCX (ziptemplate). Then, use the modified Template1.DOCX file into the Agile Document we are building. The bc-agiledocuments Processing Instruction is further detailed in the Configuring Agile Document's processing of XSLT files section of XSLT documentation.
In Example 1, we didn't use ziptemplate. However, this example needed it as the GridTable4-Accent5 table style wasn't defined in our original "unstyled" Word file. Please note that styles, including table styles, are defined in the word/styles.xml file within the DOCX (ZIP) file.
It should also be noted, that although we only applied one XSLT here, we could have applied multiple. For instance, we could have combined the XSLTs of Example 1 and 2 here in one step.
Example 3: Converting Excel Data to Word
In this example, we extract data from an Excel file (Figure 8) and turn it into a Word table via an XSLT. As you probably realize, this same activity could have been accomplished by using methods described in Example 2 of Word Basics - Start Here. The aforementioned Example 2 is better suited for simpler tasks. The application of an XSLT gives you tremendously more flexibility as it is a programmatic solution but requires time to author.
This example uses the XSLT method to parameterization the extraction of data from Excel. Thus, the user specifies an Excel start and end row to convert said data into a Word table. The advantage of this over the aforementioned Word Basics - Start Here - Example 2 is that it can be more readily applied to Excel files by essentially only specifiying two parameters (row start and row end). Admittedly, it does take time to author an XSLT. So, an XSLT will generally be advantageous if you have a number of repeatable tasks. Conversely, the Word Basics - Start Here - Example 2 method would be advantageous if you were not going to repeat that kind of mapping again.
Similar to previous examples, ensure that the folder XSLT/EX3 exists within your document library. Then create a new Agile Document through SharePoint Explorer. Go back into SharePoint and rename it EX3.AgileDocument.xml. Create and save, the Excel document ExcelToWord.XLSX shown in Figure 8 to our XSLT/EX3 folder. Create an empty Word document Template1.docx and an empty Word document Excel_CreateWordTable.DOCX. Also, create the XSLT file shown in Figure 9.
Next, edit the Agile Document as shown in Figure 10 to pair the XSLT file with the Excel file. Ensure that you have selected Exclude Insertion (Figure 11) for the Excel file and have added the blank Excel_CreateWordTable.DOCX below the Excel file. Also, ensure you set the Agile Document output type to DOCX. Save, build and then review the output (Figure 12).
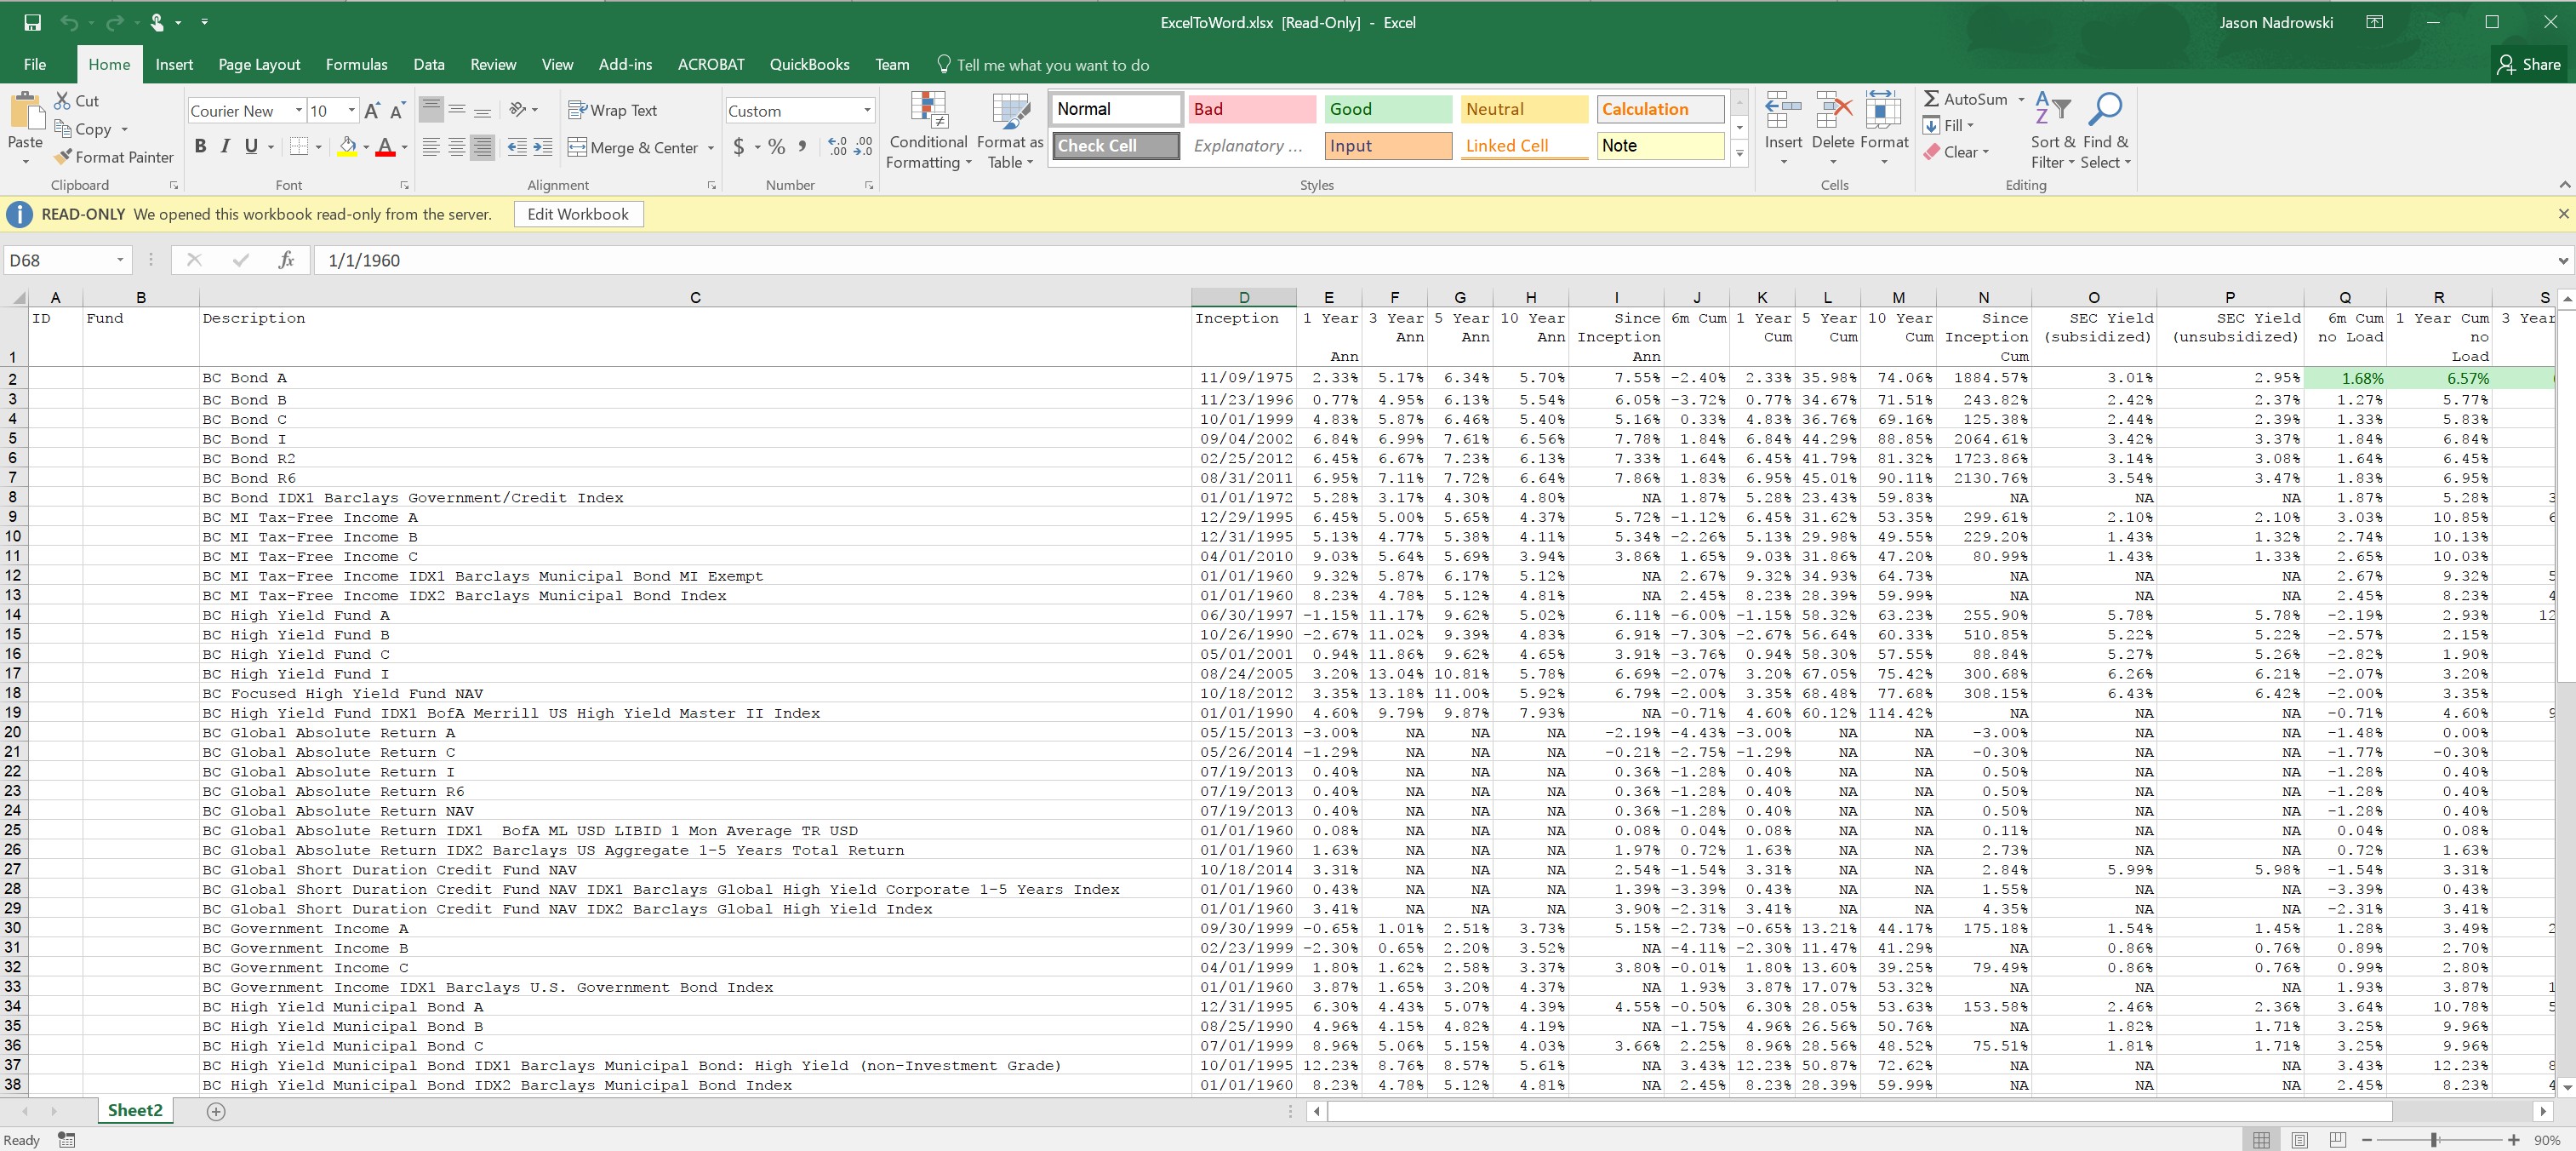
Figure 8: Excel file to extract data from
<?xml version="1.0" encoding="utf-8"?>
<?bc-agiledocuments
zipsource="xl/worksheets/Sheet1.xml"
ziptemplate="Template1.docx"
zipdestination="word/document.xml"
destination="Excel_CreateWordTable.docx" ?>
<!--
Converts data from Excel Table to Word Table
NOTES:
1. Dates in Excel are represented as the number of DAYS since Jan 1, 1900
2. There may be missing <c> elements so you need to look at c/@r to match the correct cell
-->
<xsl:stylesheet
version="2.0"
xmlns="http://schemas.openxmlformats.org/spreadsheetml/2006/main"
xmlns:e="http://schemas.openxmlformats.org/spreadsheetml/2006/main"
xmlns:r="http://schemas.openxmlformats.org/officeDocument/2006/relationships"
xmlns:mc="http://schemas.openxmlformats.org/markup-compatibility/2006"
xmlns:w="http://schemas.openxmlformats.org/wordprocessingml/2006/main"
xmlns:xs="http://www.w3.org/2001/XMLSchema"
xmlns:xsl="http://www.w3.org/1999/XSL/Transform"
xmlns:msxsl="urn:schemas-microsoft-com:xslt"
exclude-result-prefixes="msxsl"
>
<xsl:output method="xml" indent="yes"/>
<xsl:param name="pFundClassRowStart" select="2" >
<!--
The starting row for the fund grouping
-->
</xsl:param>
<xsl:param name="pFundClassRowEnd" select="8" >
<!--
The ending row for the fund grouping
-->
</xsl:param>
<xsl:param name="pTableHeaderRow1" select="''" >
<!--
The paragraph style to apply to the text in the FIRST table header.
If left blank, no style will be applied.
-->
</xsl:param>
<xsl:param name="pTableHeaderRow2" select="''" >
<!--
The paragraph style to apply to the text in the SECOND table header
If left blank, no style will be applied.
-->
</xsl:param>
<xsl:param name="pTableDataRow" select="''" >
<!--
The paragraph style to apply to the text in the table data rows.
If left blank, no style will be applied.
-->
</xsl:param>
<!--
DEBUG BELOW:
<xsl:param name="sharedstrings" select="'../content/ExcelToWord4_sharedStrings.xml'" />
<xsl:variable name="sharedstrings_doc" select="doc($sharedstrings)" />
RELEASE BELOW:
-->
<xsl:param name="sharedstrings" select="'xl/sharedStrings.xml'">
<!-- *** DO NOT CHANGE *** This is for internal use. It points to the sharedStrings xml file. -->
</xsl:param>
<xsl:variable name="sharedstrings_doc" select="doc(resolve-uri($sharedstrings, base-uri()))"/>
<!--
Default Template
-->
<xsl:template match="@* | node()">
<xsl:copy>
<xsl:apply-templates select="@* | node()" />
</xsl:copy>
</xsl:template>
<!--
Worksheet Template
-->
<xsl:template match="e:worksheet">
<!--<xsl:variable name="spreadsheet_rows" select="e:sheetData/e:row[position() >= $pFundClassRowStart and not(position() > $pFundClassRowEnd)]" />-->
<xsl:variable name="spreadsheet_rows" select="e:sheetData/e:row[@r >= $pFundClassRowStart and not(@r > $pFundClassRowEnd)]" />
<w:document xmlns:wpc="http://schemas.microsoft.com/office/word/2010/wordprocessingCanvas" xmlns:mc="http://schemas.openxmlformats.org/markup-compatibility/2006" xmlns:o="urn:schemas-microsoft-com:office:office" xmlns:r="http://schemas.openxmlformats.org/officeDocument/2006/relationships" xmlns:m="http://schemas.openxmlformats.org/officeDocument/2006/math" xmlns:v="urn:schemas-microsoft-com:vml" xmlns:wp14="http://schemas.microsoft.com/office/word/2010/wordprocessingDrawing" xmlns:wp="http://schemas.openxmlformats.org/drawingml/2006/wordprocessingDrawing" xmlns:w10="urn:schemas-microsoft-com:office:word" xmlns:w="http://schemas.openxmlformats.org/wordprocessingml/2006/main" xmlns:w14="http://schemas.microsoft.com/office/word/2010/wordml" xmlns:w15="http://schemas.microsoft.com/office/word/2012/wordml" xmlns:wpg="http://schemas.microsoft.com/office/word/2010/wordprocessingGroup" xmlns:wpi="http://schemas.microsoft.com/office/word/2010/wordprocessingInk" xmlns:wne="http://schemas.microsoft.com/office/word/2006/wordml" xmlns:wps="http://schemas.microsoft.com/office/word/2010/wordprocessingShape" mc:Ignorable="w14 w15 wp14">
<w:body>
<w:tbl>
<w:tblPr>
<w:tblW w:w="5000" w:type="pct"/>
<w:tblLook w:val="0000"
w:firstRow="0"
w:lastRow="0"
w:firstColumn="0"
w:lastColumn="0"
w:noHBand="0"
w:noVBand="0"/>
</w:tblPr>
<w:tblGrid>
<w:gridCol w:w="1000"/>
<w:gridCol w:w="1000"/>
<w:gridCol w:w="1000"/>
<w:gridCol w:w="1000"/>
<w:gridCol w:w="1000"/>
<w:gridCol w:w="36"/>
<w:gridCol w:w="1000"/>
<w:gridCol w:w="1000"/>
<w:gridCol w:w="1000"/>
<w:gridCol w:w="1000"/>
<w:gridCol w:w="36"/>
<w:gridCol w:w="1000"/>
<w:gridCol w:w="36"/>
<w:gridCol w:w="1000"/>
</w:tblGrid>
<!-- Header Row 1 -->
<w:tr >
<w:tc>
<w:tcPr>
<w:gridSpan w:val="5"/>
<w:shd w:val="clear" w:color="auto" w:fill="F2F2F2"/>
<w:vAlign w:val="bottom"/>
</w:tcPr>
<w:p>
<xsl:if test="$pTableHeaderRow1!=''">
<w:pPr>
<xsl:element name="w:pStyle">
<xsl:attribute name="w:val">
<xsl:value-of select="$pTableHeaderRow1"/>
</xsl:attribute>
</xsl:element>
<w:jc w:val="right"/>
</w:pPr>
</xsl:if>
<w:r>
<w:rPr>
<w:b/>
</w:rPr>
<w:t>Average annual total returns(%)</w:t>
</w:r>
<w:r>
<w:br/>
<w:t>with maximum sales charge</w:t>
</w:r>
</w:p>
</w:tc>
<xsl:call-template name="ColumnSpacer" />
<w:tc>
<w:tcPr>
<w:gridSpan w:val="4"/>
<w:shd w:val="clear" w:color="auto" w:fill="F2F2F2"/>
<w:vAlign w:val="bottom"/>
</w:tcPr>
<w:p>
<xsl:if test="$pTableHeaderRow1!=''">
<w:pPr>
<xsl:element name="w:pStyle">
<xsl:attribute name="w:val">
<xsl:value-of select="$pTableHeaderRow1"/>
</xsl:attribute>
</xsl:element>
<w:jc w:val="right"/>
</w:pPr>
</xsl:if>
<w:r>
<w:rPr>
<w:b/>
</w:rPr>
<w:t>Cumulative total returns(%)</w:t>
</w:r>
<w:r>
<w:br/>
<w:t>with maximum sales charge</w:t>
</w:r>
</w:p>
</w:tc>
<xsl:call-template name="ColumnSpacer" />
<w:tc>
<w:tcPr>
<w:shd w:val="clear" w:color="auto" w:fill="F2F2F2"/>
<w:vAlign w:val="bottom"/>
</w:tcPr>
<w:p >
<xsl:if test="$pTableHeaderRow1!=''">
<w:pPr>
<xsl:element name="w:pStyle">
<xsl:attribute name="w:val">
<xsl:value-of select="$pTableHeaderRow1"/>
</xsl:attribute>
</xsl:element>
<w:jc w:val="right"/>
</w:pPr>
</xsl:if>
<w:r>
<w:rPr>
<w:b/>
</w:rPr>
<w:t>SEC 30-day yield (%)</w:t>
</w:r>
<w:r>
<w:br/>
<w:t>subsidized</w:t>
</w:r>
</w:p>
</w:tc>
<xsl:call-template name="ColumnSpacer" />
<w:tc>
<w:tcPr>
<w:shd w:val="clear" w:color="auto" w:fill="F2F2F2"/>
<w:vAlign w:val="bottom"/>
</w:tcPr>
<w:p >
<xsl:if test="$pTableHeaderRow1!=''">
<w:pPr>
<xsl:element name="w:pStyle">
<xsl:attribute name="w:val">
<xsl:value-of select="$pTableHeaderRow1"/>
</xsl:attribute>
</xsl:element>
<w:jc w:val="right"/>
</w:pPr>
</xsl:if>
<w:r>
<w:rPr>
<w:b/>
</w:rPr>
<w:t>SEC 30-day yield (%)</w:t>
</w:r>
<w:r>
<w:br/>
<w:t>unsubsidized</w:t>
</w:r>
</w:p>
</w:tc>
</w:tr>
<!-- Header Row 2 -->
<w:tr >
<xsl:call-template name="Word_Column_AsString" >
<xsl:with-param name="stringvalue" select="''" />
<xsl:with-param name="paraStyle" select="$pTableHeaderRow2" />
<xsl:with-param name="paraAlign" select="'right'" />
<xsl:with-param name="bottomBorder" select="'true'" />
</xsl:call-template>
<xsl:call-template name="Word_Column_AsString" >
<xsl:with-param name="stringvalue" select="'1-year'" />
<xsl:with-param name="paraStyle" select="$pTableHeaderRow2" />
<xsl:with-param name="paraAlign" select="'right'" />
<xsl:with-param name="bottomBorder" select="'true'" />
</xsl:call-template>
<xsl:call-template name="Word_Column_AsString" >
<xsl:with-param name="stringvalue" select="'5-year'" />
<xsl:with-param name="paraStyle" select="$pTableHeaderRow2" />
<xsl:with-param name="paraAlign" select="'right'" />
<xsl:with-param name="bottomBorder" select="'true'" />
</xsl:call-template>
<xsl:call-template name="Word_Column_AsString" >
<xsl:with-param name="stringvalue" select="'10-year'" />
<xsl:with-param name="paraStyle" select="$pTableHeaderRow2" />
<xsl:with-param name="paraAlign" select="'right'" />
<xsl:with-param name="bottomBorder" select="'true'" />
</xsl:call-template>
<xsl:call-template name="Word_Column_AsString" >
<xsl:with-param name="stringvalue" select="'Since inception'" />
<xsl:with-param name="paraStyle" select="$pTableHeaderRow2" />
<xsl:with-param name="paraAlign" select="'right'" />
<xsl:with-param name="bottomBorder" select="'true'" />
</xsl:call-template>
<xsl:call-template name="ColumnSpacer" />
<xsl:call-template name="Word_Column_AsString" >
<xsl:with-param name="stringvalue" select="'6-month'" />
<xsl:with-param name="paraStyle" select="$pTableHeaderRow2" />
<xsl:with-param name="paraAlign" select="'right'" />
<xsl:with-param name="bottomBorder" select="'true'" />
</xsl:call-template>
<xsl:call-template name="Word_Column_AsString" >
<xsl:with-param name="stringvalue" select="'5-year'" />
<xsl:with-param name="paraStyle" select="$pTableHeaderRow2" />
<xsl:with-param name="paraAlign" select="'right'" />
<xsl:with-param name="bottomBorder" select="'true'" />
</xsl:call-template>
<xsl:call-template name="Word_Column_AsString" >
<xsl:with-param name="stringvalue" select="'10-year'" />
<xsl:with-param name="paraStyle" select="$pTableHeaderRow2" />
<xsl:with-param name="paraAlign" select="'right'" />
<xsl:with-param name="bottomBorder" select="'true'" />
</xsl:call-template>
<xsl:call-template name="Word_Column_AsString" >
<xsl:with-param name="stringvalue" select="'Since inception'" />
<xsl:with-param name="paraStyle" select="$pTableHeaderRow2" />
<xsl:with-param name="paraAlign" select="'right'" />
<xsl:with-param name="bottomBorder" select="'true'" />
</xsl:call-template>
<xsl:call-template name="ColumnSpacer" />
<xsl:variable name="HeaderRowCol8And9" select="concat('D', $spreadsheet_rows[1]/@r)" />
<xsl:call-template name="Word_Column_AsOfDate" >
<xsl:with-param name="numericvalue_dayCount" select="$spreadsheet_rows[1]/e:c[@r=$HeaderRowCol8And9]/e:v" />
<xsl:with-param name="paraStyle" select="$pTableHeaderRow2" />
<xsl:with-param name="paraAlign" select="'right'" />
<xsl:with-param name="bottomBorder" select="'true'" />
</xsl:call-template>
<xsl:call-template name="ColumnSpacer" />
<xsl:call-template name="Word_Column_AsOfDate" >
<xsl:with-param name="numericvalue_dayCount" select="$spreadsheet_rows[1]/e:c[@r=$HeaderRowCol8And9]/e:v" />
<xsl:with-param name="paraStyle" select="$pTableHeaderRow2" />
<xsl:with-param name="paraAlign" select="'right'" />
<xsl:with-param name="bottomBorder" select="'true'" />
</xsl:call-template>
</w:tr>
<!-- DATA Rows -->
<xsl:for-each select="$spreadsheet_rows" >
<w:tr>
<!-- Class Column -->
<xsl:variable name="rowcol1" select="concat('C', @r)" />
<xsl:call-template name="Word_Column" >
<xsl:with-param name="c_XElement" select="e:c[@r=$rowcol1]" />
<xsl:with-param name="paraStyle" select="$pTableDataRow" />
<xsl:with-param name="paraAlign" select="'left'" />
<xsl:with-param name="bottomBorder" select="'true'" />
</xsl:call-template>
<!-- 1-year Annual Column -->
<xsl:variable name="rowcol2" select="concat('E', @r)" />
<xsl:call-template name="Word_Column" >
<xsl:with-param name="c_XElement" select="e:c[@r=$rowcol2]" />
<xsl:with-param name="paraStyle" select="$pTableDataRow" />
<xsl:with-param name="paraAlign" select="'right'" />
<xsl:with-param name="bottomBorder" select="'true'" />
</xsl:call-template>
<!-- 5-year Annual Column -->
<xsl:variable name="rowcol3" select="concat('G', @r)" />
<xsl:call-template name="Word_Column" >
<xsl:with-param name="c_XElement" select="e:c[@r=$rowcol3]" />
<xsl:with-param name="paraStyle" select="$pTableDataRow" />
<xsl:with-param name="paraAlign" select="'right'" />
<xsl:with-param name="bottomBorder" select="'true'" />
</xsl:call-template>
<!-- 10-year Annual Column -->
<xsl:variable name="rowcol4" select="concat('H', @r)" />
<xsl:call-template name="Word_Column" >
<xsl:with-param name="c_XElement" select="e:c[@r=$rowcol4]" />
<xsl:with-param name="paraStyle" select="$pTableDataRow" />
<xsl:with-param name="paraAlign" select="'right'" />
<xsl:with-param name="bottomBorder" select="'true'" />
</xsl:call-template>
<!-- Since Inception Annual Column -->
<xsl:variable name="rowcol5" select="concat('I', @r)" />
<xsl:call-template name="Word_Column" >
<xsl:with-param name="c_XElement" select="e:c[@r=$rowcol5]" />
<xsl:with-param name="paraStyle" select="$pTableDataRow" />
<xsl:with-param name="paraAlign" select="'right'" />
<xsl:with-param name="bottomBorder" select="'true'" />
</xsl:call-template>
<xsl:call-template name="ColumnSpacer" />
<!-- 1-year Cumulative Column -->
<xsl:variable name="rowcol6" select="concat('J', @r)" />
<xsl:call-template name="Word_Column" >
<xsl:with-param name="c_XElement" select="e:c[@r=$rowcol6]" />
<xsl:with-param name="paraStyle" select="$pTableDataRow" />
<xsl:with-param name="paraAlign" select="'right'" />
<xsl:with-param name="bottomBorder" select="'true'" />
</xsl:call-template>
<!-- 5-year Cumulative Column -->
<xsl:variable name="rowcol7" select="concat('L', @r)" />
<xsl:call-template name="Word_Column" >
<xsl:with-param name="c_XElement" select="e:c[@r=$rowcol7]" />
<xsl:with-param name="paraStyle" select="$pTableDataRow" />
<xsl:with-param name="paraAlign" select="'right'" />
<xsl:with-param name="bottomBorder" select="'true'" />
</xsl:call-template>
<!-- 10-year Cumulative Column -->
<xsl:variable name="rowcol8" select="concat('M', @r)" />
<xsl:call-template name="Word_Column" >
<xsl:with-param name="c_XElement" select="e:c[@r=$rowcol8]" />
<xsl:with-param name="paraStyle" select="$pTableDataRow" />
<xsl:with-param name="paraAlign" select="'right'" />
<xsl:with-param name="bottomBorder" select="'true'" />
</xsl:call-template>
<!-- Since Inception Cumulative Column -->
<xsl:variable name="rowcol9" select="concat('N', @r)" />
<xsl:call-template name="Word_Column" >
<xsl:with-param name="c_XElement" select="e:c[@r=$rowcol9]" />
<xsl:with-param name="paraStyle" select="$pTableDataRow" />
<xsl:with-param name="paraAlign" select="'right'" />
<xsl:with-param name="bottomBorder" select="'true'" />
</xsl:call-template>
<xsl:call-template name="ColumnSpacer" />
<!-- As Of Subsidized Column -->
<xsl:variable name="rowcol10" select="concat('O', @r)" />
<xsl:call-template name="Word_Column" >
<xsl:with-param name="c_XElement" select="e:c[@r=$rowcol10]" />
<xsl:with-param name="paraStyle" select="$pTableDataRow" />
<xsl:with-param name="paraAlign" select="'right'" />
<xsl:with-param name="bottomBorder" select="'true'" />
</xsl:call-template>
<xsl:call-template name="ColumnSpacer" />
<!-- As Of UNSubsidized Column -->
<xsl:variable name="rowcol11" select="concat('P', @r)" />
<xsl:call-template name="Word_Column" >
<xsl:with-param name="c_XElement" select="e:c[@r=$rowcol11]" />
<xsl:with-param name="paraStyle" select="$pTableDataRow" />
<xsl:with-param name="paraAlign" select="'right'" />
<xsl:with-param name="bottomBorder" select="'true'" />
</xsl:call-template>
</w:tr>
</xsl:for-each>
</w:tbl>
</w:body>
</w:document>
</xsl:template>
<xsl:template name="Word_Column">
<xsl:param name = "c_XElement" />
<xsl:param name = "paraStyle" select="''" />
<xsl:param name = "paraAlign" select="'right'" />
<xsl:param name = "bottomBorder" select="'false'" />
<xsl:choose>
<xsl:when test="$c_XElement/@t='s'" >
<xsl:variable name="sharedstring_index" select="$c_XElement/e:v + 1" />
<xsl:call-template name="Word_Column_AsString" >
<xsl:with-param name="stringvalue" select="$sharedstrings_doc/e:sst/e:si[$sharedstring_index]/e:t" />
<xsl:with-param name="paraStyle" select="$paraStyle" />
<xsl:with-param name="paraAlign" select="$paraAlign" />
<xsl:with-param name="bottomBorder" select="$bottomBorder" />
</xsl:call-template>
</xsl:when>
<xsl:otherwise>
<xsl:call-template name="Word_Column_AsPercentage" >
<xsl:with-param name="numericvalue" select="$c_XElement/e:v" />
<xsl:with-param name="paraStyle" select="$paraStyle" />
<xsl:with-param name="paraAlign" select="$paraAlign" />
<xsl:with-param name="bottomBorder" select="$bottomBorder" />
</xsl:call-template>
</xsl:otherwise>
</xsl:choose>
</xsl:template>
<!-- Output Word Column as Date -->
<xsl:template name="Word_Column_AsOfDate">
<xsl:param name="numericvalue_dayCount" />
<xsl:param name = "paraStyle" select="''" />
<xsl:param name = "paraAlign" select="'right'" />
<xsl:param name = "bottomBorder" select="'false'" />
<xsl:variable name="numericvalue_dayCount_minus2" select="$numericvalue_dayCount - 2" />
<w:tc>
<w:tcPr>
<w:tcBorders>
<xsl:if test="$bottomBorder='true'">
<w:bottom w:val="single" w:sz="4" w:space="0" w:color="auto"/>
</xsl:if>
</w:tcBorders>
<w:vAlign w:val="bottom"/>
</w:tcPr>
<w:p>
<xsl:if test="$paraStyle!=''">
<w:pPr>
<xsl:element name="w:pStyle">
<xsl:attribute name="w:val">
<xsl:value-of select="$paraStyle"/>
</xsl:attribute>
</xsl:element>
<xsl:element name="w:jc">
<xsl:attribute name="w:val">
<xsl:value-of select="$paraAlign"/>
</xsl:attribute>
</xsl:element>
</w:pPr>
</xsl:if>
<w:r>
<w:t>
<xsl:variable name="BaseDate" select="'1900-01-01'" />
<xsl:variable name="Duration" select="concat('P', $numericvalue_dayCount_minus2, 'D')"/>
<xsl:variable name="CalculatedDate" select="xs:date($BaseDate) + xs:dayTimeDuration($Duration)" />
as of<w:br/>
<xsl:value-of select="format-date($CalculatedDate,'[M01]-[D01]-[Y01]')"/>
</w:t>
</w:r>
</w:p>
</w:tc>
</xsl:template>
<!-- Output Word Column as Percentage -->
<xsl:template name="Word_Column_AsPercentage">
<xsl:param name = "numericvalue" />
<xsl:param name = "paraStyle" select="''" />
<xsl:param name = "paraAlign" select="'right'" />
<xsl:param name = "bottomBorder" select="'false'" />
<w:tc>
<w:tcPr>
<w:tcBorders>
<xsl:if test="$bottomBorder='true'">
<w:bottom w:val="single" w:sz="4" w:space="0" w:color="auto"/>
</xsl:if>
</w:tcBorders>
<w:vAlign w:val="bottom"/>
</w:tcPr>
<w:p>
<xsl:if test="$paraStyle!=''">
<xsl:comment >
<xsl:value-of select="$paraStyle"/>
</xsl:comment>
<w:pPr>
<xsl:element name="w:pStyle">
<xsl:attribute name="w:val">
<xsl:value-of select="$paraStyle"/>
</xsl:attribute>
</xsl:element>
<xsl:element name="w:jc">
<xsl:attribute name="w:val">
<xsl:value-of select="$paraAlign"/>
</xsl:attribute>
</xsl:element>
</w:pPr>
</xsl:if>
<w:r>
<w:t>
<xsl:value-of select="format-number($numericvalue, '0.00%')"/>
</w:t>
</w:r>
</w:p>
</w:tc>
</xsl:template>
<!-- Output Word Column as String -->
<xsl:template name="Word_Column_AsString">
<xsl:param name = "stringvalue" />
<xsl:param name = "paraStyle" select="''" />
<xsl:param name = "paraAlign" select="'right'" />
<xsl:param name = "bottomBorder" select="'false'" />
<w:tc>
<w:tcPr>
<w:tcBorders>
<xsl:if test="$bottomBorder='true'">
<w:bottom w:val="single" w:sz="4" w:space="0" w:color="auto"/>
</xsl:if>
</w:tcBorders>
<w:vAlign w:val="bottom"/>
</w:tcPr>
<w:p>
<xsl:if test="$paraStyle!=''">
<w:pPr>
<xsl:element name="w:pStyle">
<xsl:attribute name="w:val">
<xsl:value-of select="$paraStyle"/>
</xsl:attribute>
</xsl:element>
<xsl:element name="w:jc">
<xsl:attribute name="w:val">
<xsl:value-of select="$paraAlign"/>
</xsl:attribute>
</xsl:element>
</w:pPr>
</xsl:if>
<w:r>
<w:t>
<xsl:value-of select="$stringvalue"/>
</w:t>
</w:r>
</w:p>
</w:tc>
</xsl:template>
<xsl:template name="ColumnSpacer">
<w:tc>
<w:tcPr>
<w:tcW w:w="36" w:type="dxa"/>
<w:vAlign w:val="bottom"/>
</w:tcPr>
<w:p>
</w:p>
</w:tc>
</xsl:template>
</xsl:stylesheet>
Figure 9: XSLT applied to Word that generates an Excel document
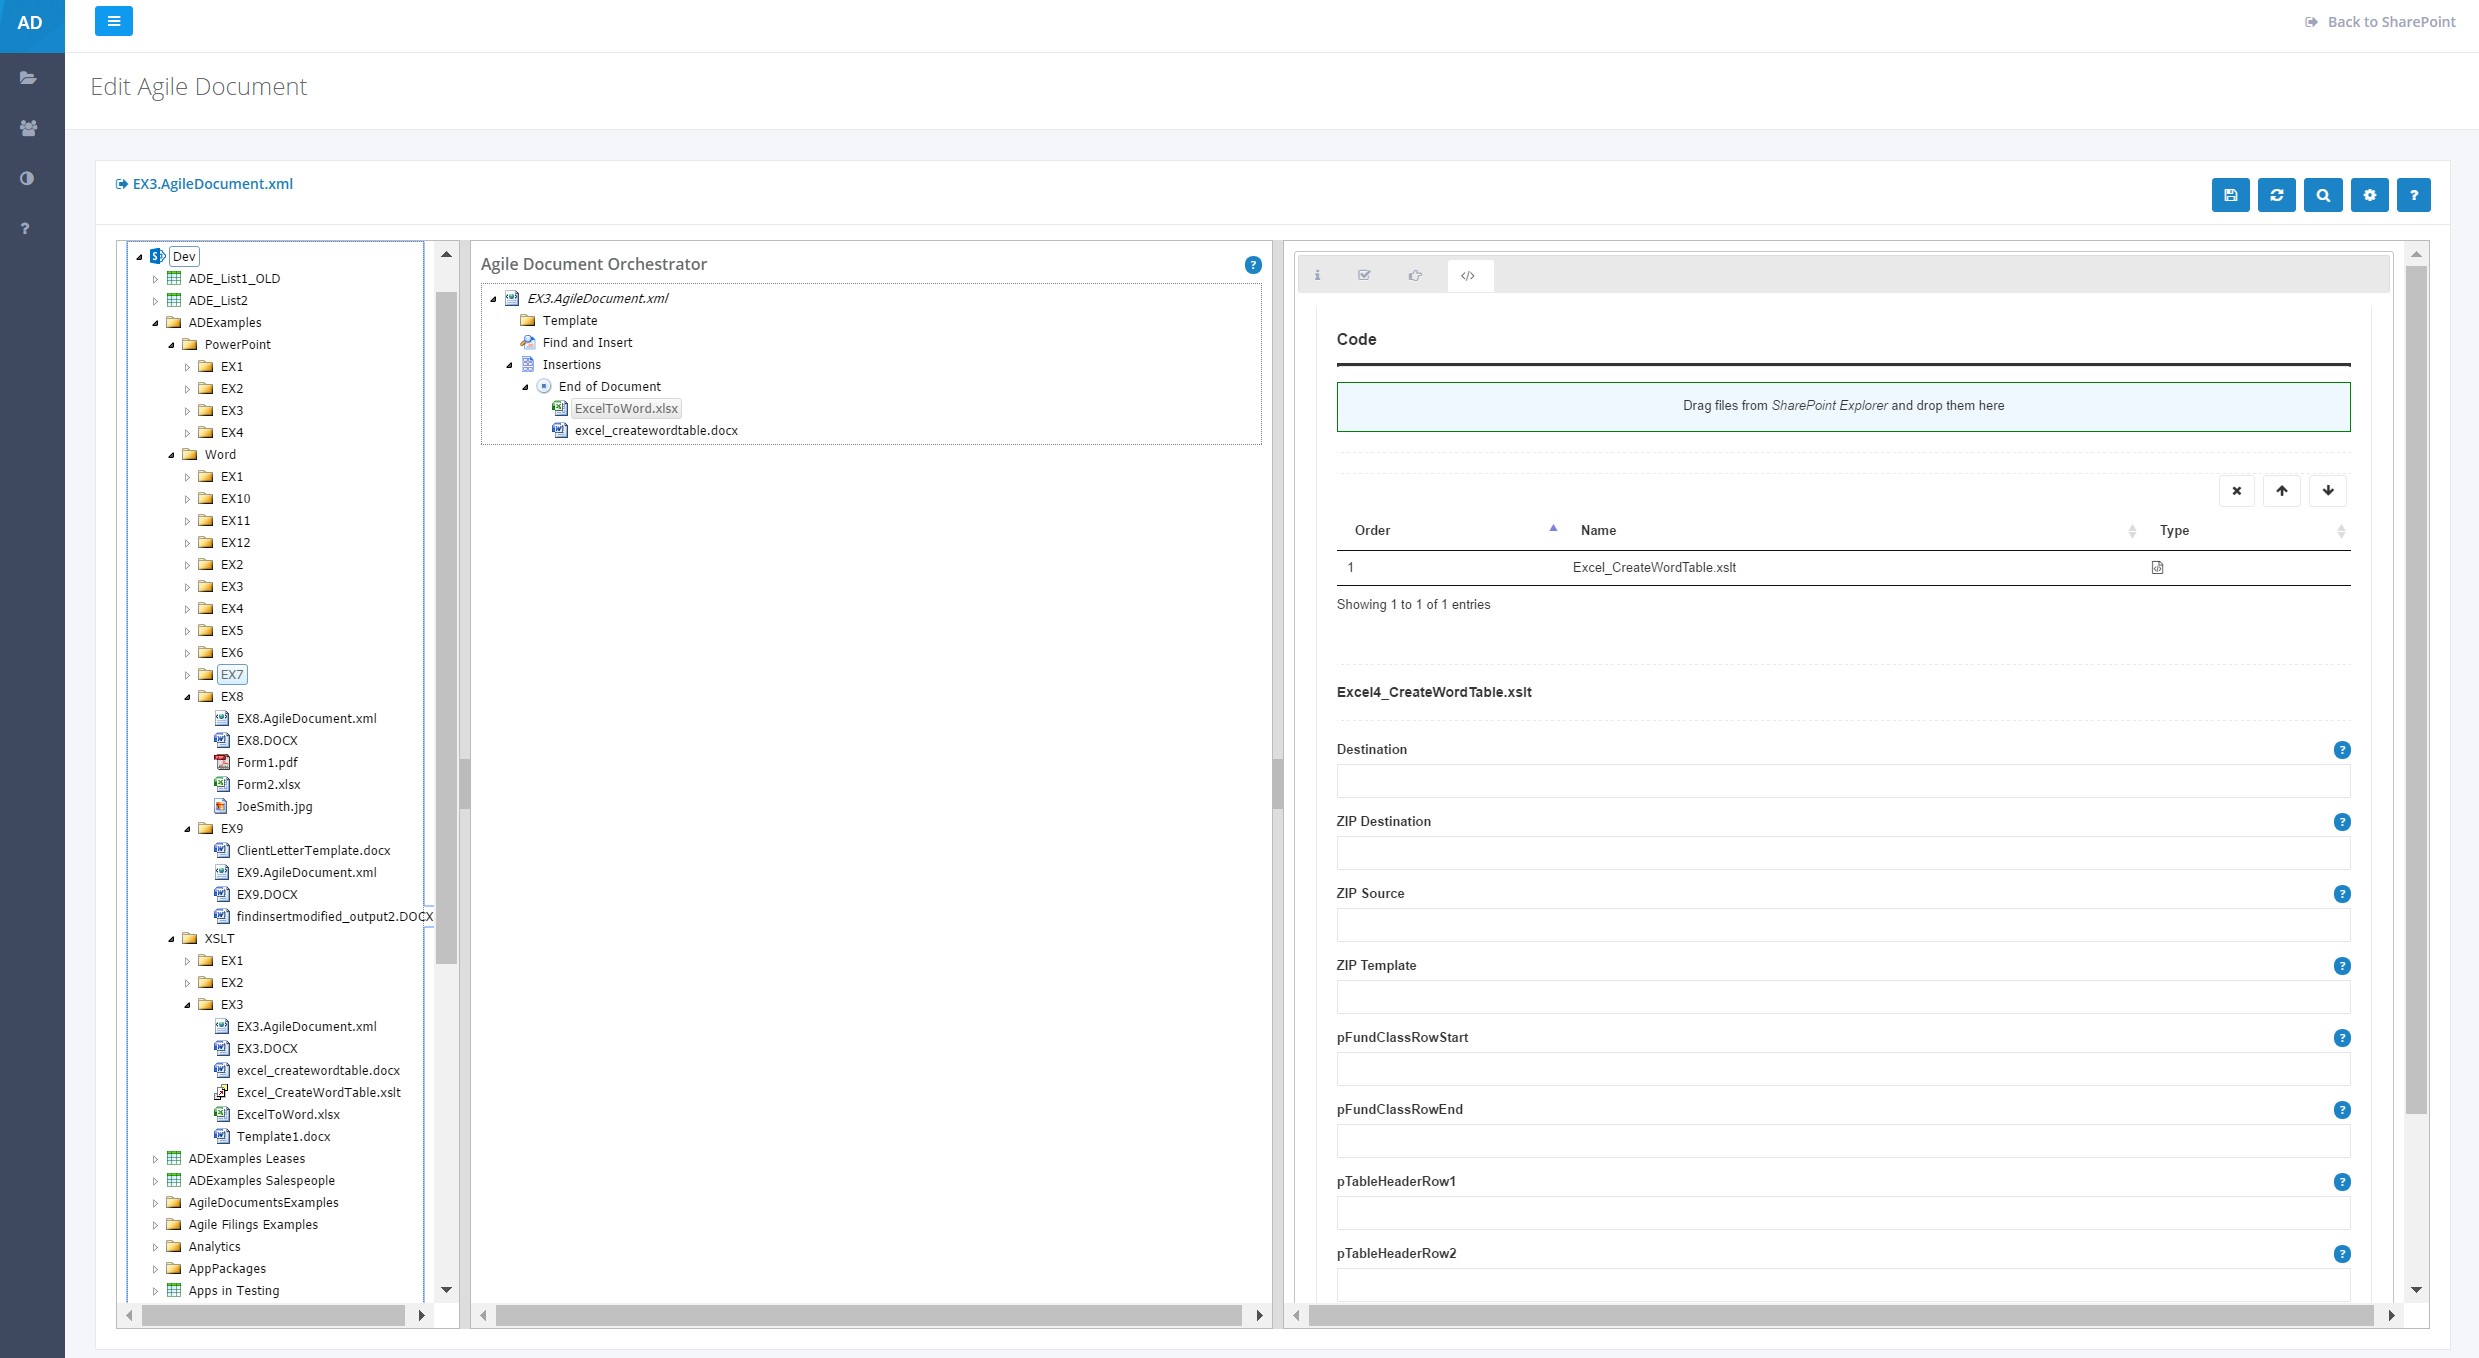
Figure 10: Agile Document Editor Code Pane
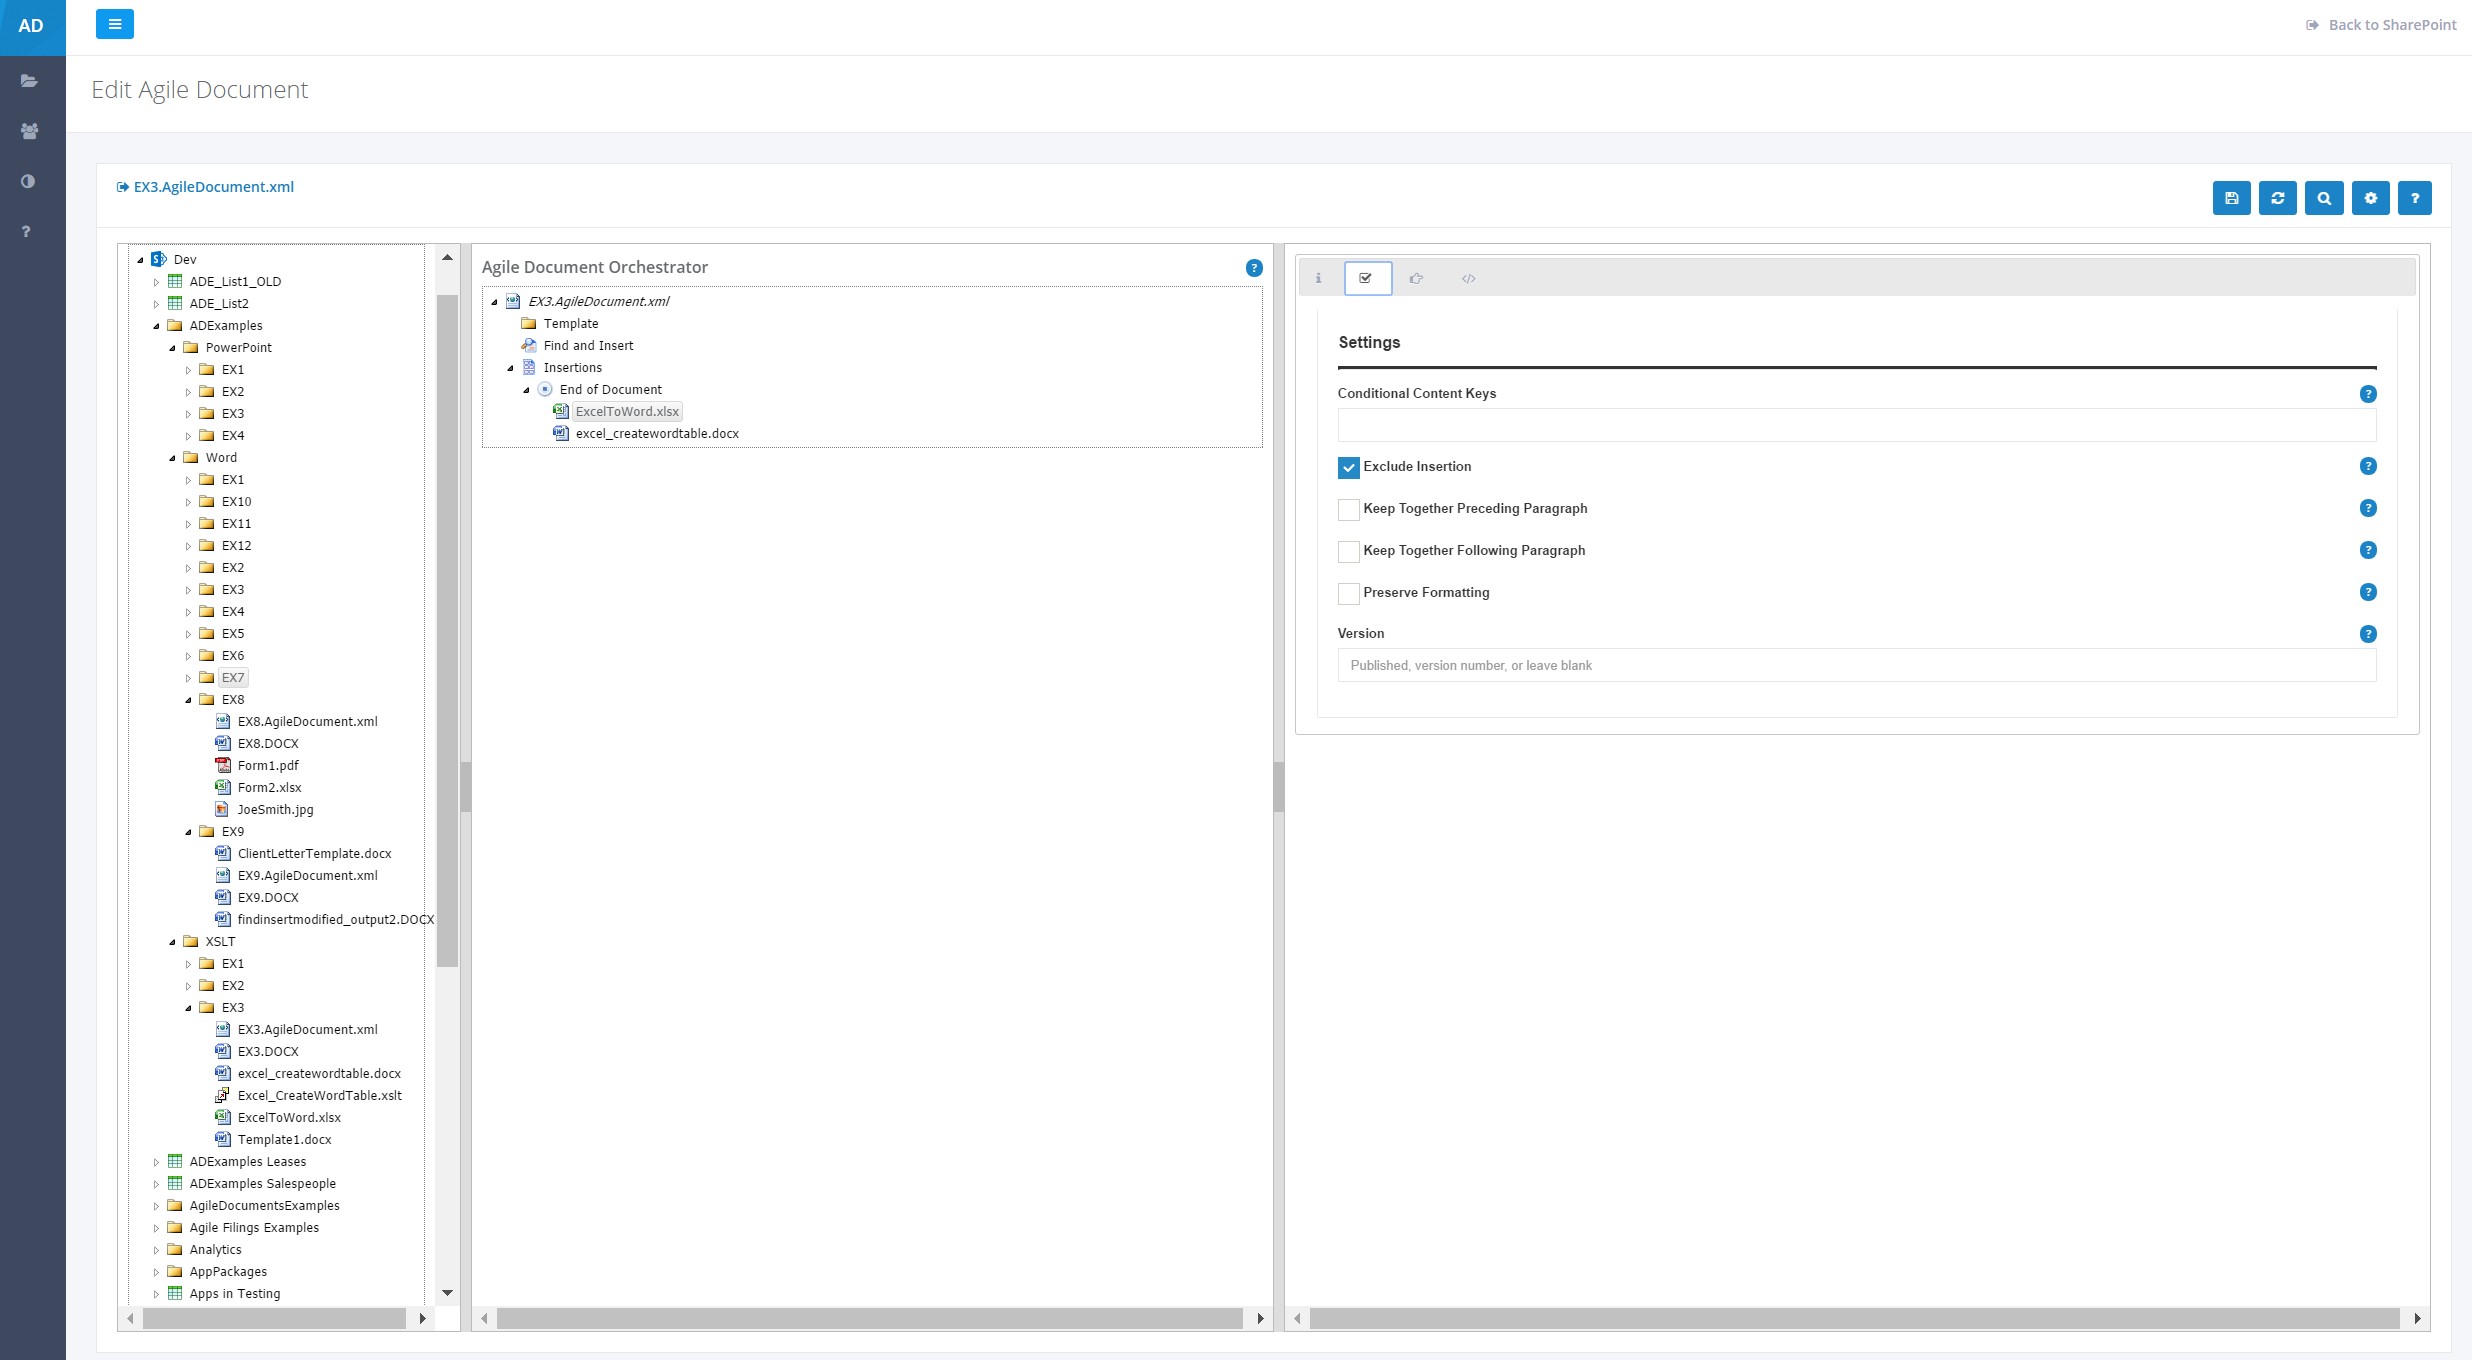
Figure 11: Agile Document Editor Settings Pane
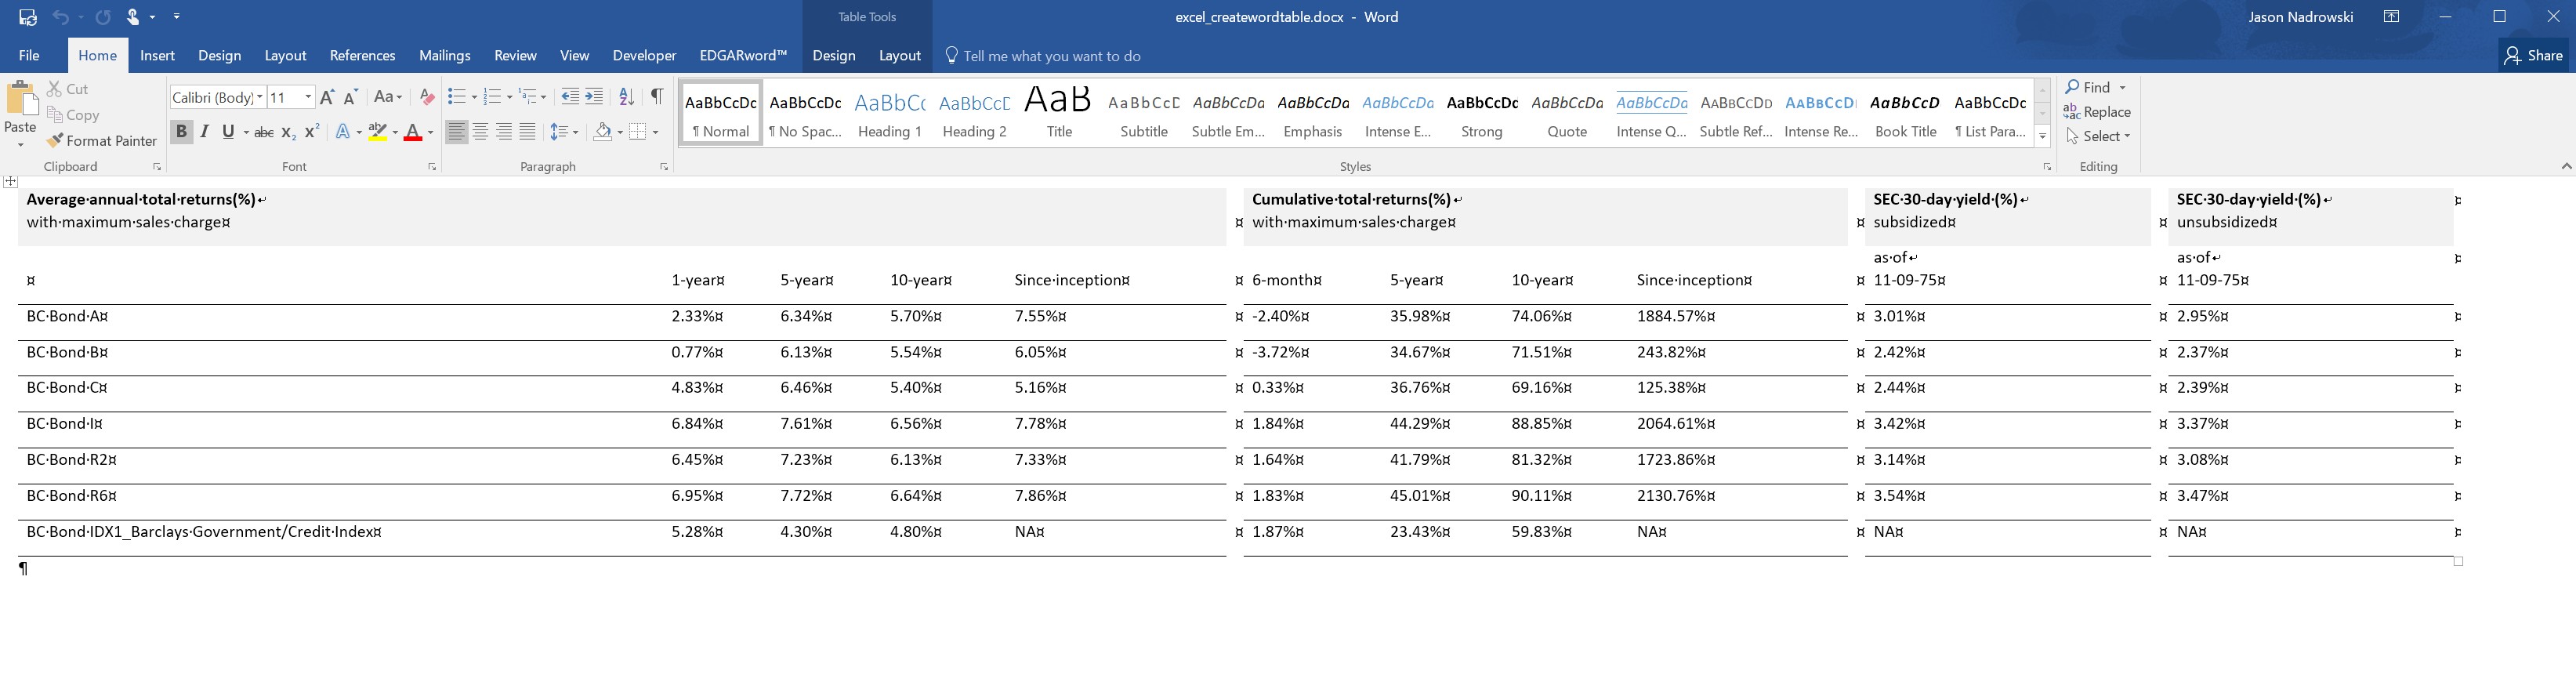
Figure 12: Output
As you review the output, you'll notice that it extracted data from rows 2 through 8 from the Excel document. You will also notice that it selected a subset of the column data in those rows. This extraction and manipulation into a Word table was completely done thorugh XSLT.
As detailed in processing instruction, lines 3 through 7, Agile Documents is to do the following. (1) Apply the XSLT to the Excel file's xl/worksheets/Sheet1.xml file (zipsource). (2) Output the results inside a copy of the Template1.DOCX file stored on SharePoint (ziptemplate). (3) Specifically, store the results to the word/document.xml (zipdestination) inside a copy of the Template1.DOCX file. (4) Upload the modified Template1.DOCX copy to SharePoint as Excel_CreateTable.DOCX (destination).
In this example, we only extracted Excel data from rows 2 thorugh 8. However, there were several other funds included in that Excel spreadsheet. That is why, we paramertized the start and end rows so that the defaults of 2 and 8 could be customized as needed. For simplicity, we only created one table. However, this XSLT allows for the creation of any number of other tables as needed -- such as rows 9 through 12 -- by customizing the pFundClassRowsStart, pFundClassRowsEnd and destination parameters. As we noted above, you can apply several XSLTs to a single content file. Thus, we could have added another XSLT instance under our existing one in Figure 10 and customized with pFundClassRowsStart set ot 9, pFundClassRowsEnd set to 12 and destination set to Excel_CreateTable2.DOCX. ...and add Excel_CreateTable2.DOCX immediately below Excel_CreateTable.DOCX in our Agile Document.
With that said, you may still be confused as to why we excluded the Excel file from Agile Documents, created an empty Excel_CreateTable.DOCX file and added it to the Agile Document. This was done because the XSLT created a completely new Word file from an Excel file. Because there were a multitude of things you could have done with that Word file, it was ambigious as to what Agile Documents should do with it. So, Agile Documents ignores these output files unless you specifically ask for it to do something with it. In our case, we wanted to append it to the Agile Document we were building. Thus, we told Agile Document's only to do XSLT processing with the Excel file and not include it in the Agile Document. The XSLT processing creates (copies over) the Excel_CreateWordTable.DOCX file. Since Agile Documents processes files in the order they are encountered, we needed to append the Excel_CreateWordTable.DOCX file after the XSLT processing. That is why we appended the Excel_CreateWordTable.DOCX to our Agile Document and why it is immediately below the Excel file.