Help / Examples / API
Summary
This article talks about integrating Agile Documents API functionality. Before continuing, it would be helpful--but not necessary--to understand Agile Document's basic functionality described in Word Basics - Start Here.
Most of the time you will directly interact with Agile Documents by launching it through SharePoint. In other cases, it may be preferable to (1) directly launch Agile Documents through an URL or (2) integrate cloud services or custom code with Agile Documents.
In the first case, you may embed an URL in an email or a web page that immediately builds an Agile Document. This is in contrast to the traditional and longer way, which necessitates navigating to SharePoint, clicking on the Agile Documents app, finding the Agile Document in SharePoint Explorer and then right-clicking on it to build. Both methods are optimized for user access. So if the user has not previously logged into SharePoint or has expired credentials, they will be prompted and then forwarded along. We refer to this method of integration as API - URL. This construct is explained in Example 1 below. This type of behavior is not optimized for custom code and service platform integration.
In the second case, We provide a set of REST API methods to integrate with your custom code or other service platforms. We refer to this method of integration as API - REST.
The examples described here exist on other platforms and therefore are not installed on SharePoint. However, these examples rely on some on previously discussed examples that were installable. That installation procedure is described in Installing Examples.
Example 1: URL API
Sometimes you may wish to employ Agile Document's API - URL functionality to provide a shortcut to Agile Document's functionality. For instance, you could send out an email with a link to build [and then review] an Agile Document. This is the crux of this example. However, keep in mind that you also could embed this URL in a web page and provide a direct link to SharePoint Explorer, Editing a document and/or a Content Relationships Report.
To start, right click on any Agile Document in SharePoint Explorer. As shown in Figure 2, select API - URL -> Build. This will open a window showing the build URI that you can select and copy (Ctrl-C on windows) to the clipboard (Figure 3). Copy the URL to the clipboard. Then compose an email in Outlook or any other email editor. If you are using Outlook, you can specify a link by selecting the linkable text and then clicking on the Link ribbon button (Figure 4). This will open a dialog where you can paste the previously copied link (Figure 5). When the email is received, the reader can click on the link and will be directed to building the specified Agile Document -- just as if they had initiated it through SharePoint Explorer. They will see the build status and be alerted to any issues with the build process (Figure 6).
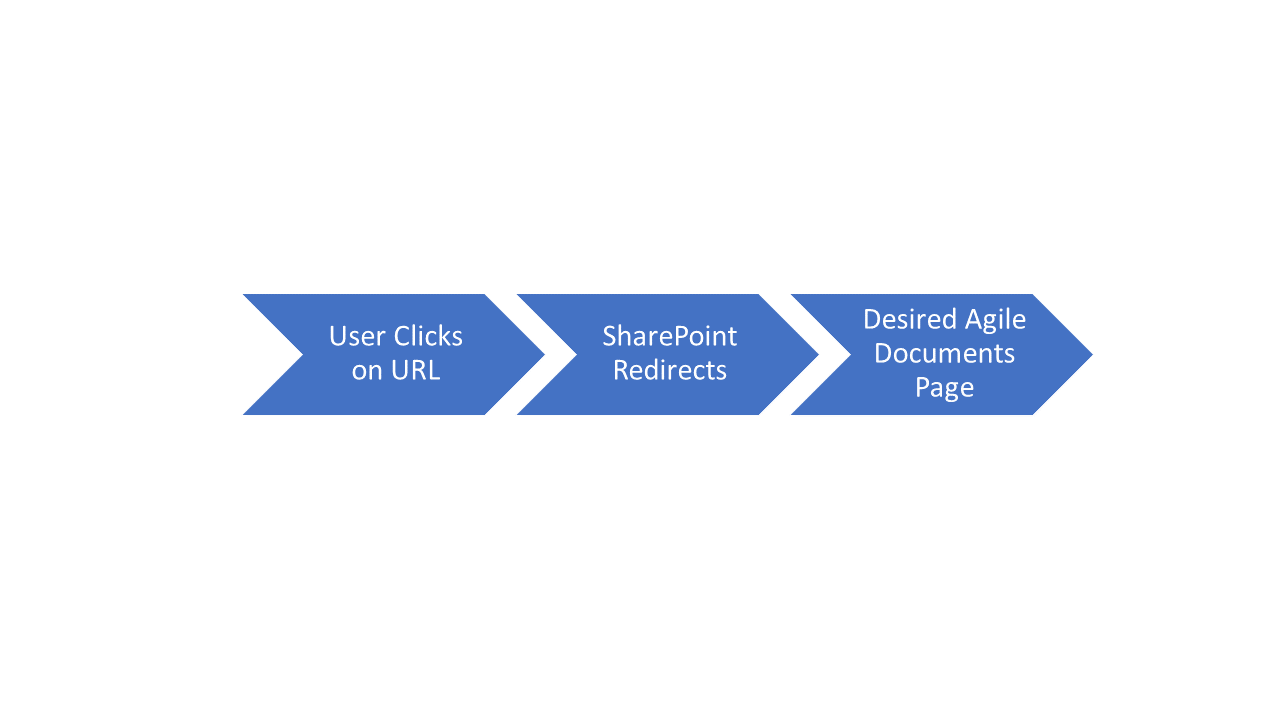
Figure 1: SharePoint URL Forwarding
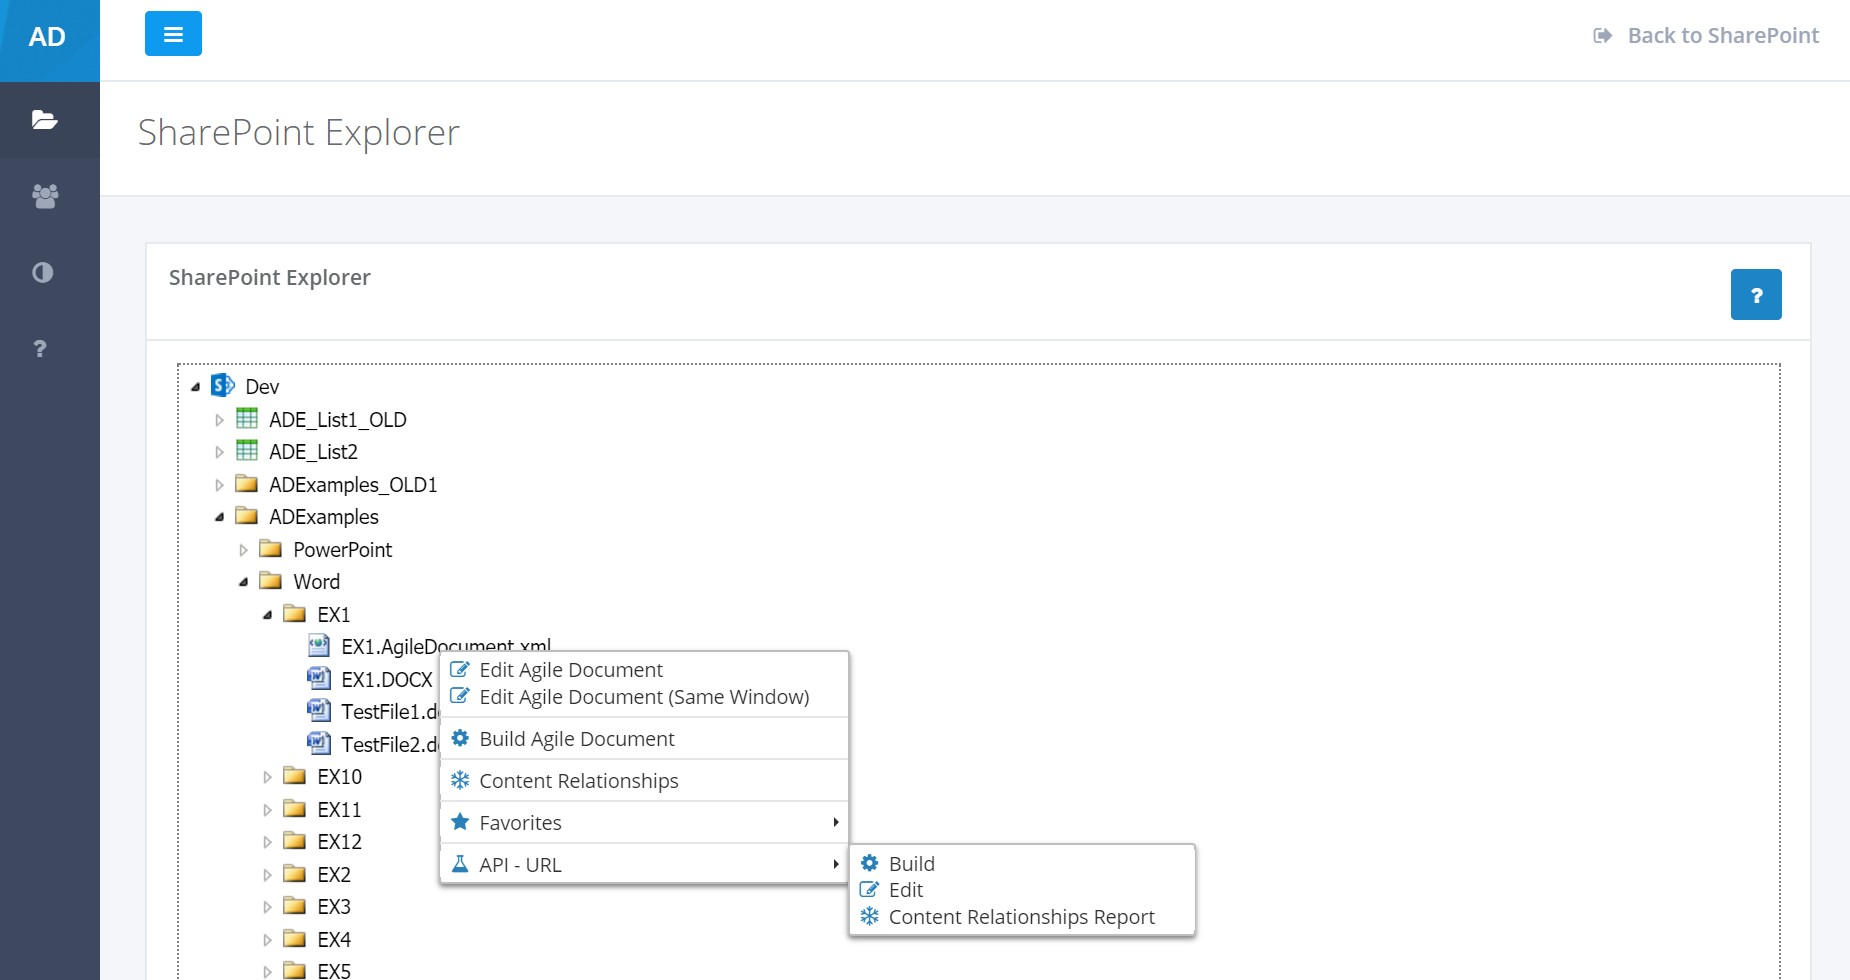
Figure 2: API - URL, choosing build
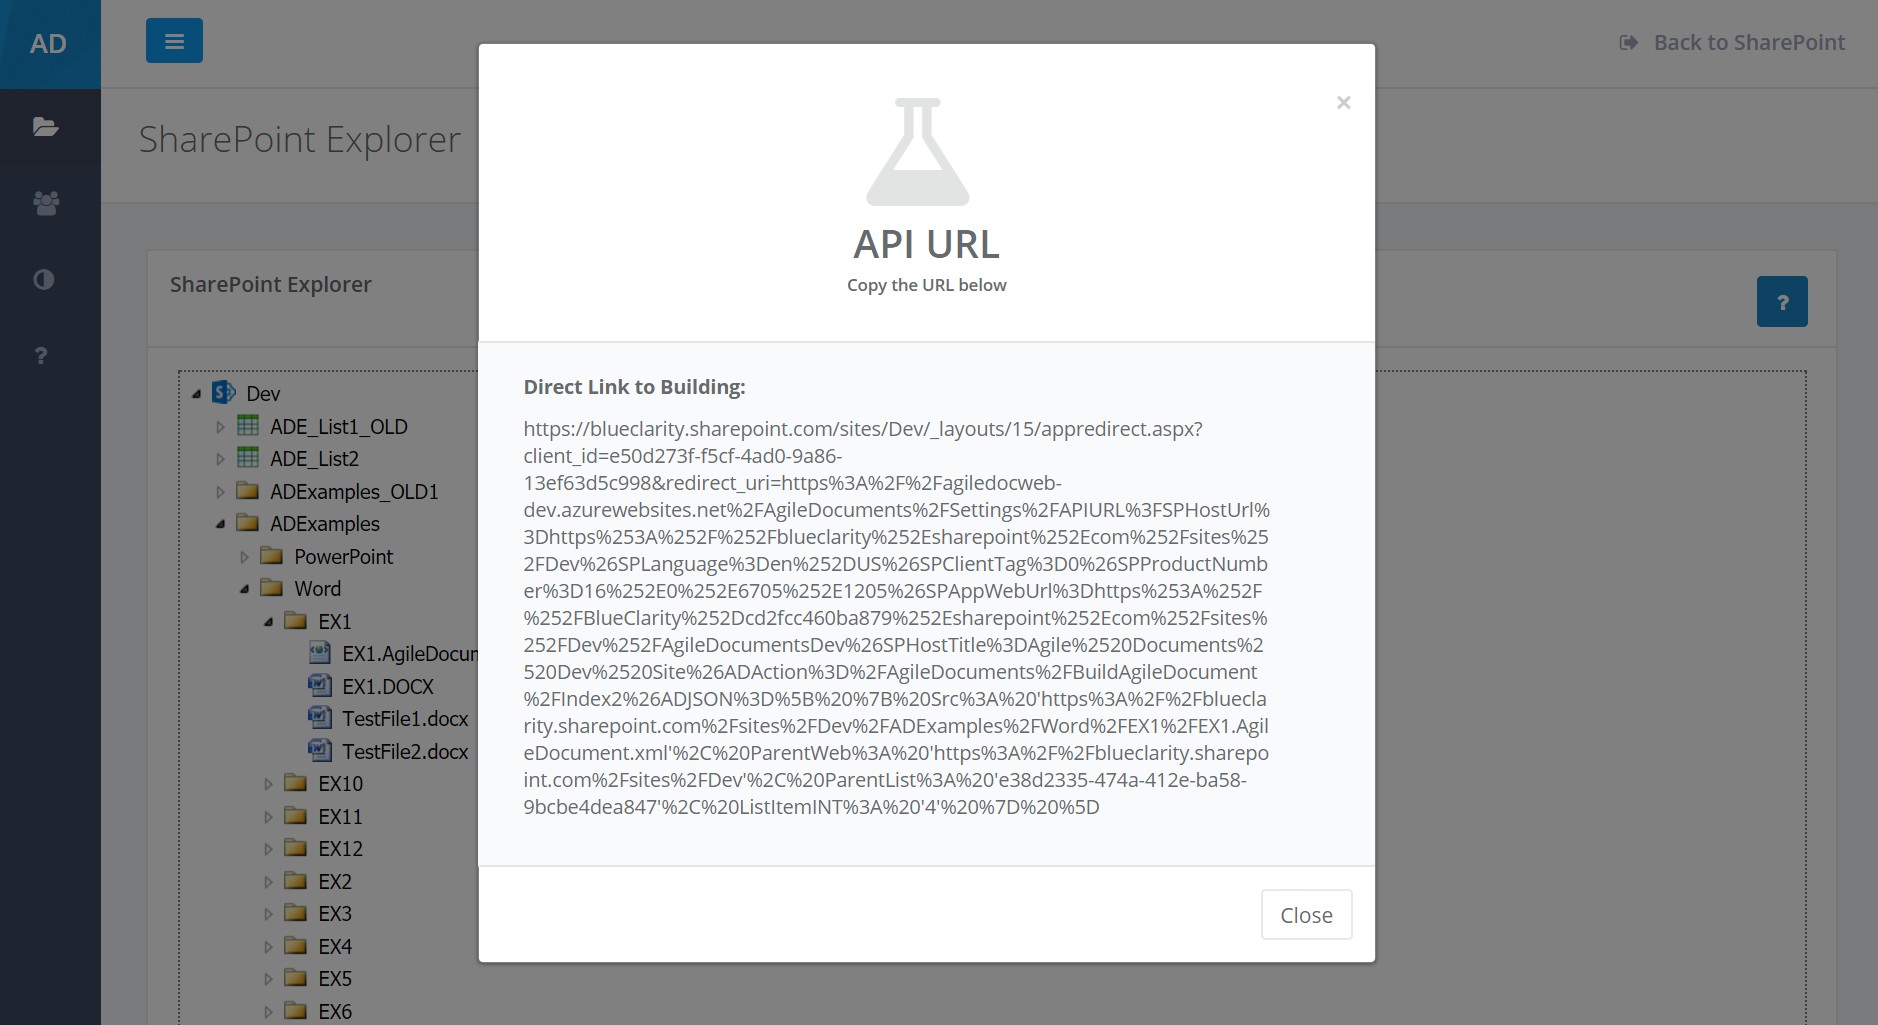
Figure 3: API - URL, Build URL
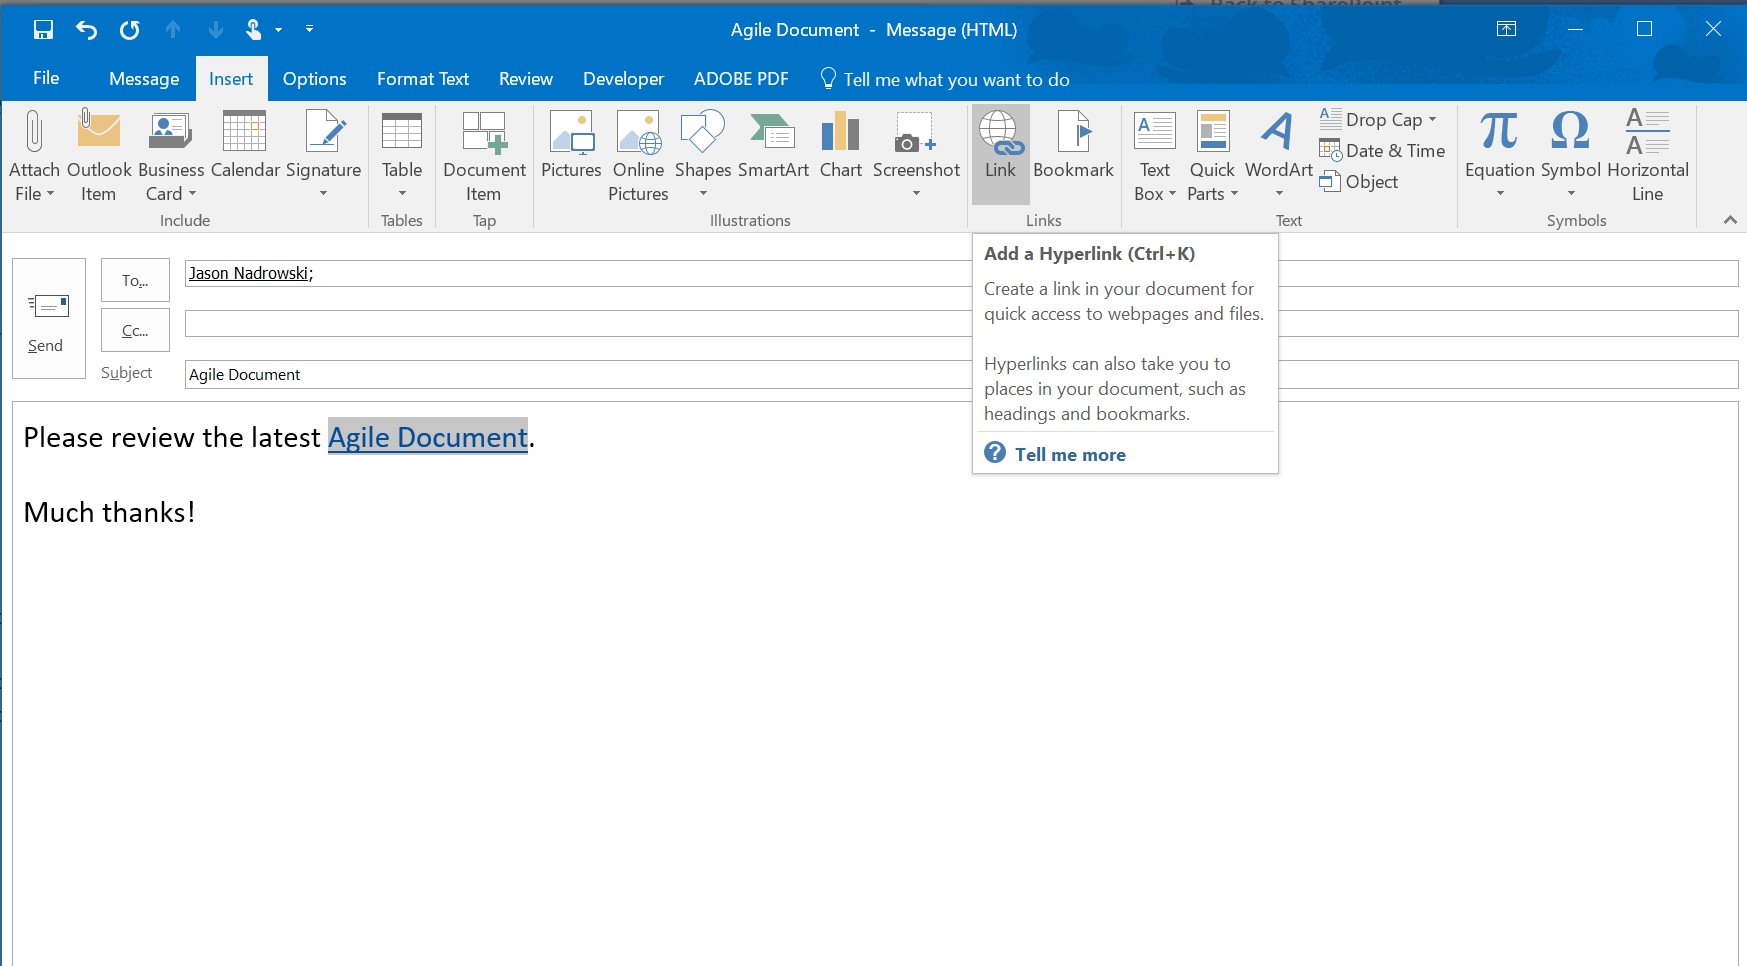
Figure 4: API - URL, Constructing an email with a link
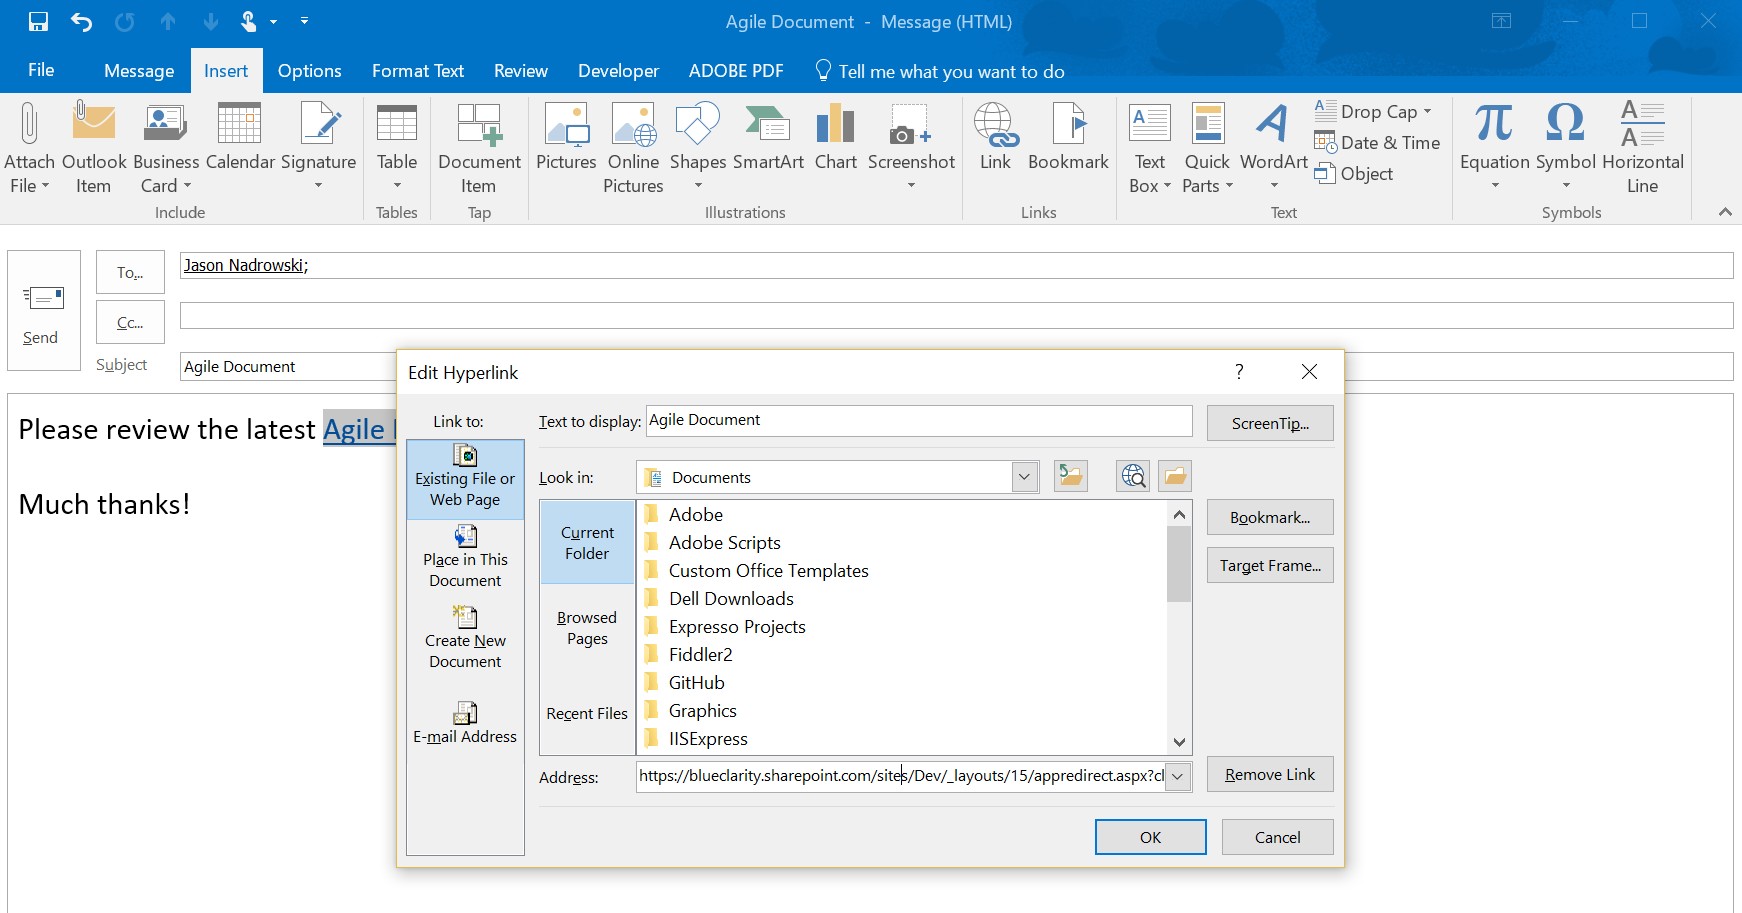
Figure 5: API - URL, Populating email link
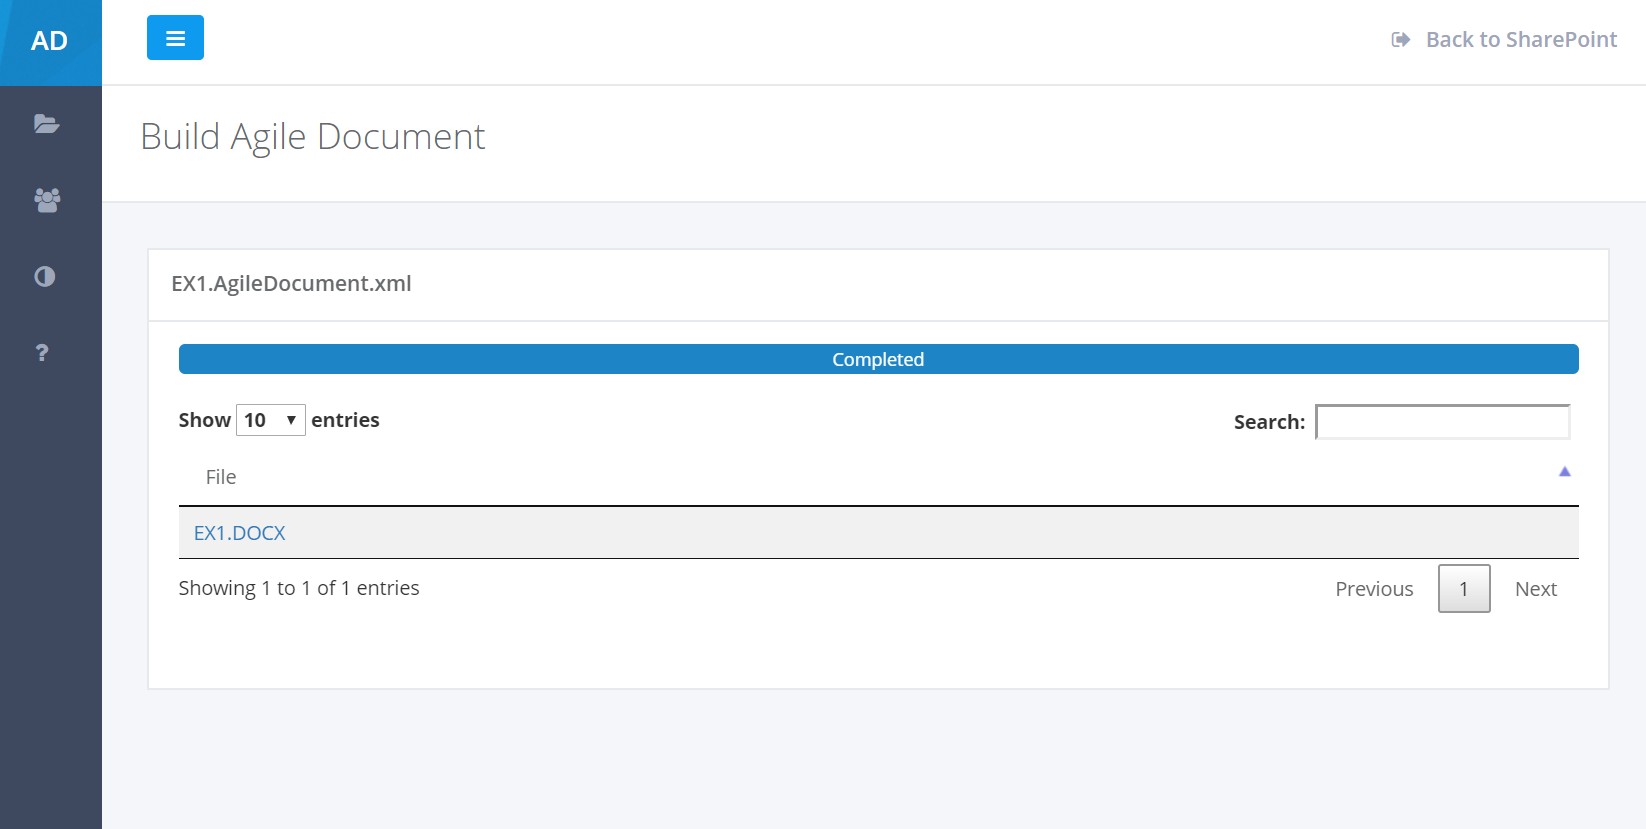
Figure 6: API - URL, Resultant Click
Example 2: Microsoft Flow - Integrating Google Sheets with Agile Documents
Microsoft Flow is one of several workflow platforms that can integrate with Agile Documents. Through Flow, you can integrate Agile Documents with over 150 platforms. In order to connect your Flow account to Agile Document, please see Microsoft Flow Integration in the API - REST documentation.
In this example, we integrate data from a Google Sheet into an Agile Document (Figure 7). We will use Flow to copy data from the Google Sheet to the SharePoint List and then build the Word Example 7 Agile Document. As you may recall, Word Example 7 is built by consuming data from a SharePoint List. We will couple that Word Example 7 to this example by injecting Google Sheets data into the SharePoint list and then building the Agile Document with that list data. The actual Flow Workflow is shown in Figures 8 and 9.
To start, you will need a Google Drive account. Create a Google Sheet like the one shown in Figure 10. You'll notice that the Google Sheet has a header row and a __PowerAppsId__ column. In Microsoft Flow, you will use these to define the data cell you wish to retrieve. It should be noted that when you reference a Google Sheet through a Flow action, Flow will automatically create a __PowerAppsId__ column if it doesn't already exist. This column is used to detail a unique identifier for the row. That unique row identifier is how Microsoft Flow figures out what row in the specified Google Sheet to retrieve.
Next, create a manually triggered Flow that gets a row from a Google Sheet and then updates a SharePoint list item (Figure 8). As alluded to earlier, the Row id specified in the Get row action references the row with the matching value in the __PowerAppsId__ column. In our case, it is row 2. The Id specified in the Update item action refers to the SharePoint list item ID column. You can determine the ID of a list item a number of ways, but the easiest is to customize a SharePoint List View to display it (Figure 11). Now when you view the list, the IDs of the list items are clearly specified.
Construct the last part of the Flow to look like Figure 9. Notice that the Agile Document URI for Example 7 is specified for the agiledocumentURI parameter in the queue build action. Also note that the Do until loop relies on the IsCompleted parameter resulting from the get information action. Thus, you can't reference IsCompleted until you add get information to the Do until first. Finally, note the the TaskID specified in get task information originates from the queue build action.
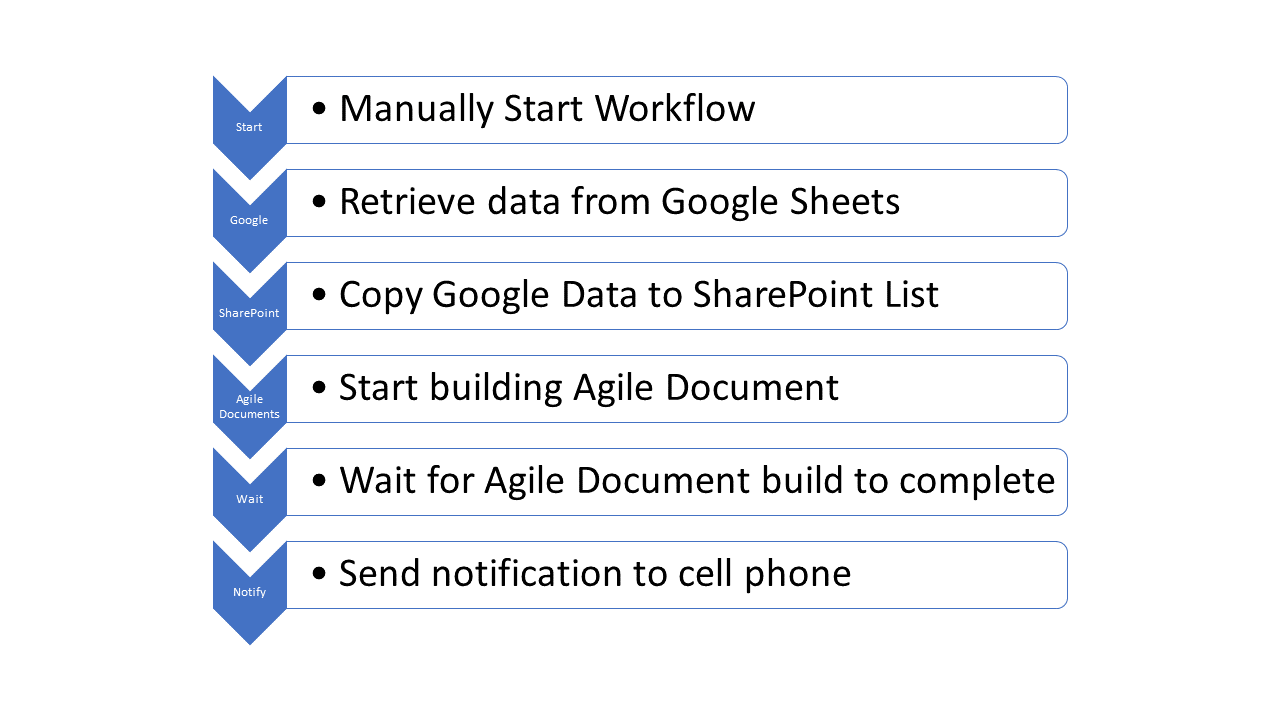
Figure 7: Example Overview
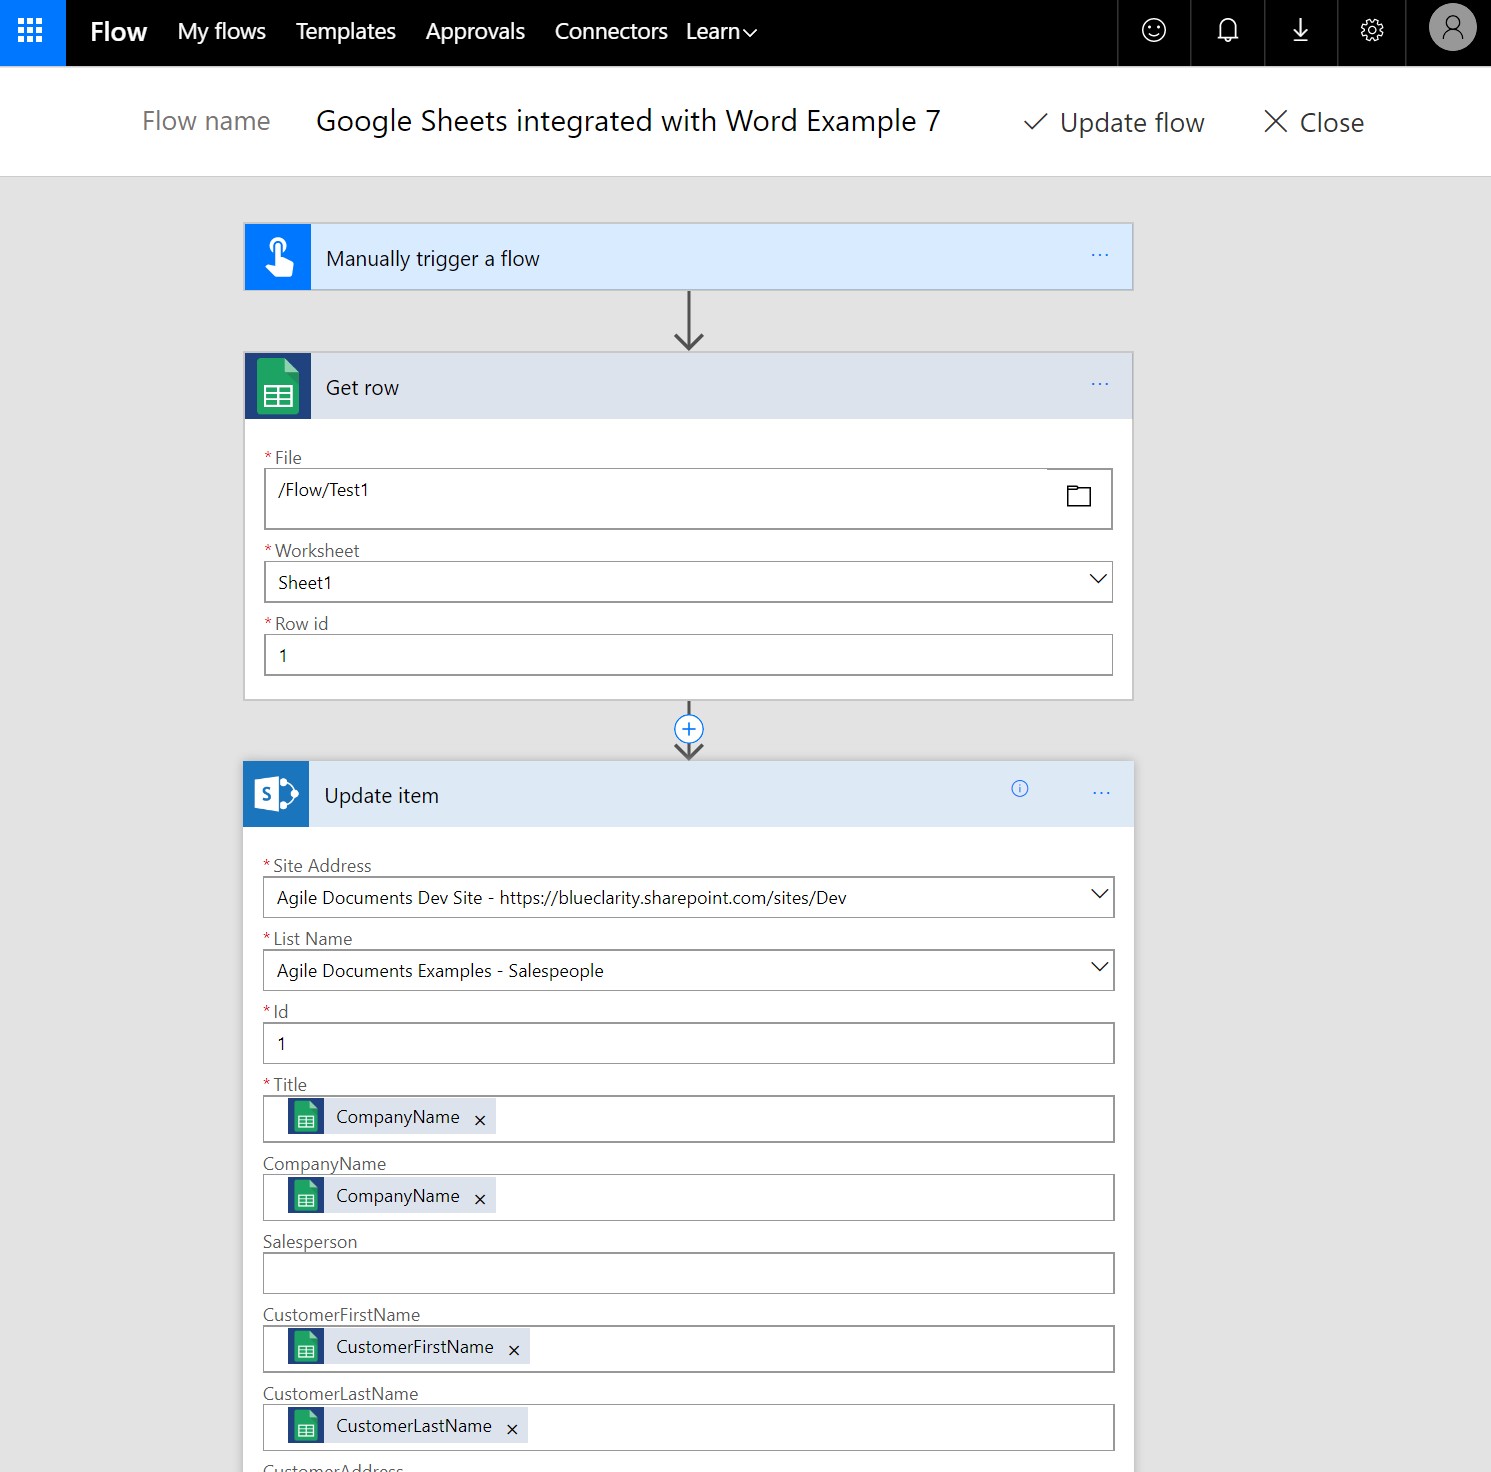
Figure 8: Google Sheet Get row and SharePoint Update item
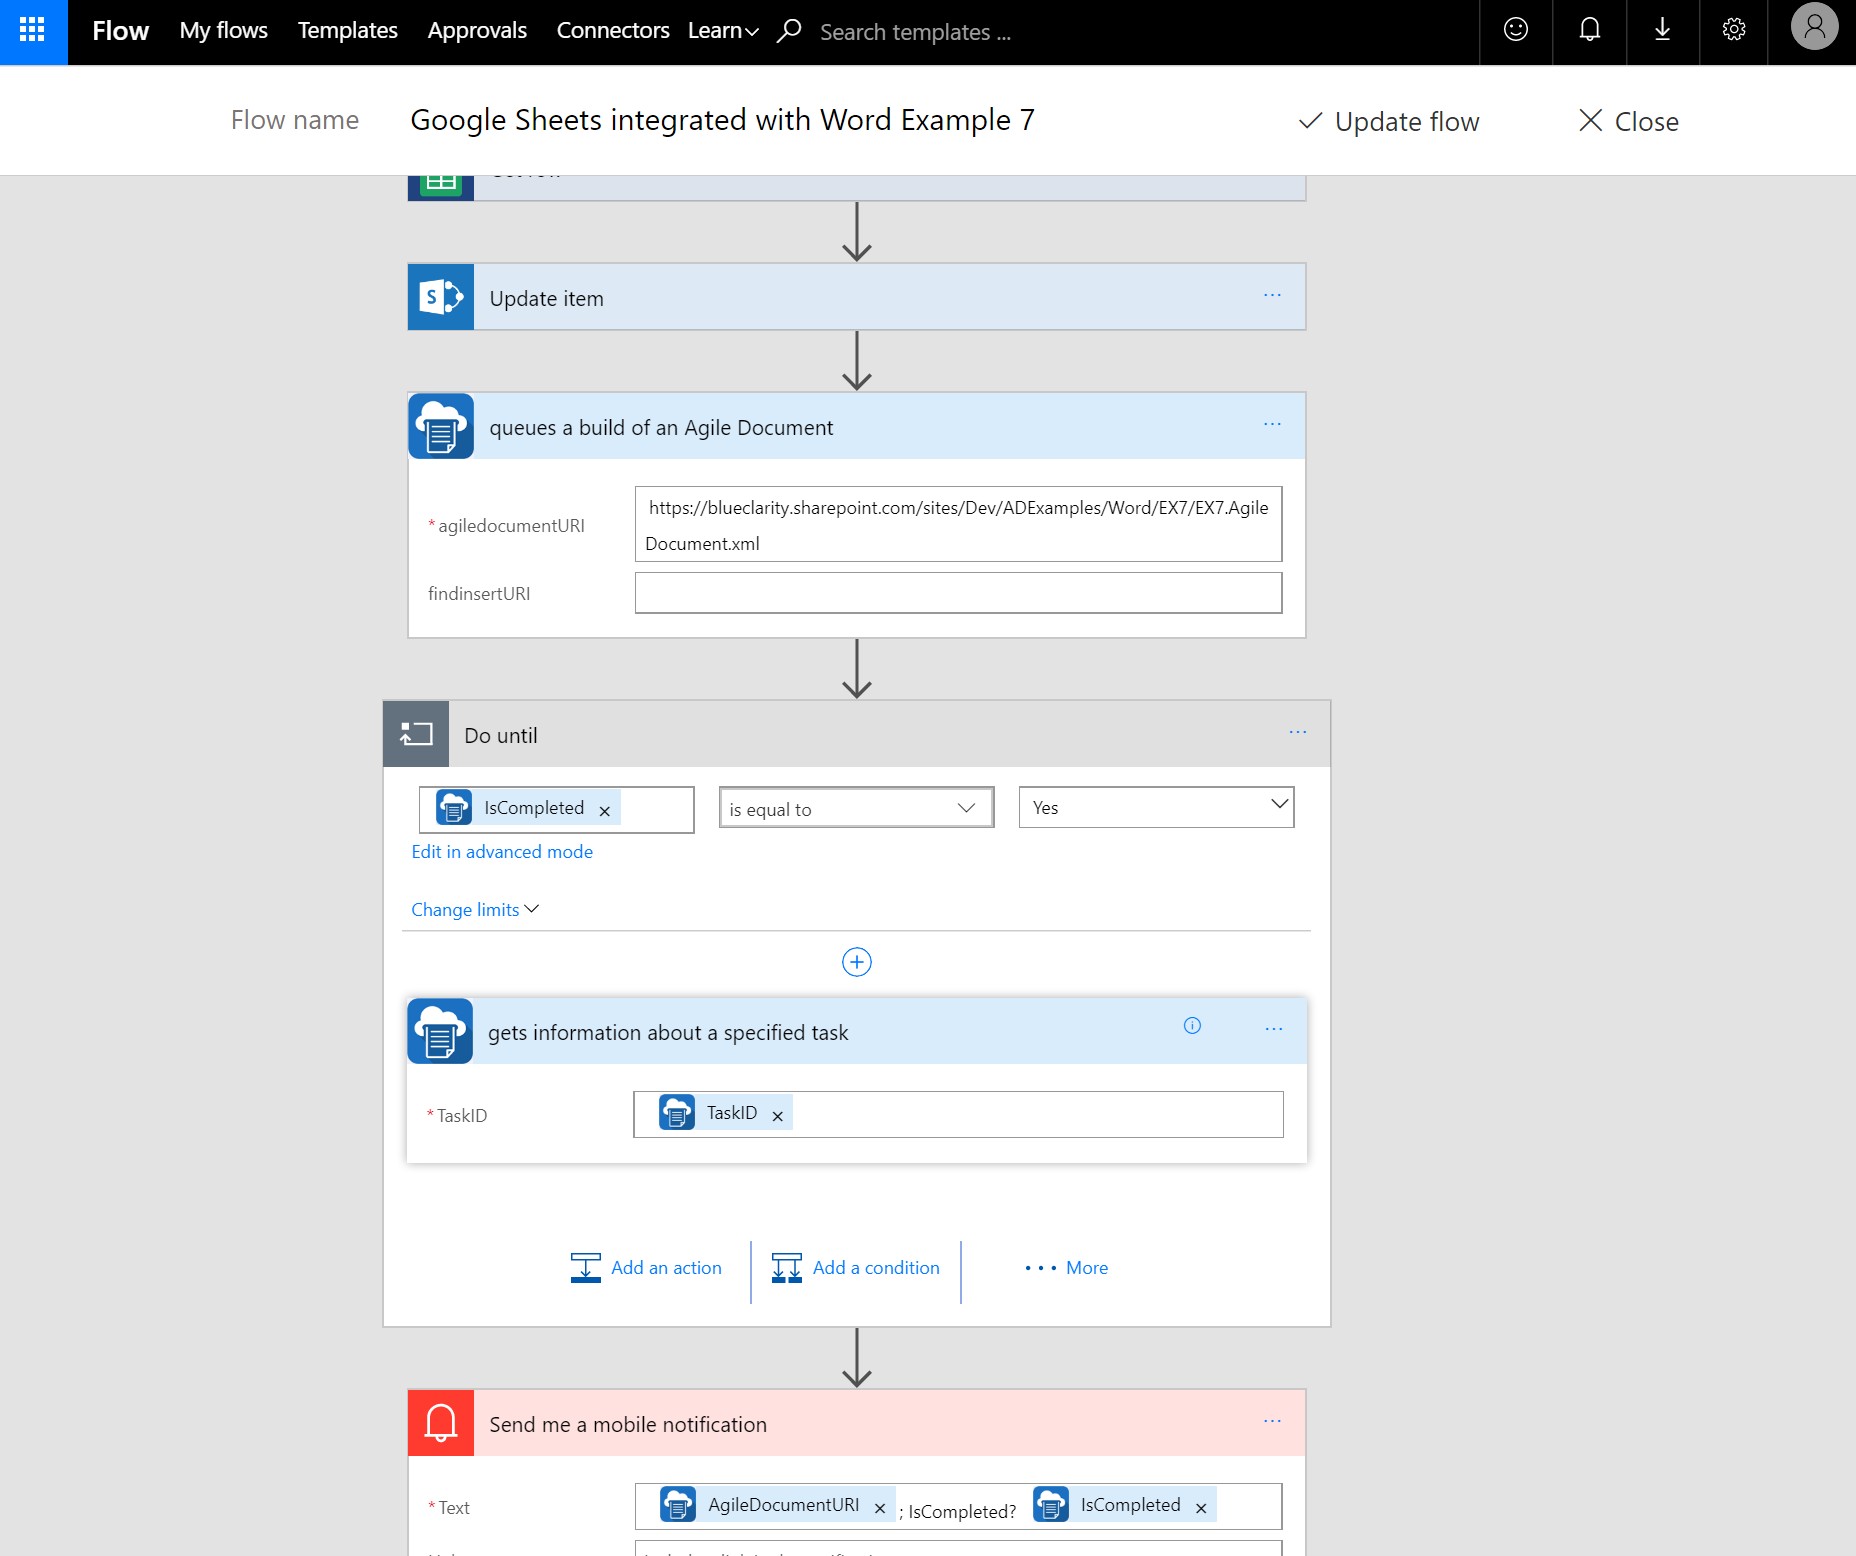
Figure 9: Queue Build, Do Until, Send Notification
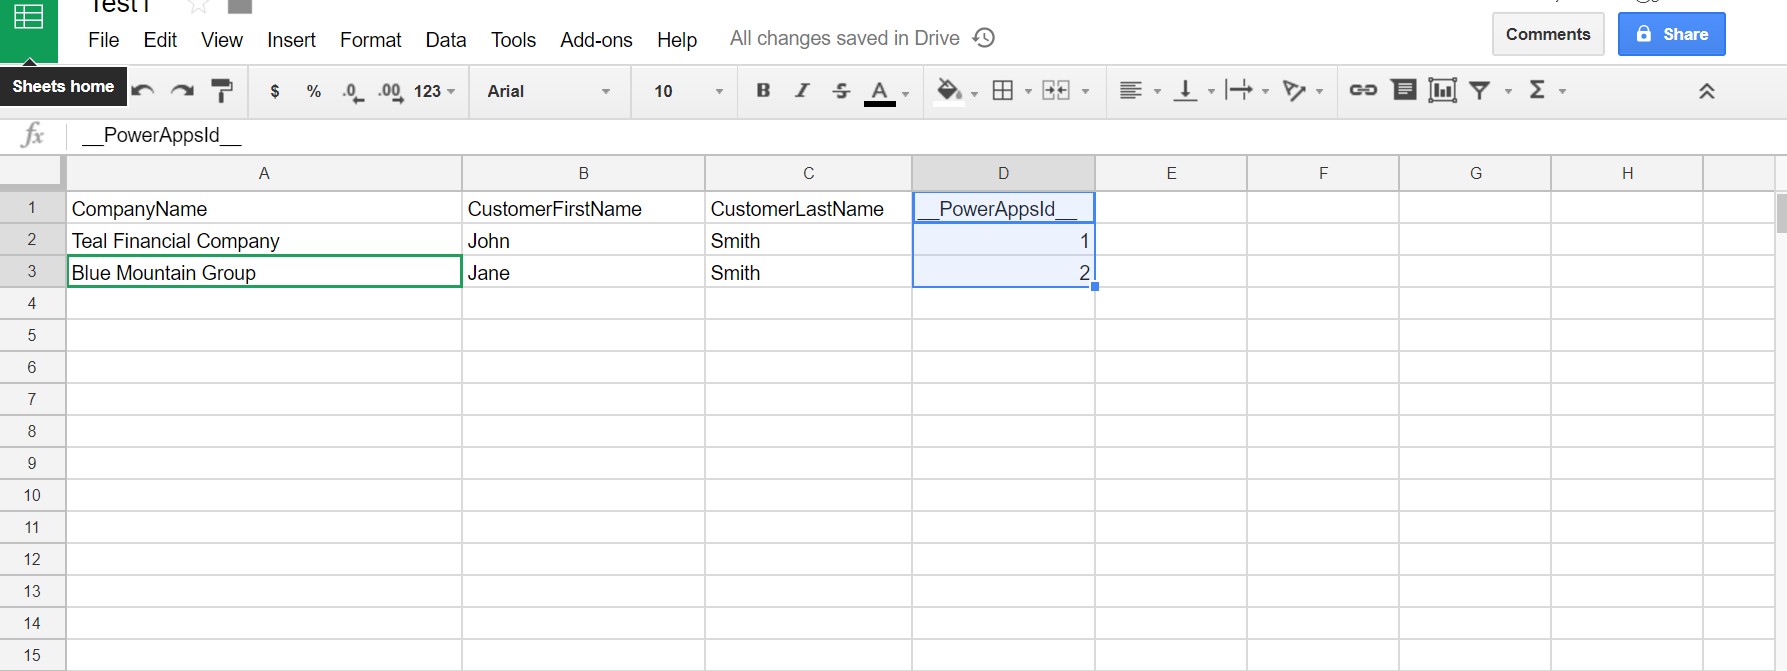
Figure 10: Google Sheet
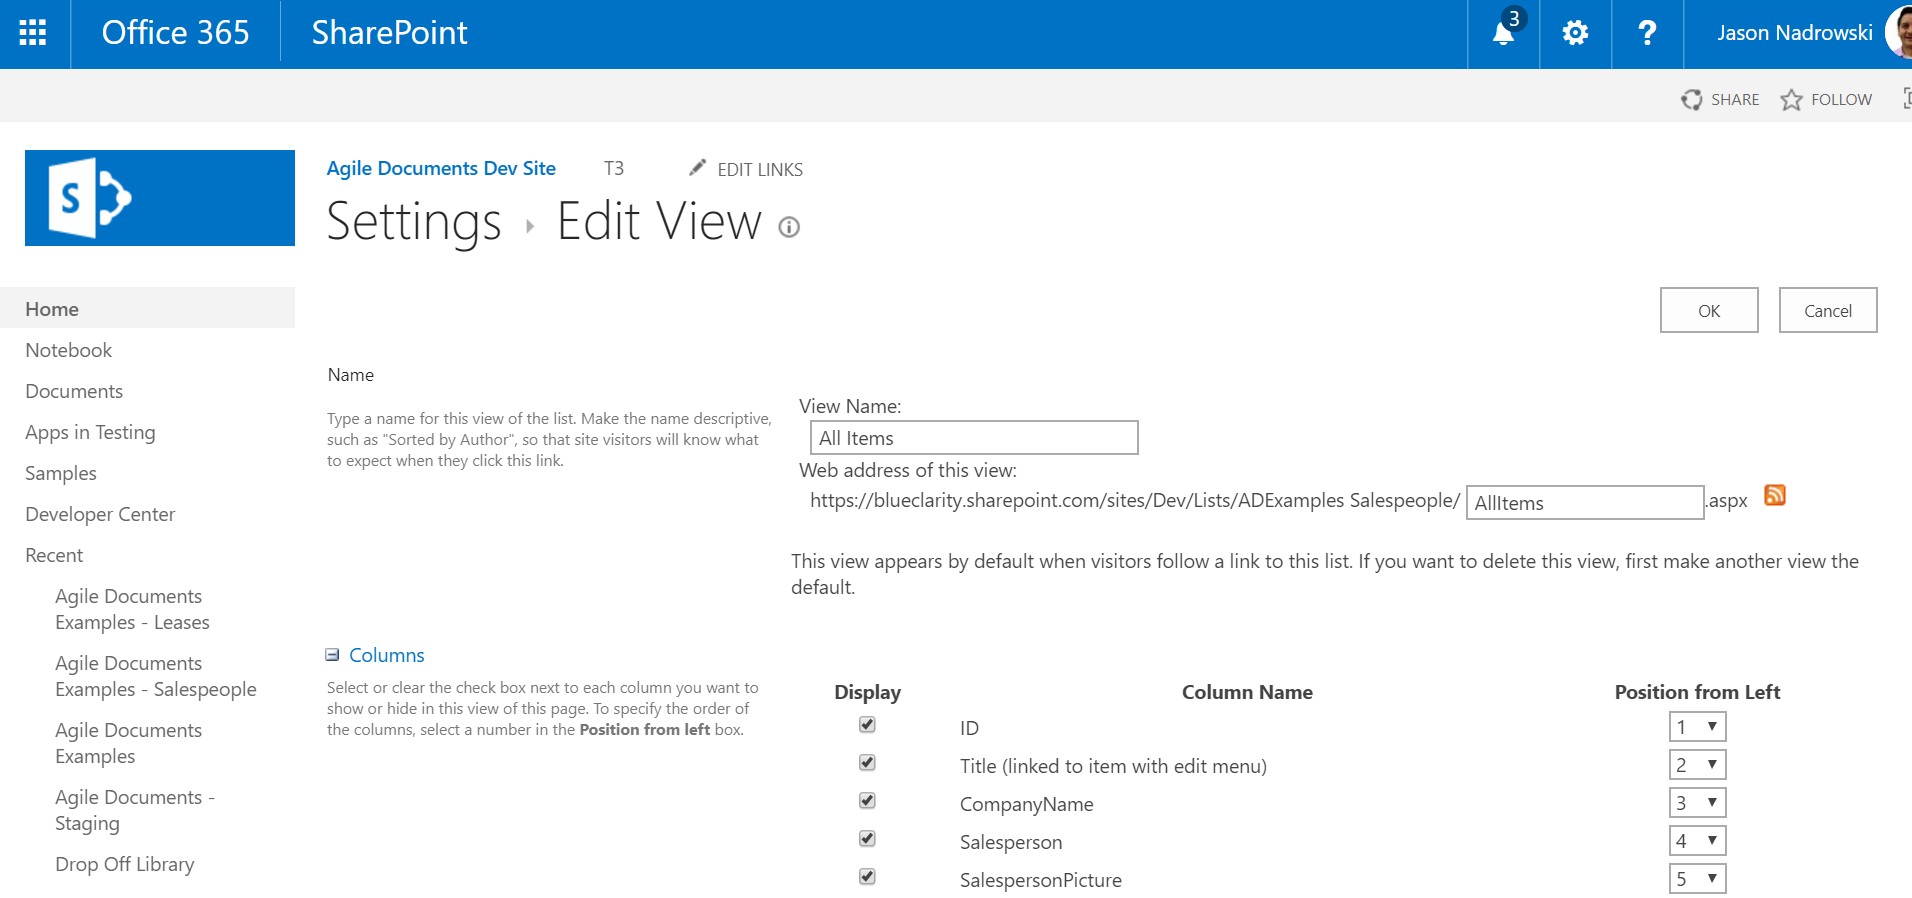
Figure 11: Customize a SharePoint List View
Example 3: Microsoft Flow - Integrating Microsoft Forms with Agile Documents
In this example, we inject dynamic data from a Microsoft Form into an Agile Document (Figure 12). Specifically, we create a new SharePoint list item and build the Agile Document with that newly defined list item. This is different from the previous example where we updated an existing SharePoint list item.
As you may recall, Word Example 10 is built by dynamically injecting data into the Agile Document from a SharePoint List. We will build Example 10 with data from a Microsoft Form. The details of the Flow are detailed in Figures 13 and 14. The Flow is started whenever a someone submits data to the Form. Then the Form data is copied into a new SharePoint List item. Next, the Agile Document is built by specifying the Agile Document URI and the Find and Insert URI. Note that the Find and Insert URI refers to the SharePoint List Item we just created (Figure 14). The Find and Insert URI should take the form of https://my.sharepoint.com/sites/site1/list1/1_.000, we need to construct it with the multiple elements from the Create item task. Finally, we queue the build request and then wait for it to finish.
The Microsoft Form we created for this example is shown in Figure 15. Microsoft Forms is a web platform for designing Forms and collecting data from other using these forms. There are a number of other similar platforms such as Formstack and WUFOO. So don't think you are locked into only using Microsoft Forms. If you want to fill out your form and/or have others fill it out, you need to obtain the share-able URL shown in Figure 16.
We opted to create a new SharePoint list to house the data we collected from the Microsoft Form. The lists List definition is shown in Figure 17. The output file (AD_OutputFileUri) is defined by a calculated field whose definition is shown in Figure 18. To see a more detailed example on customizing the name of the output file please see Example 9. The AD_OutputFileUri formula combines the client's last name and first name together so that we will have a unique output file name.
As expected, when you fill out the Microsoft Form, Flow creates a new SharePoint List Item. Recall, the mappings were shown in Figure 13. Figure 19 shows example data collected from Microsoft Forms consolidated into a SharePoint List Item. Figure 20 shows the resulting Agile Document built from that data.
Please note that we tried to keep this example simple. But, its important to point out that we could have used data passing through Flow (such as a Microsoft Form) to drive conditional content in the Agile Document. This allows the selective inclusion/exclusion of content into the document. Please see Examples 11 and 12 detailing Conditional Content.
Its also worth mentioning that this example's Flow could have extended/enhanced any number of ways. For instance, one the Agile Document was built, it could have signed with DocuSign and then emailed to the customer via Mandrill. It could also have been printed and then mailed to the client via LOB. As you might expect, there are even more ways to integrate Agile Document with various workflow actions.
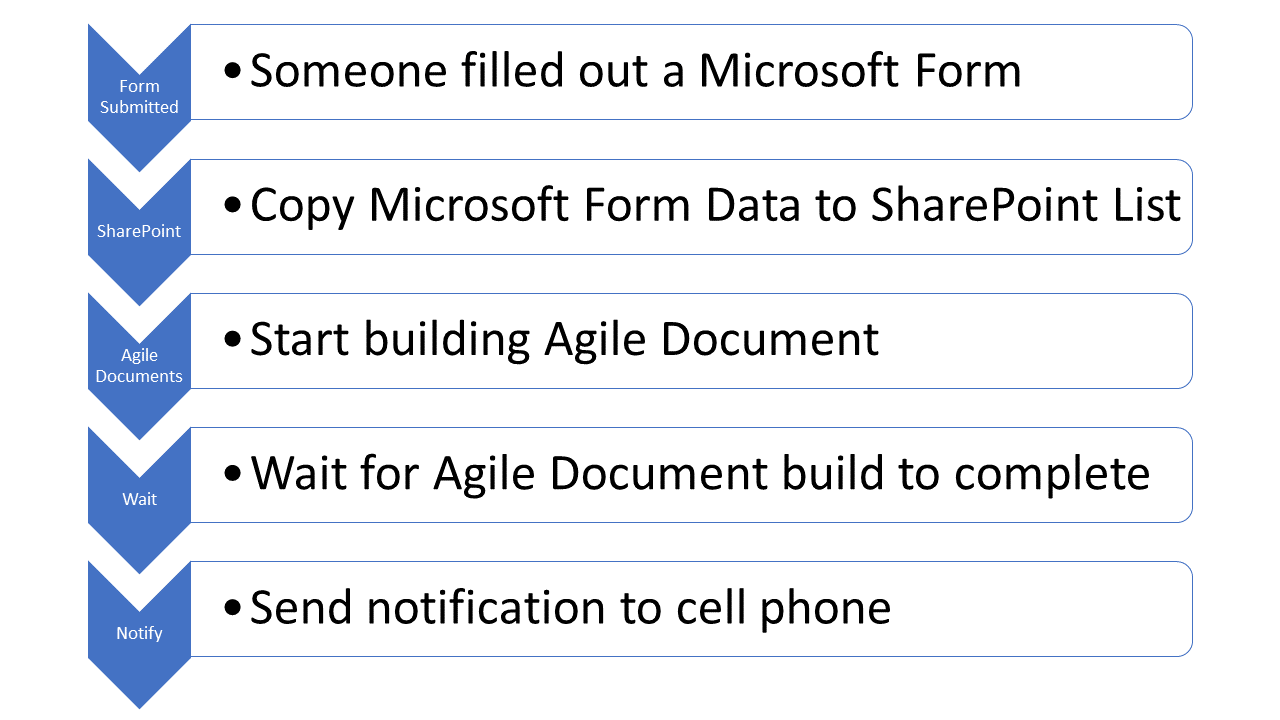
Figure 12: Example Overview
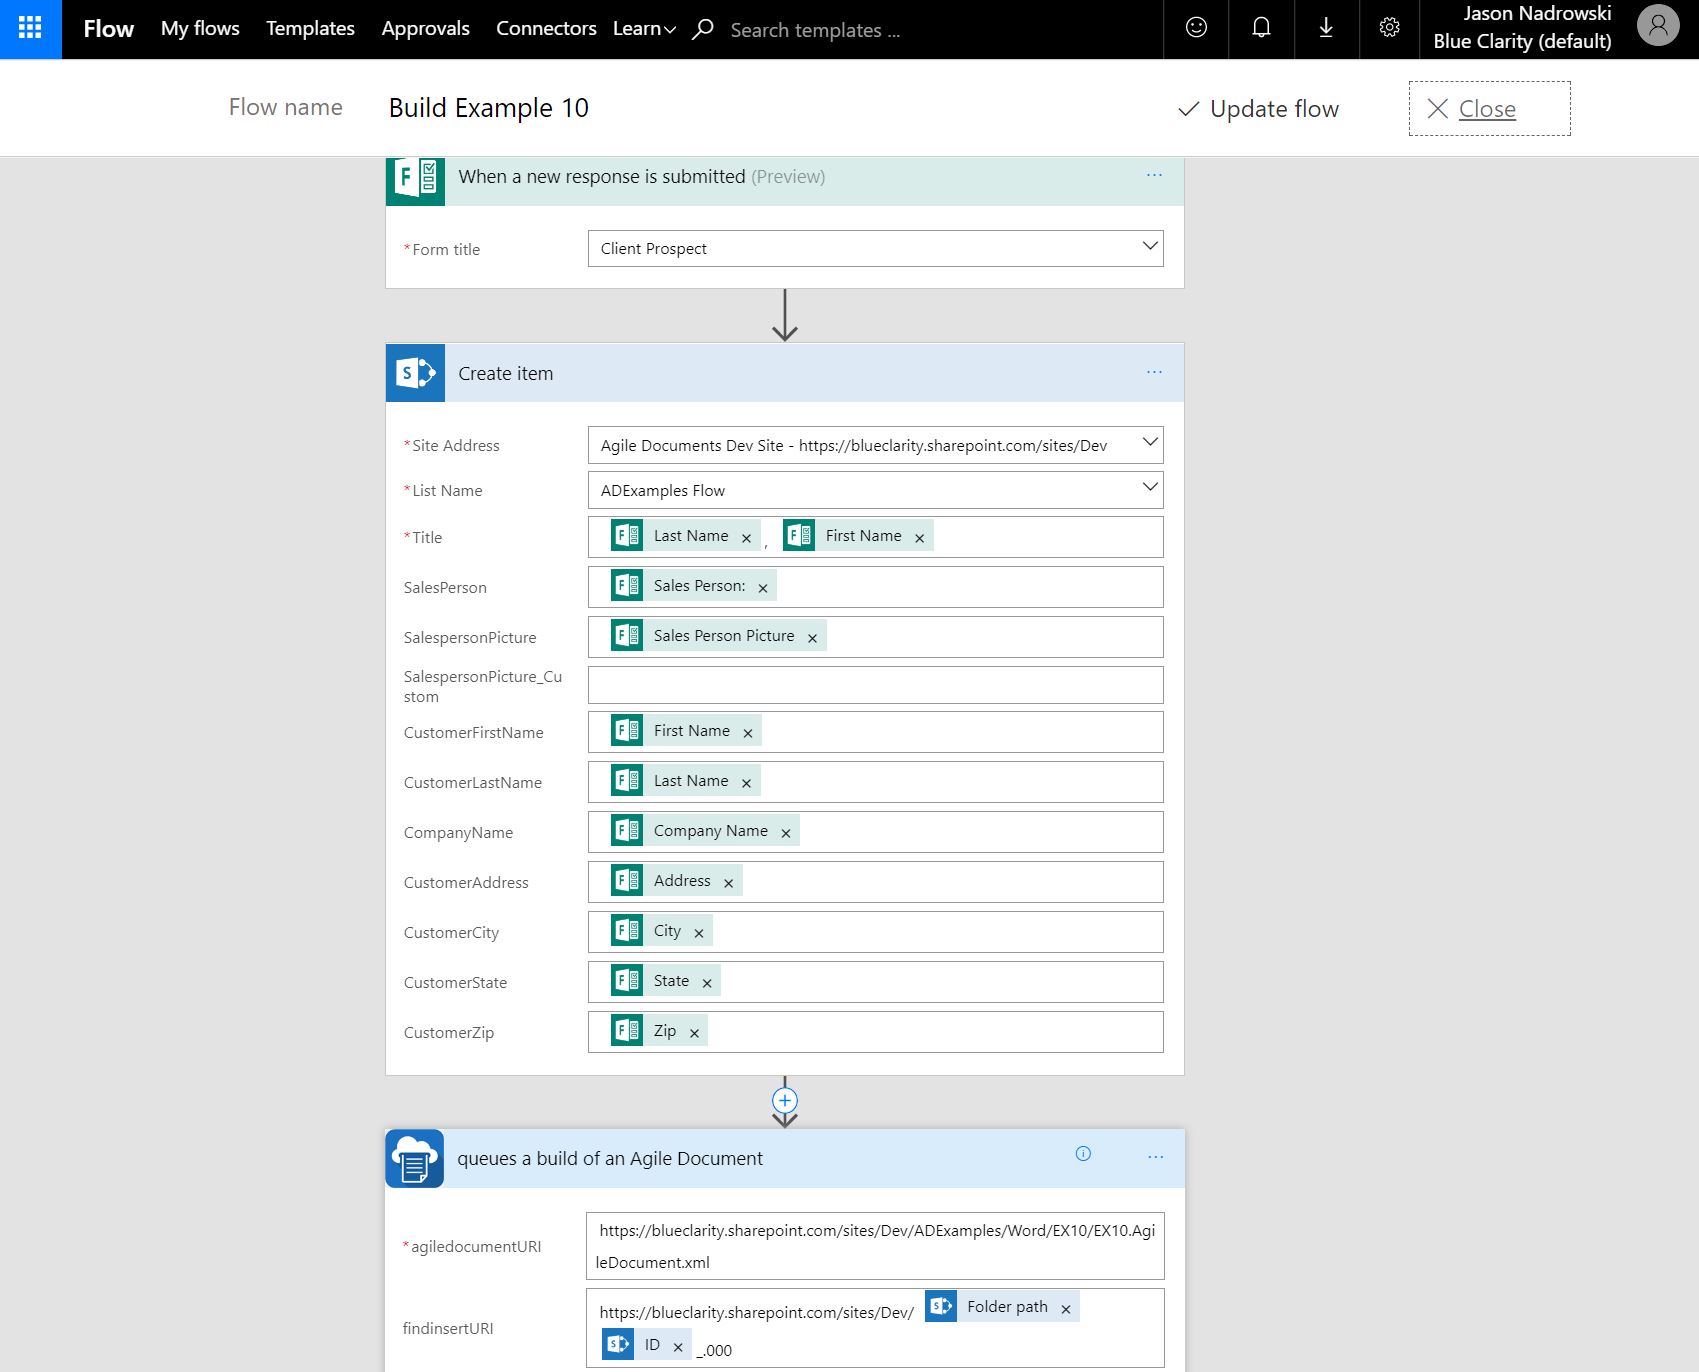
Figure 13: Flow Defintion Part 1
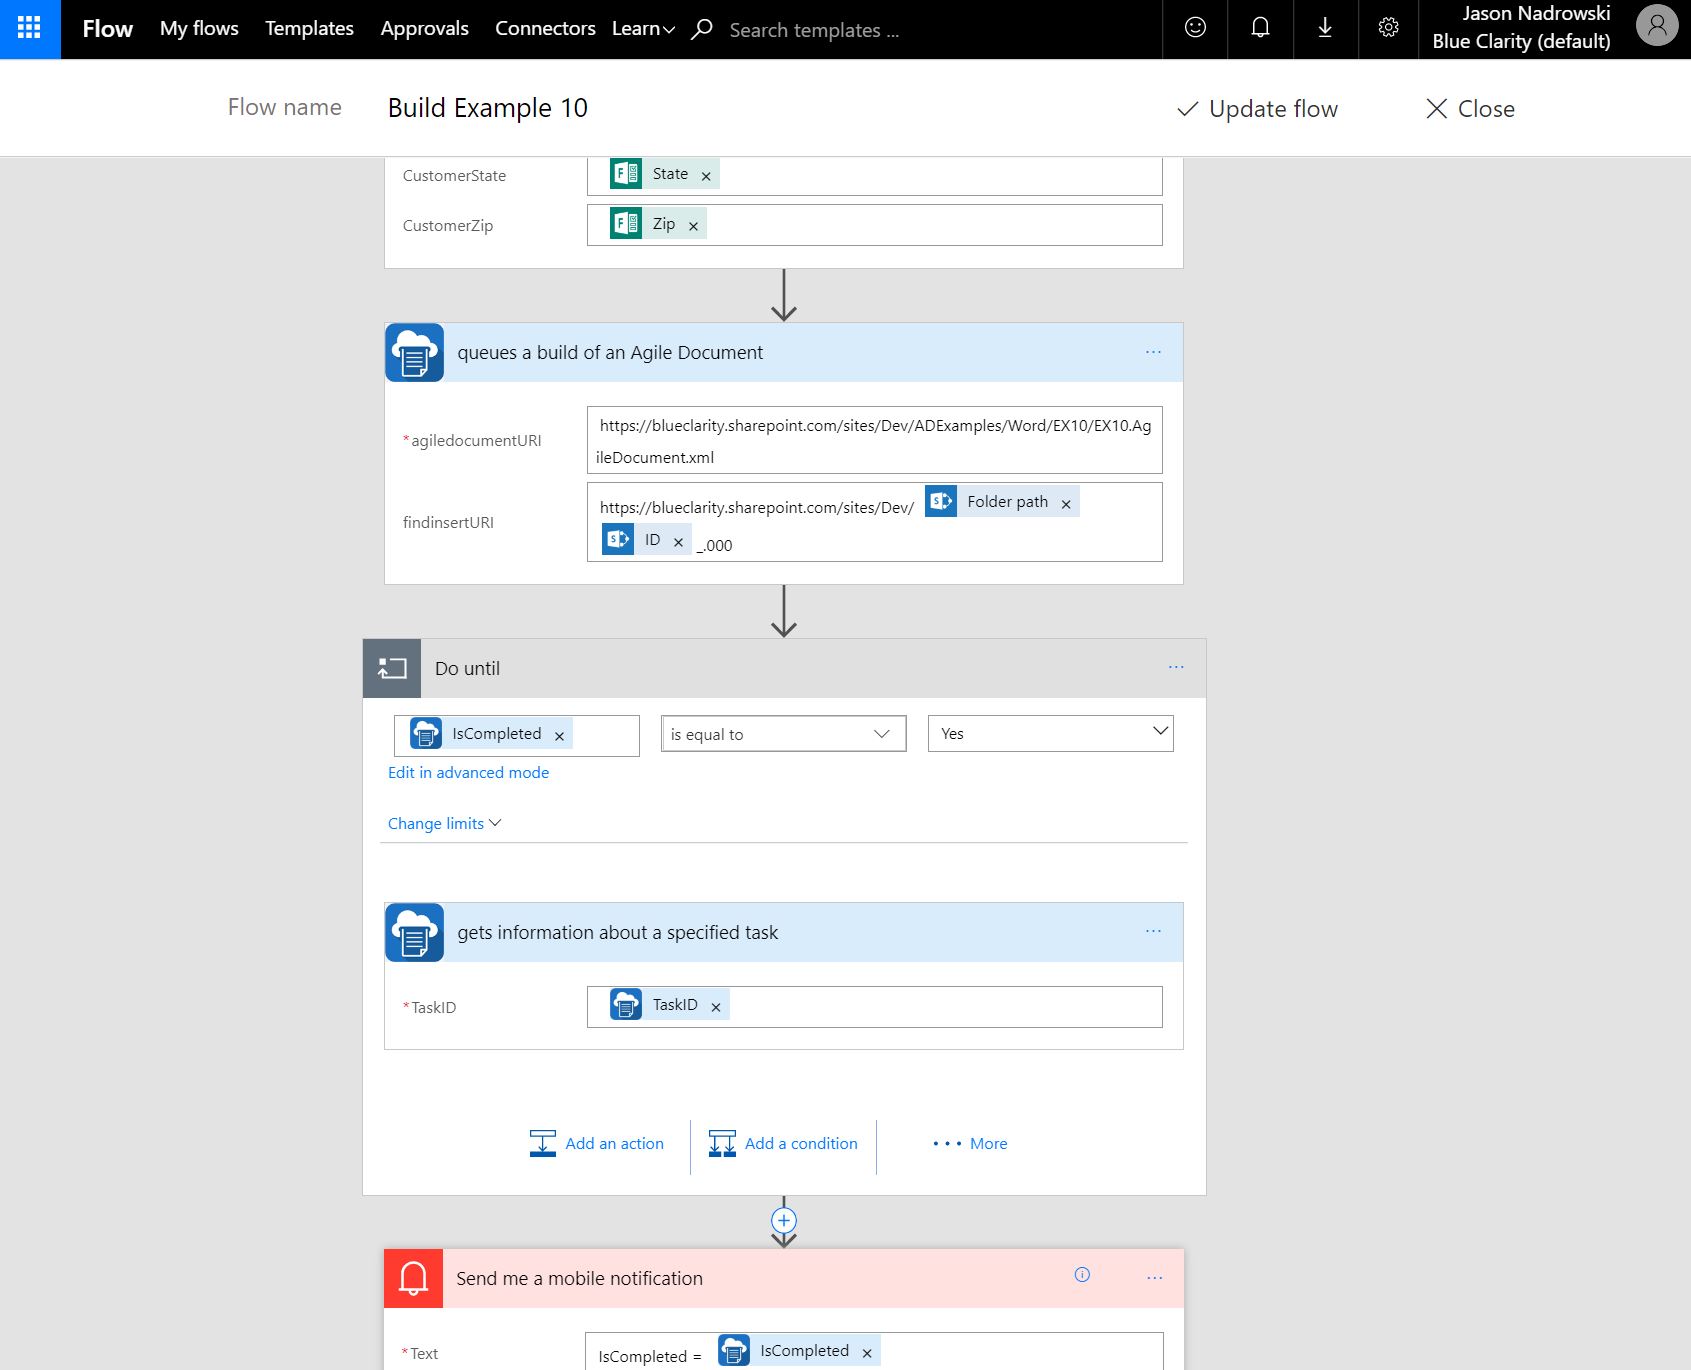
Figure 14: Flow Defintion Part 2
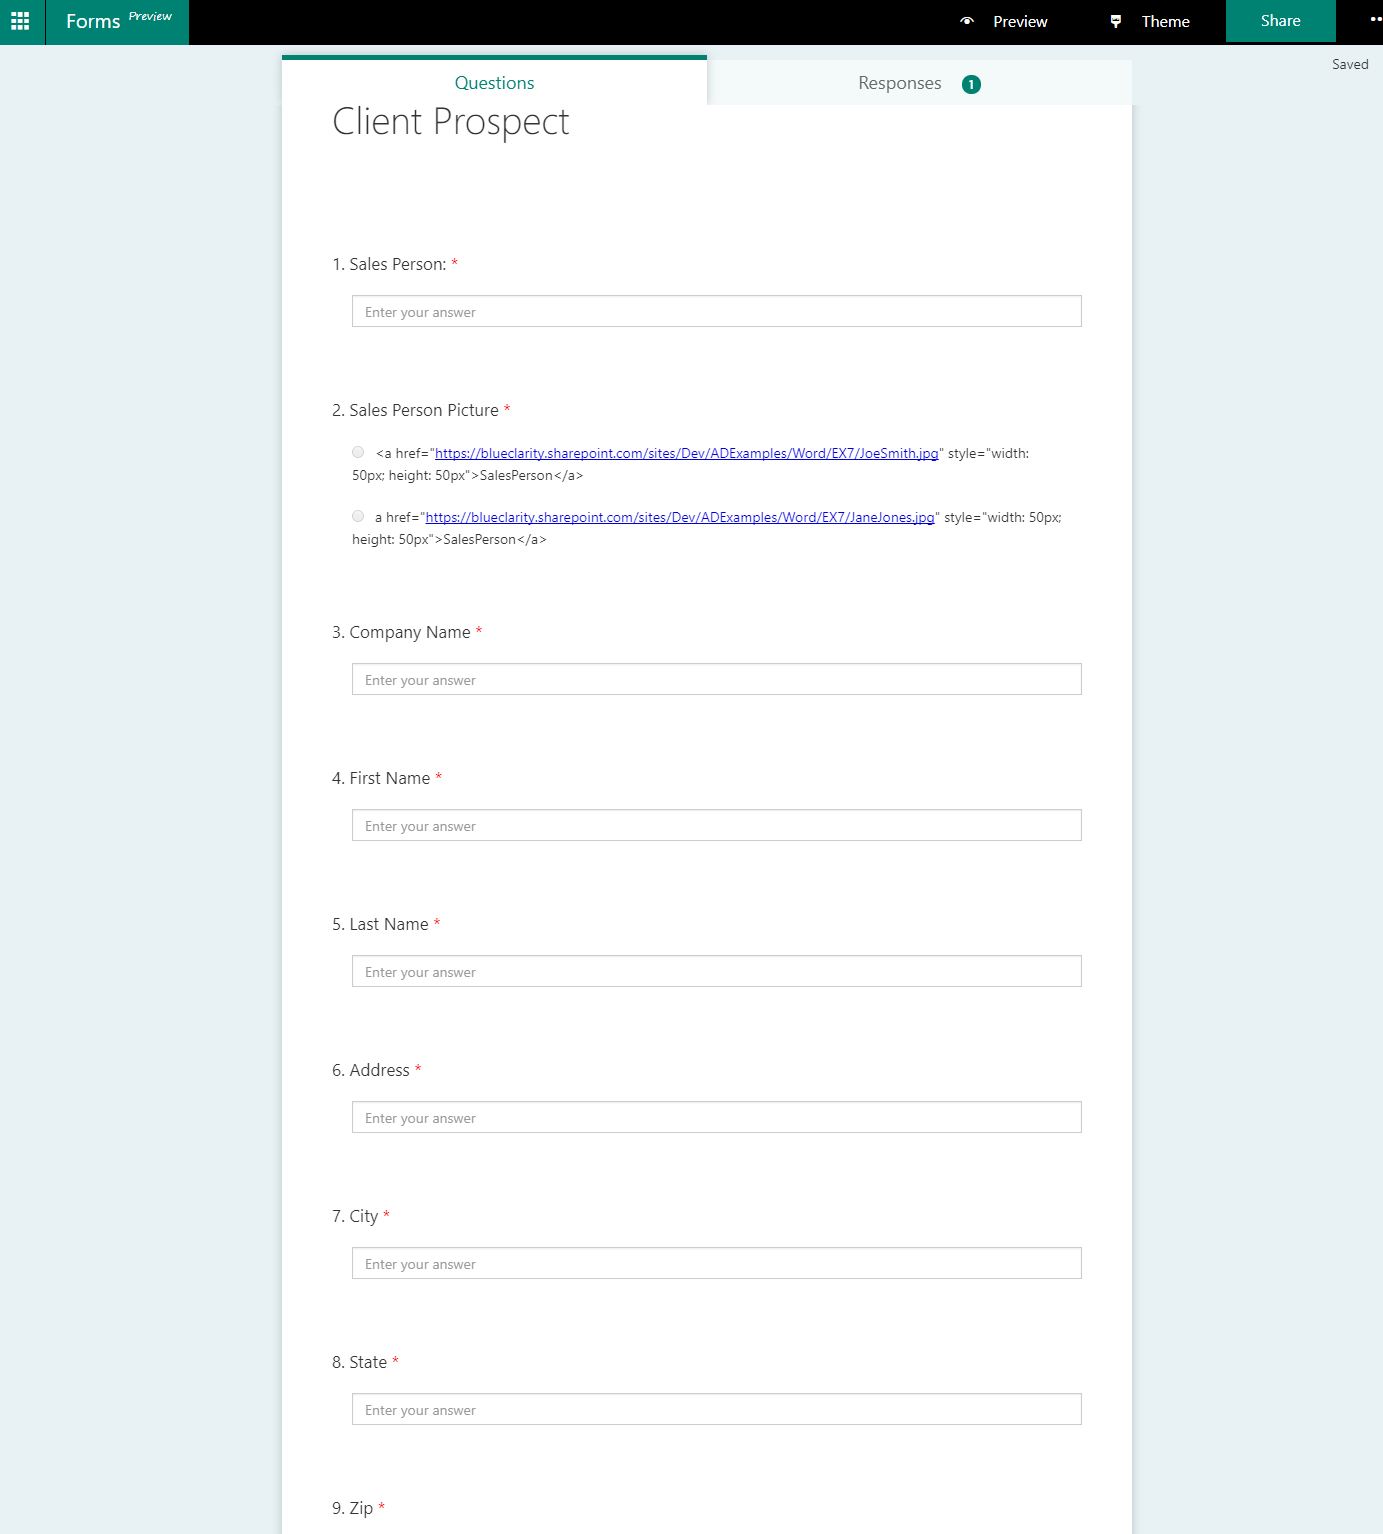
Figure 15: Microsoft Forms Designer
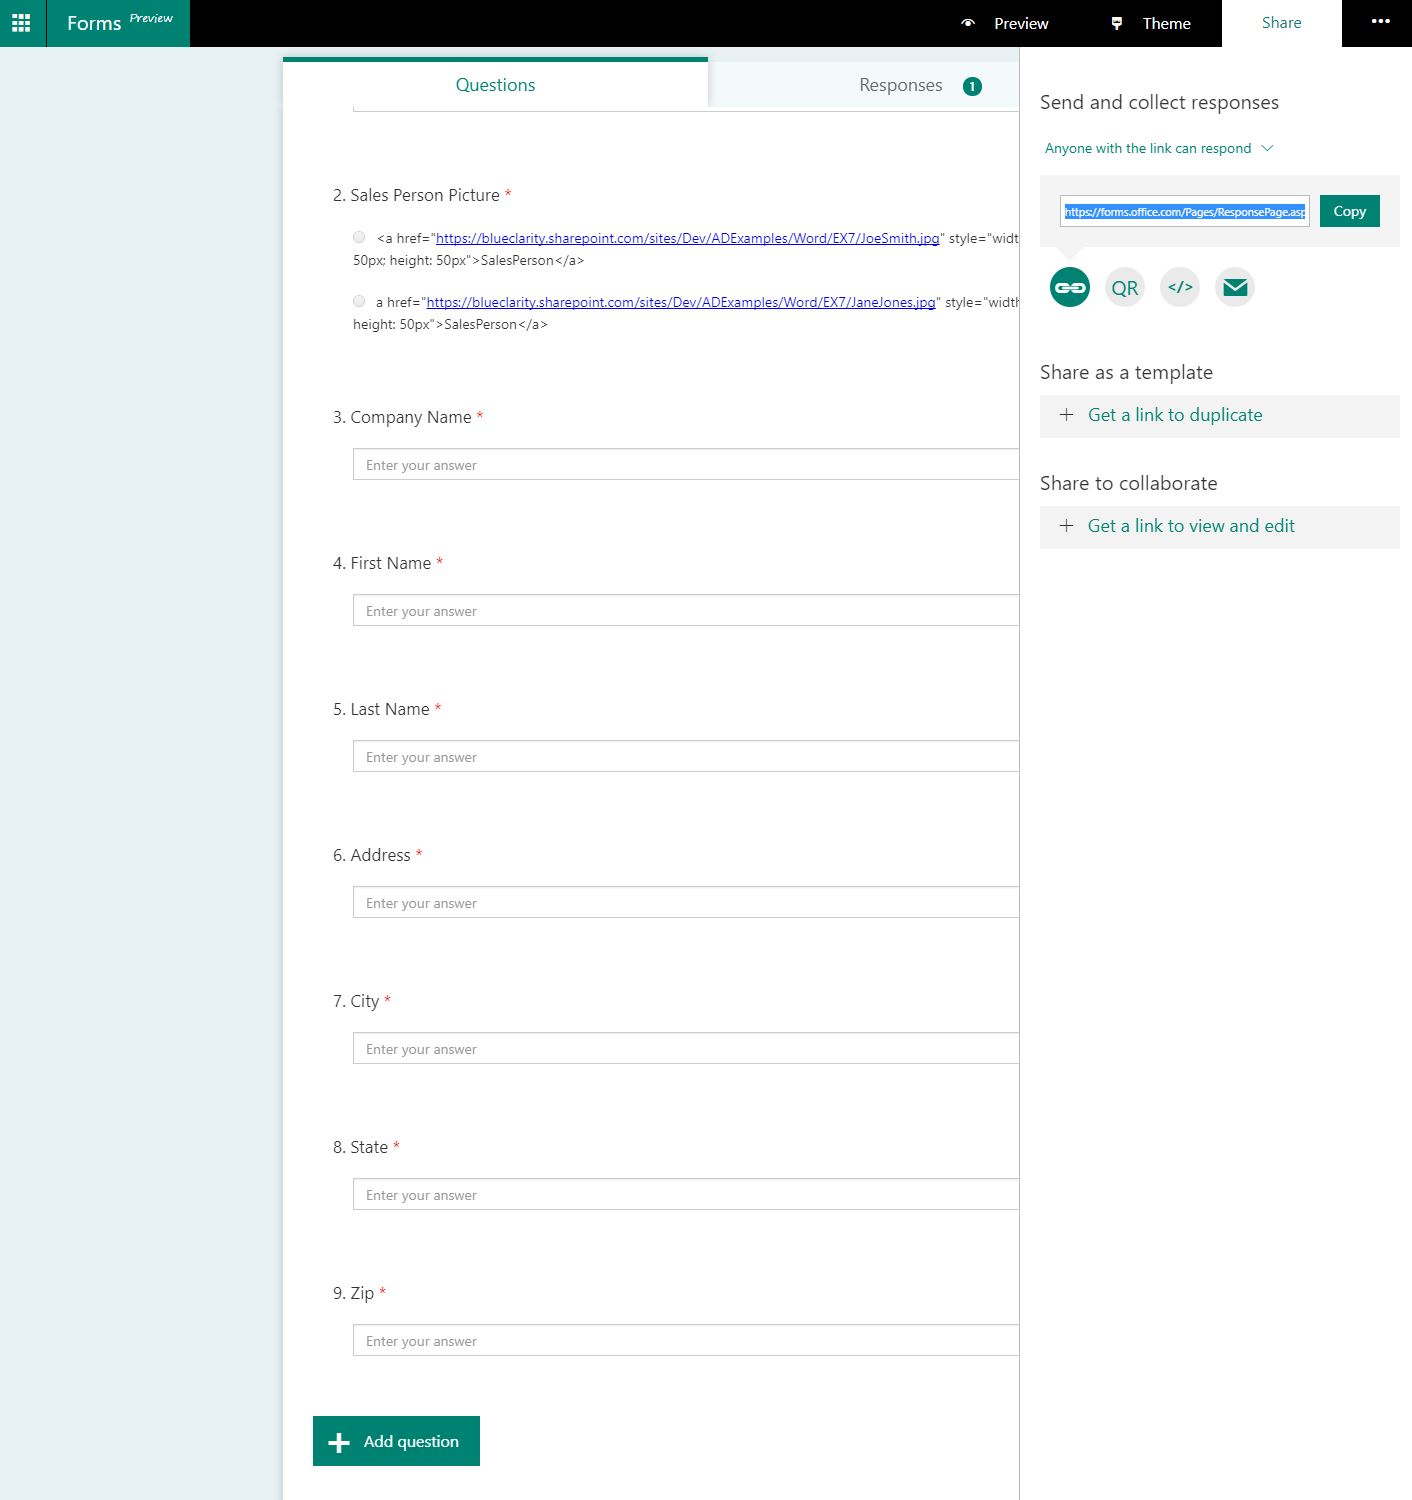
Figure 16: Sharing a Microsoft Form
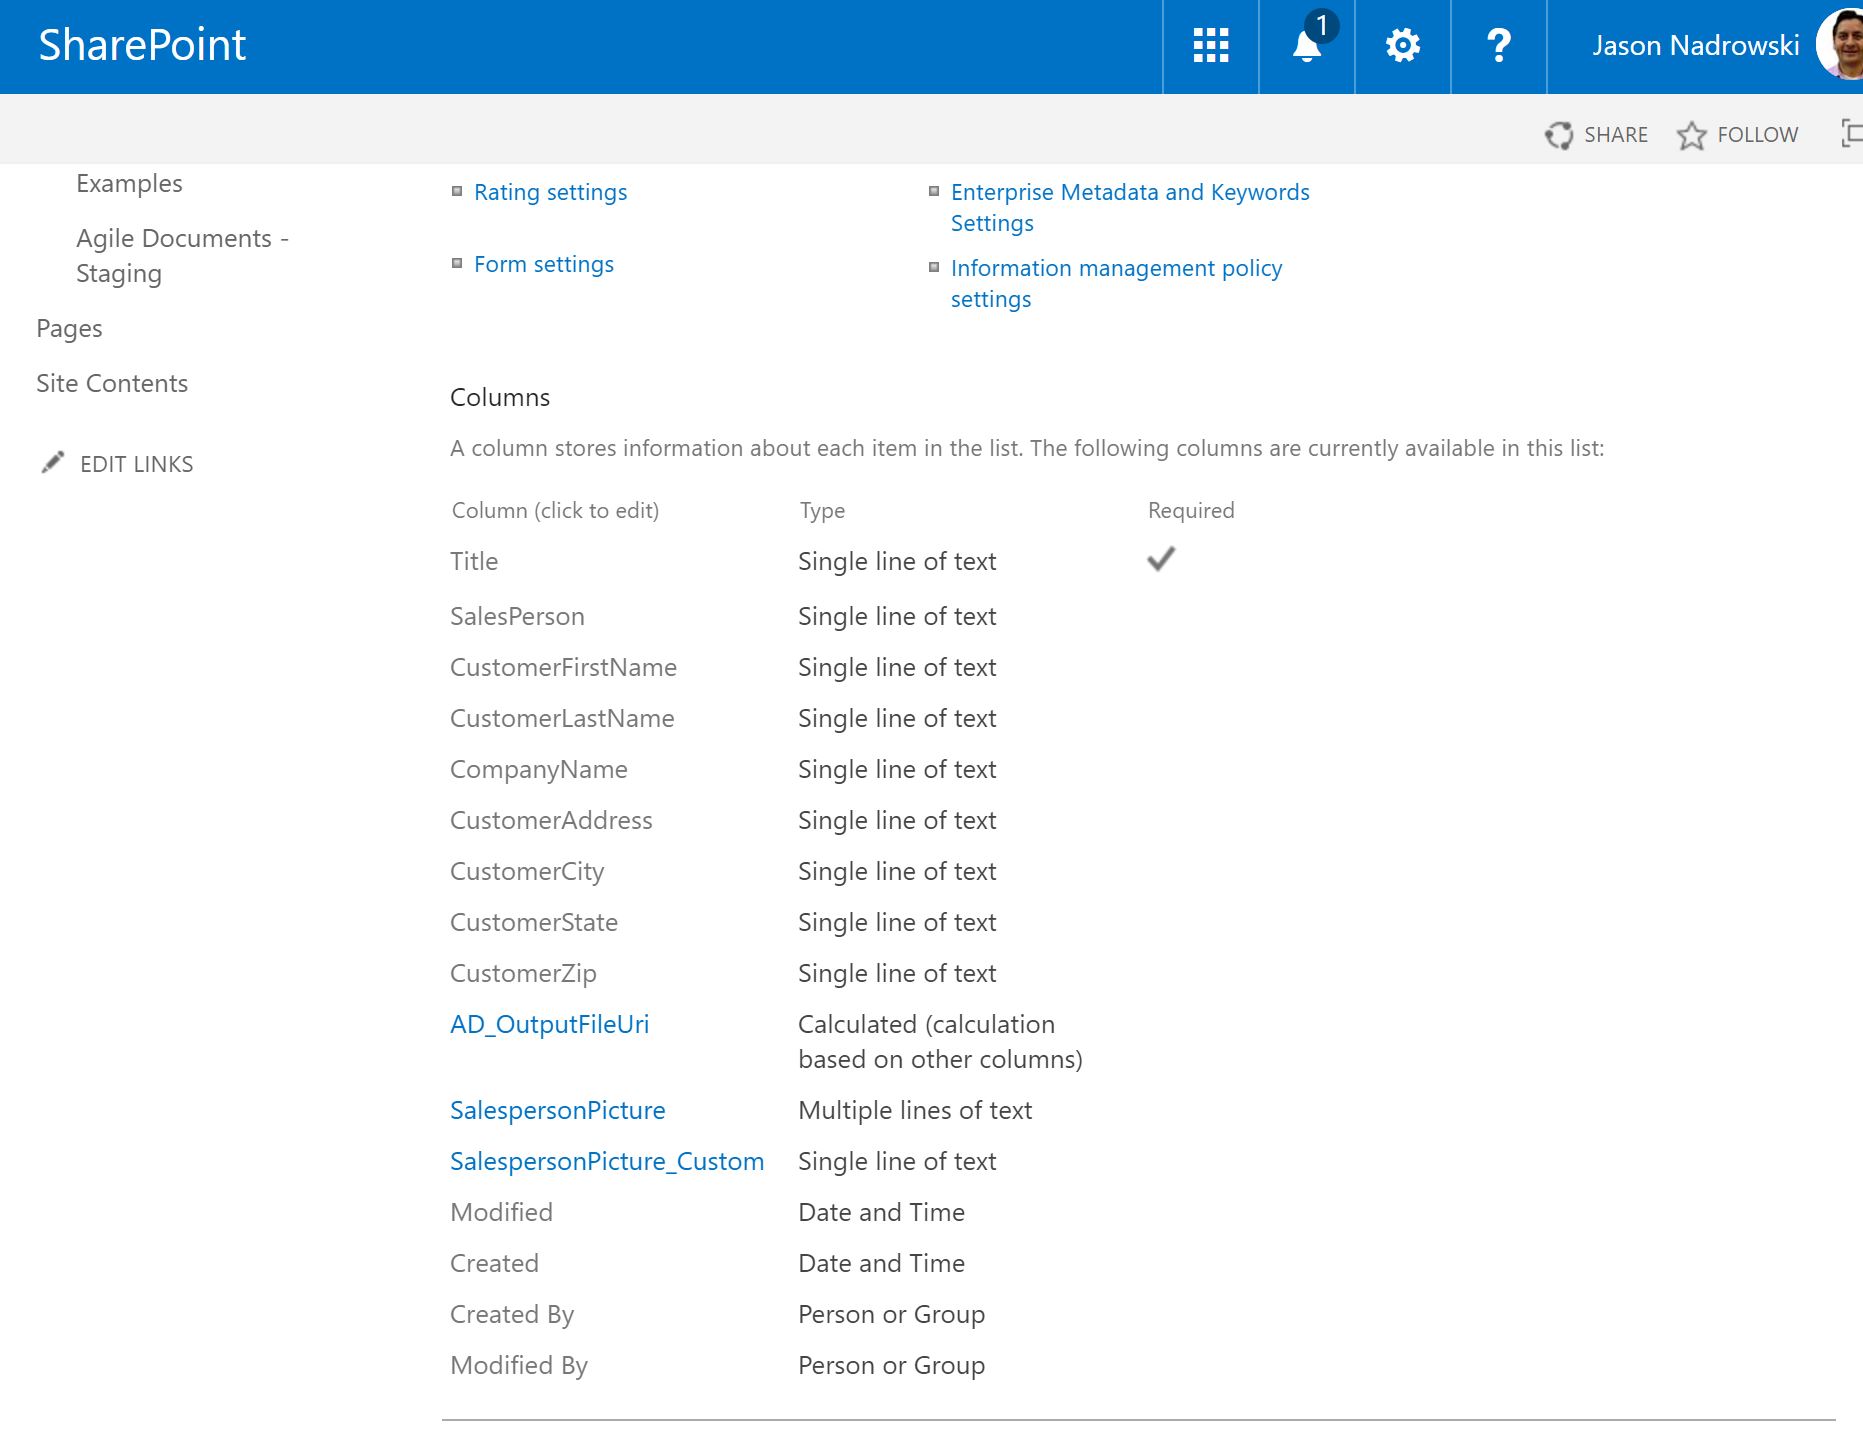
Figure 17: SharePoint List Definition

Figure 18: SharePoint List Column Definition
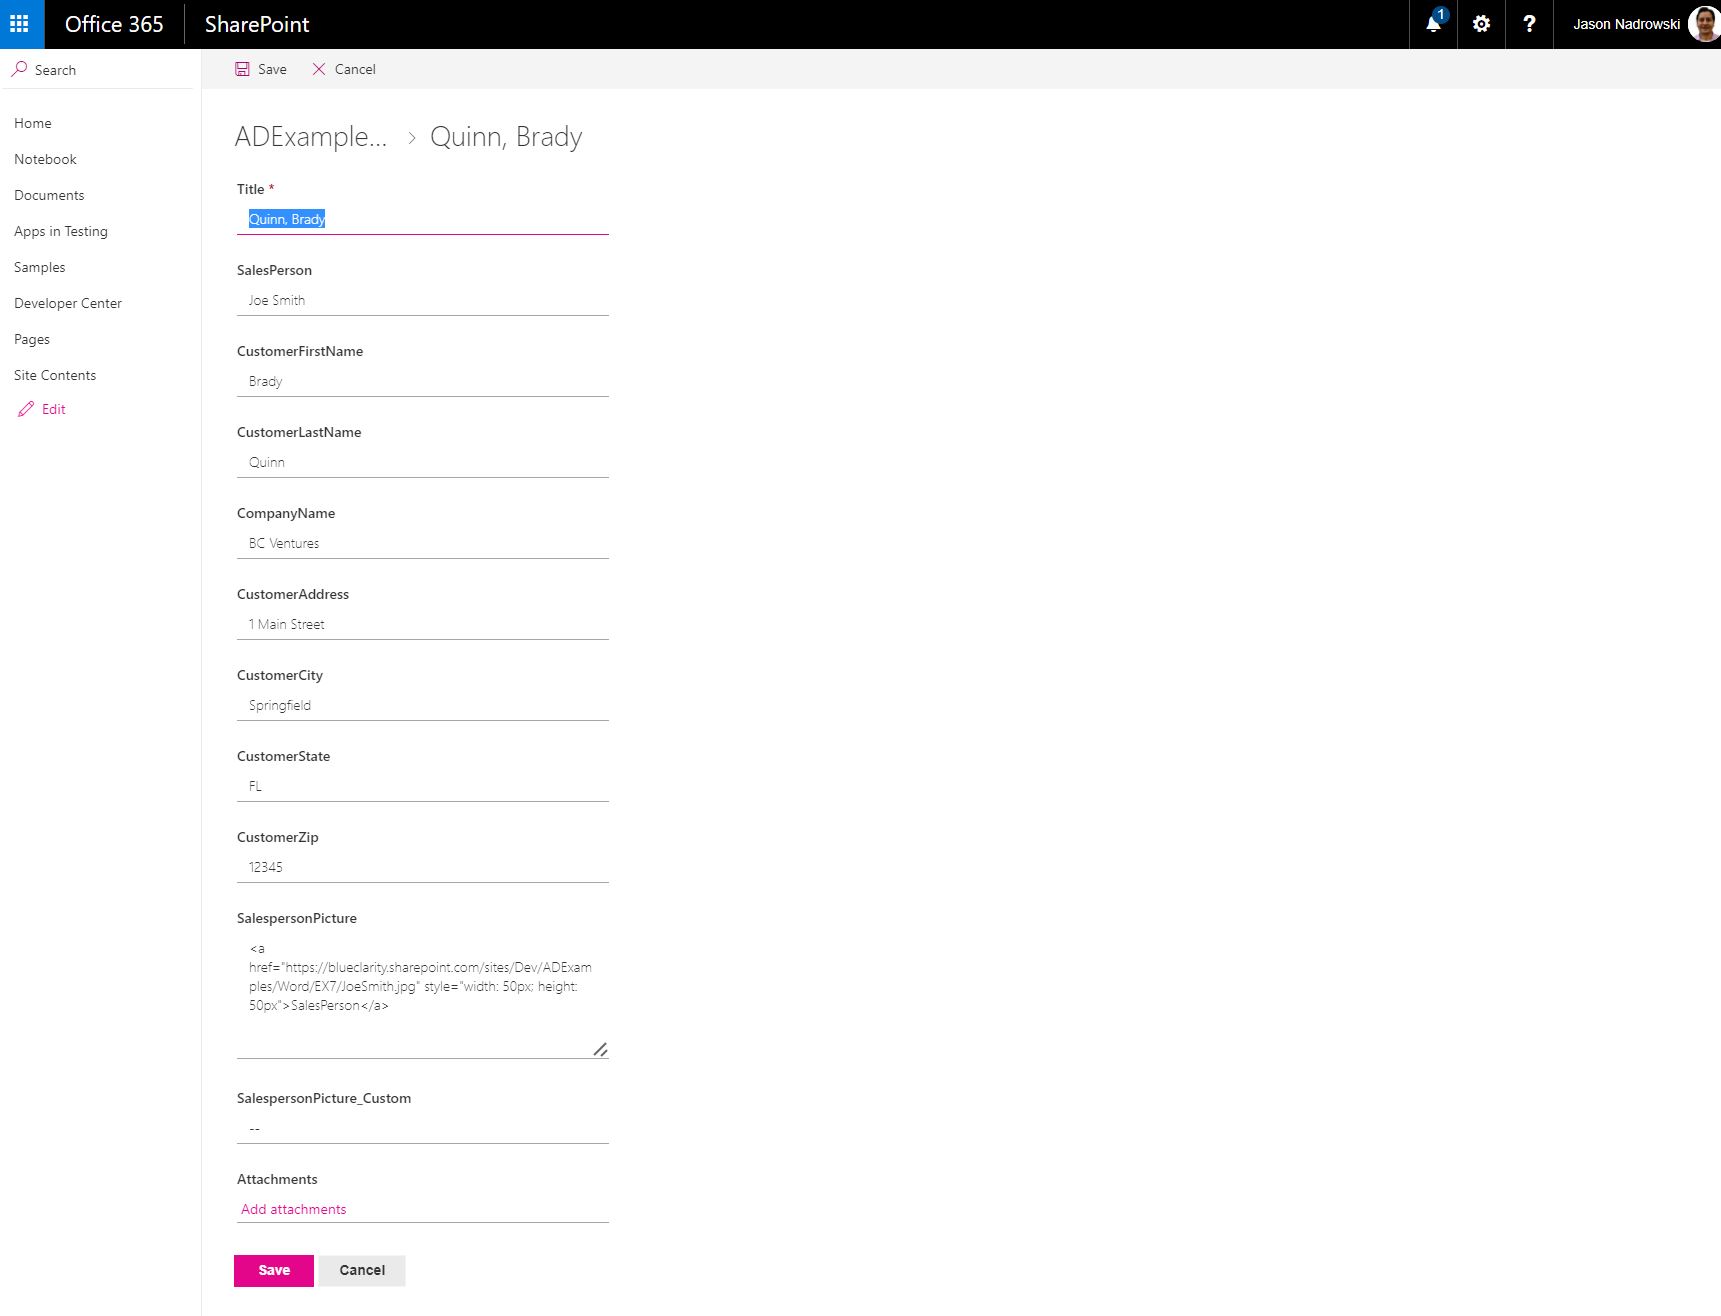
Figure 19: SharePoint List Item created from a Microsoft Form
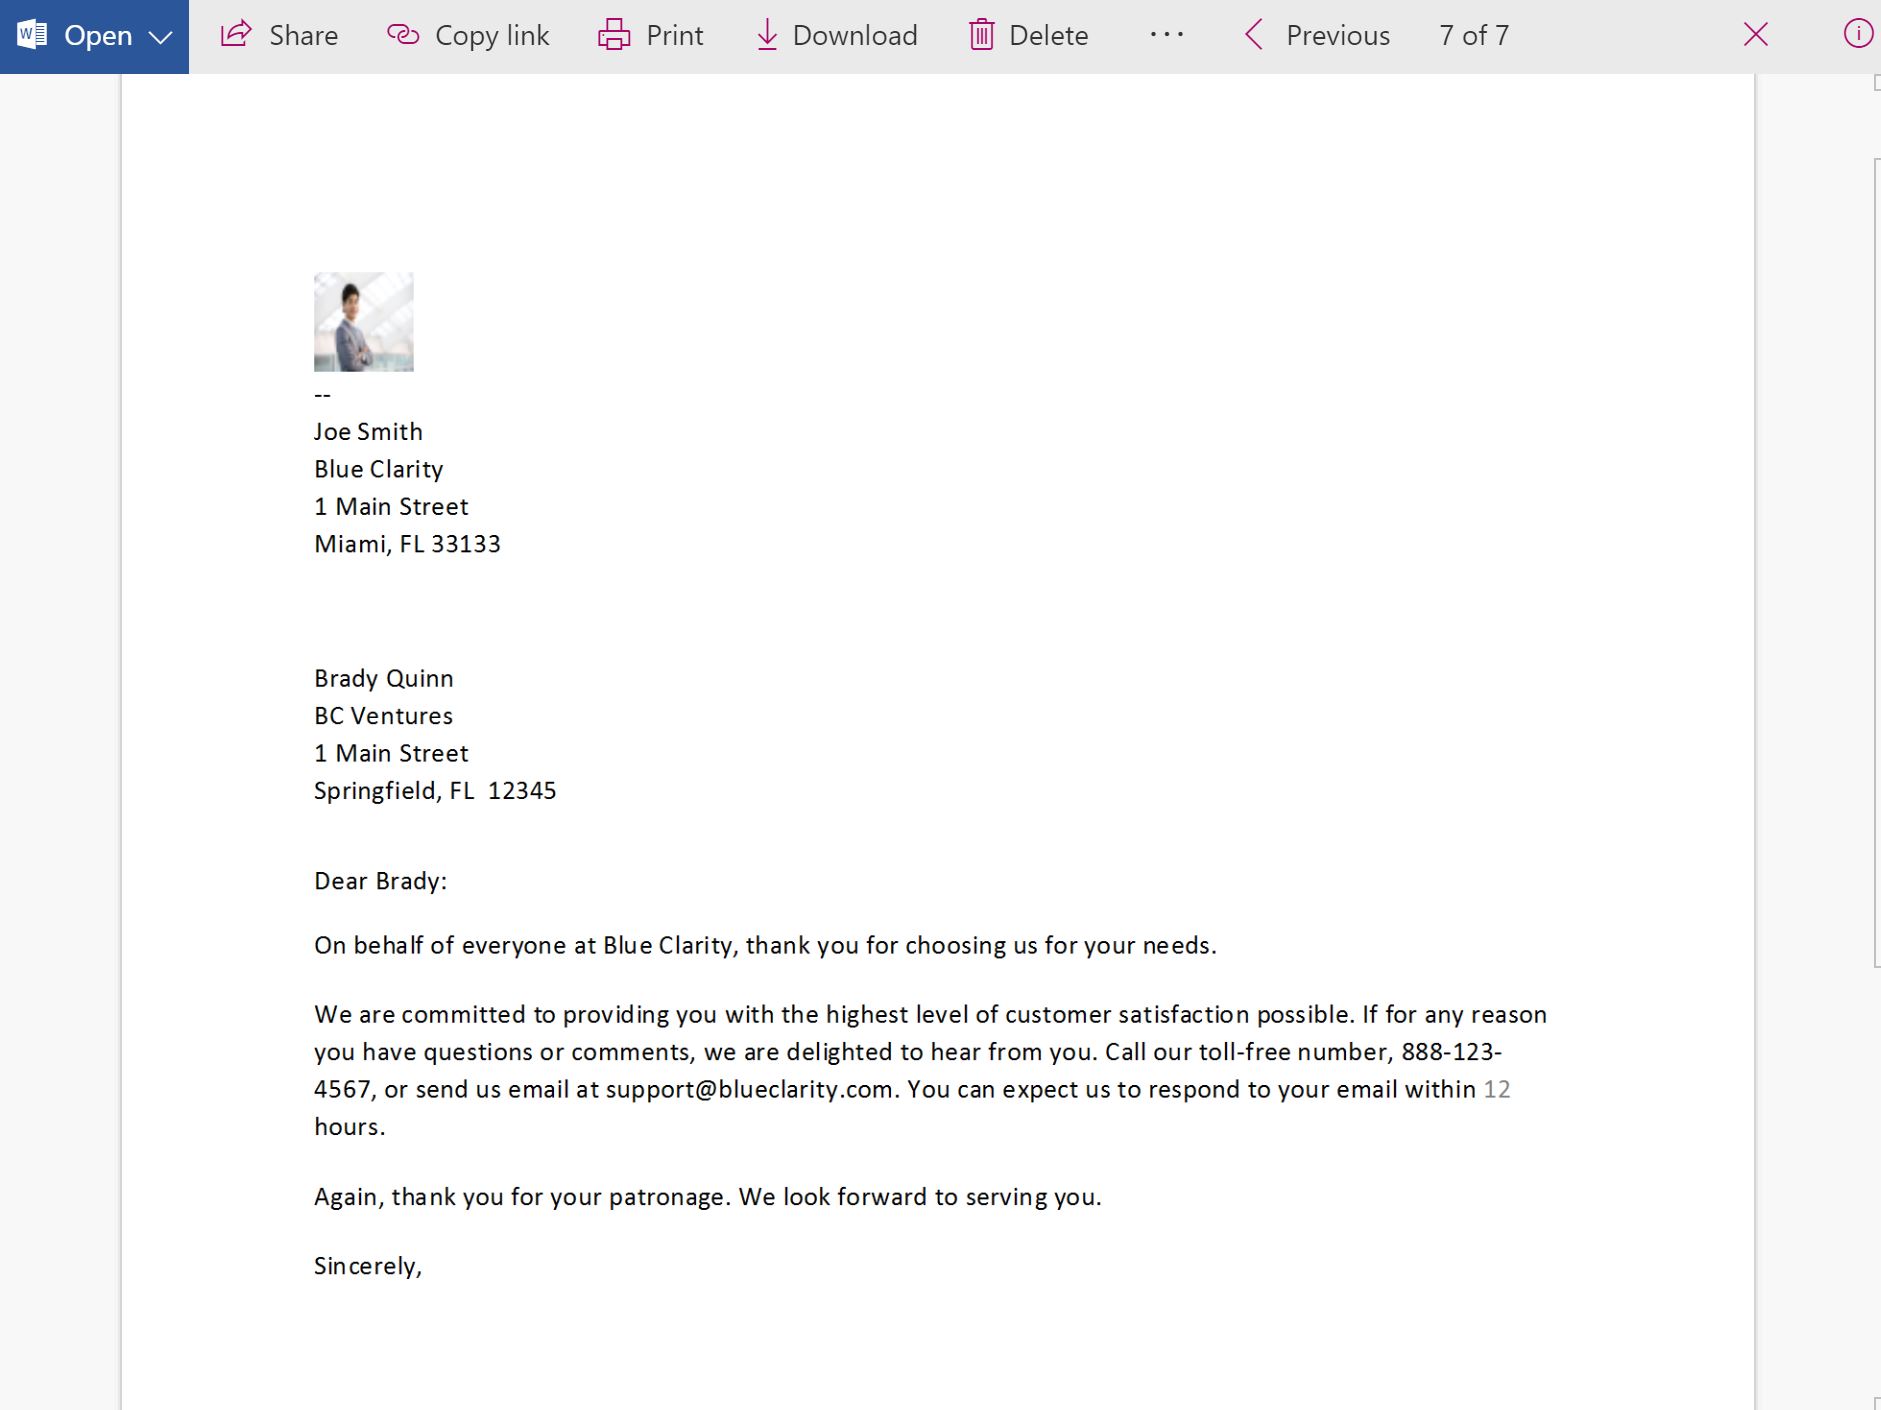
Figure 20: Agile Document Output