Help / Examples / Basics (Word) / Find and Insert
Summary
This article talks about Agile Documents Find and Insert functionality and builds on what we learned in Word Basics - Start Here and Word Basics - Templates. That is why this article starts with Example 7. If you are completely new to Agile Documents, you should start with Example 1. After that, you can generally skip around as needed.
Find and Insert is just what it sounds like. In fact, it parallels the Find and Replace functionality in Microsoft Word. In Microsoft Word, Find and Replace allows the user to specify something to look for and then something to replace it with. Agile Document’s Find and Insert allows the user to specify a series of key-value pairs. The key is what to look for and the value is what to insert immediately above it. In Agile Documents, the key must match a field (Mail Merge Field in Microsoft Word).
Please note that the examples described here are easily installed onto your SharePoint site. That installation procedure is described in Installing Examples.
Example 7: Dear Find and Insert
We are going to convert the Microsoft Word template Introductory letter to new client to an Agile Document. The template is downloadable from Microsoft (Figure 1).
The template has several content controls which are used to fill in the blank as a means to customize the letter. In our case, we will remove the various content controls and replace them with Word mail merge fields. We will also customize the letter a little to suit our needs. Our modifications are shown in Figure 2.
Similar to previous examples, ensure that the folder Word/EX7 exists within your document library. Then create a new Agile Document through SharePoint Explorer. Go back into SharePoint and rename it EX7.AgileDocument.xml. Also, modify the template as described above (Figure 2) and then save it in the EX7 folder.
This example requires the use of some images. If you don't haven any handy, copy the contact photos from the template used in Examples 5 and 6. Then place them in the EX7 folder.
We also need to create a SharePoint list item to drive the Find and Insert. Of course, we need to create a SharePoint list to house this list item. So, create a SharePoint list entitled ADExamples_Salespeople. Then create the columns as shown in Figure 3. Next, create a list item with the values shown in Figure 4. Please note that you will have to update the two URLs to the sales person images so that blueclarity.sharepoint.com/sites/dev is changed to the appropriate value for your site.
Finally, edit the Agile Document as shown in Figure 5. In addition, make sure you set the Agile Document output type to DOCX. Save, build and then review Figure 6.
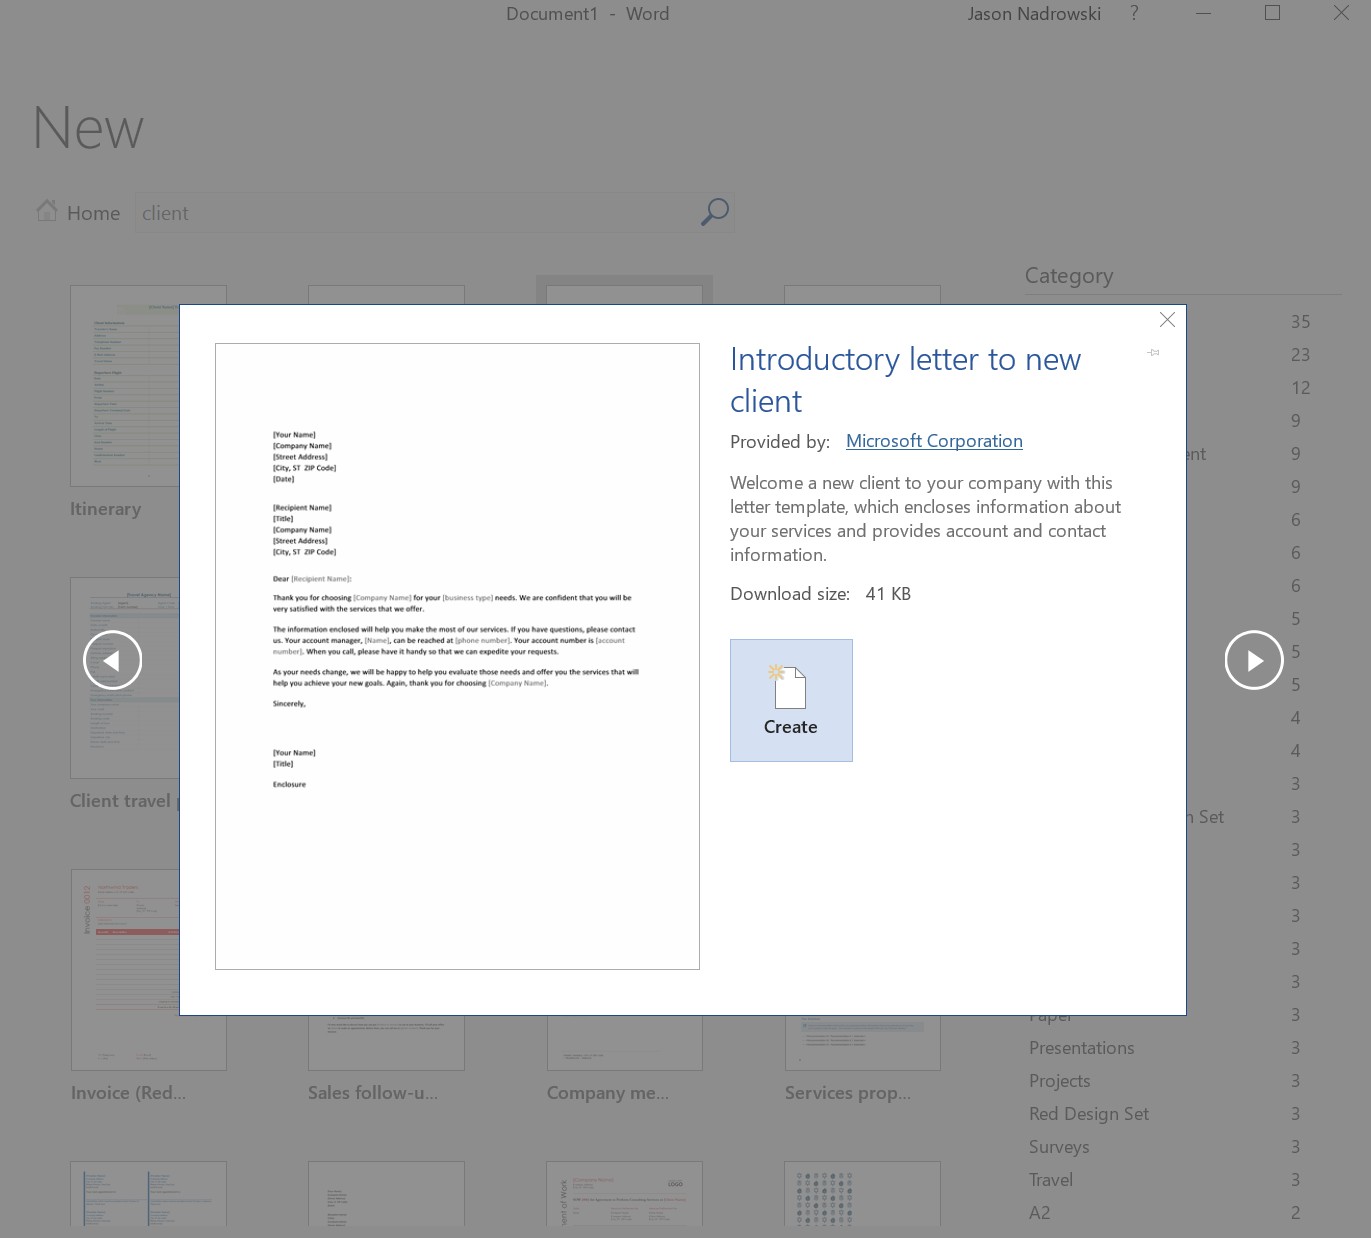
Figure 1: Client Letter Template
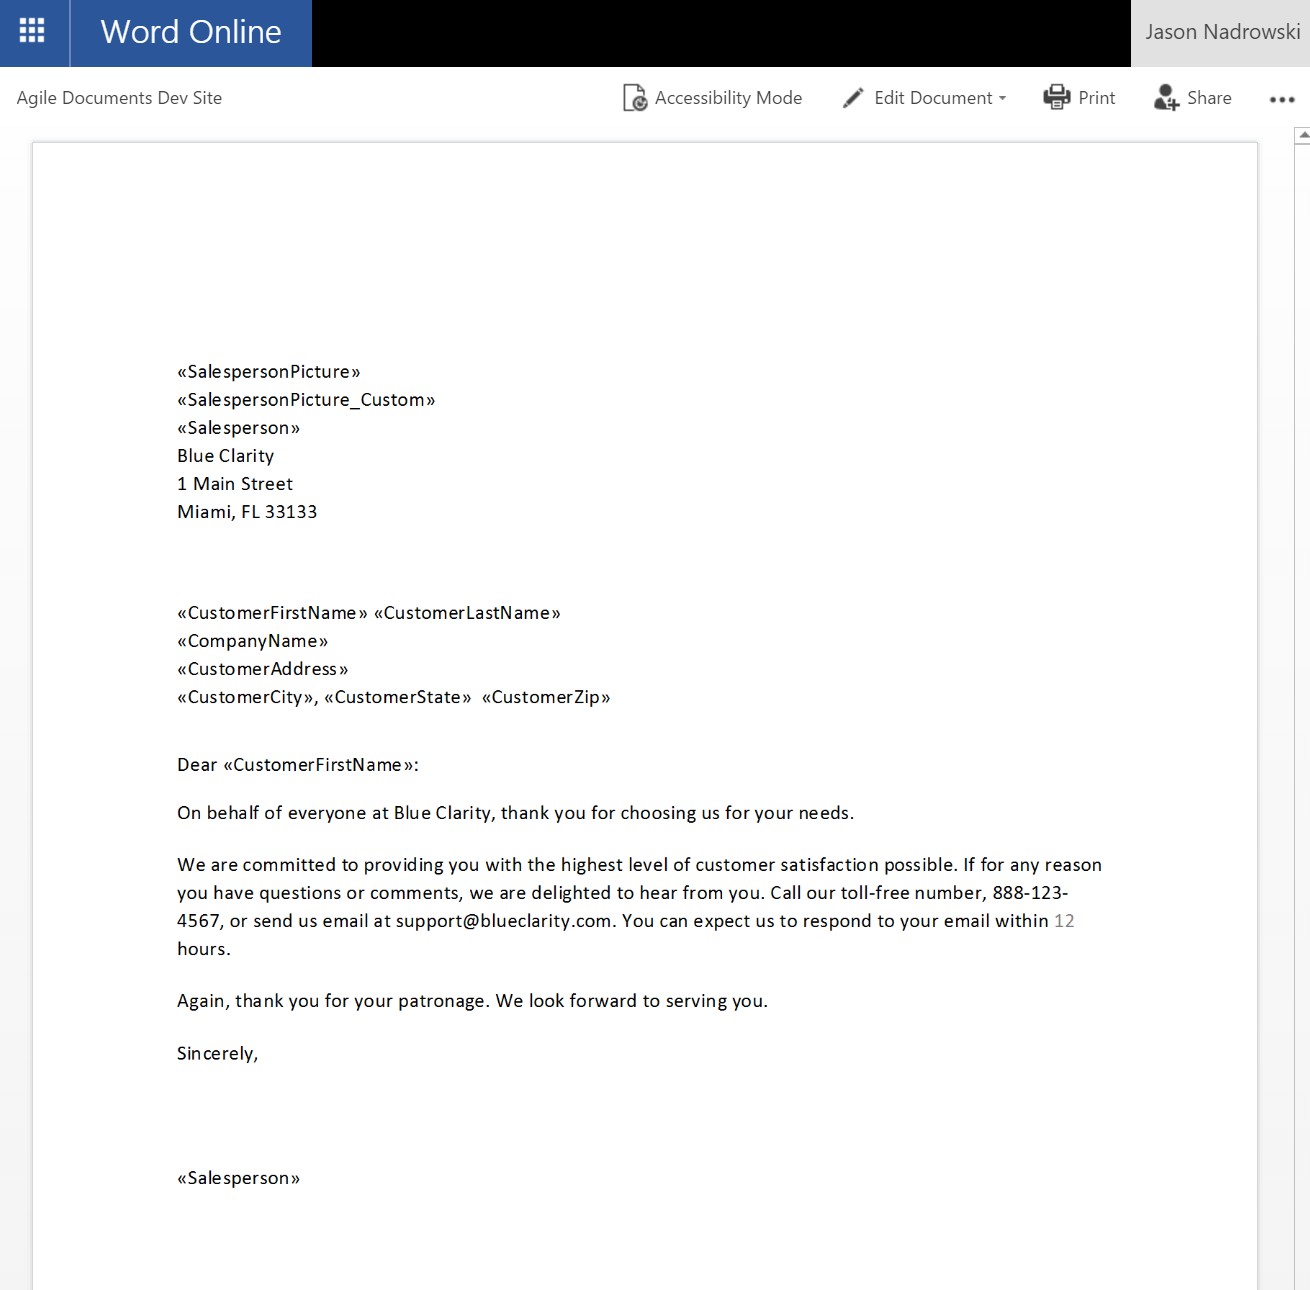
Figure 2: Customized Template
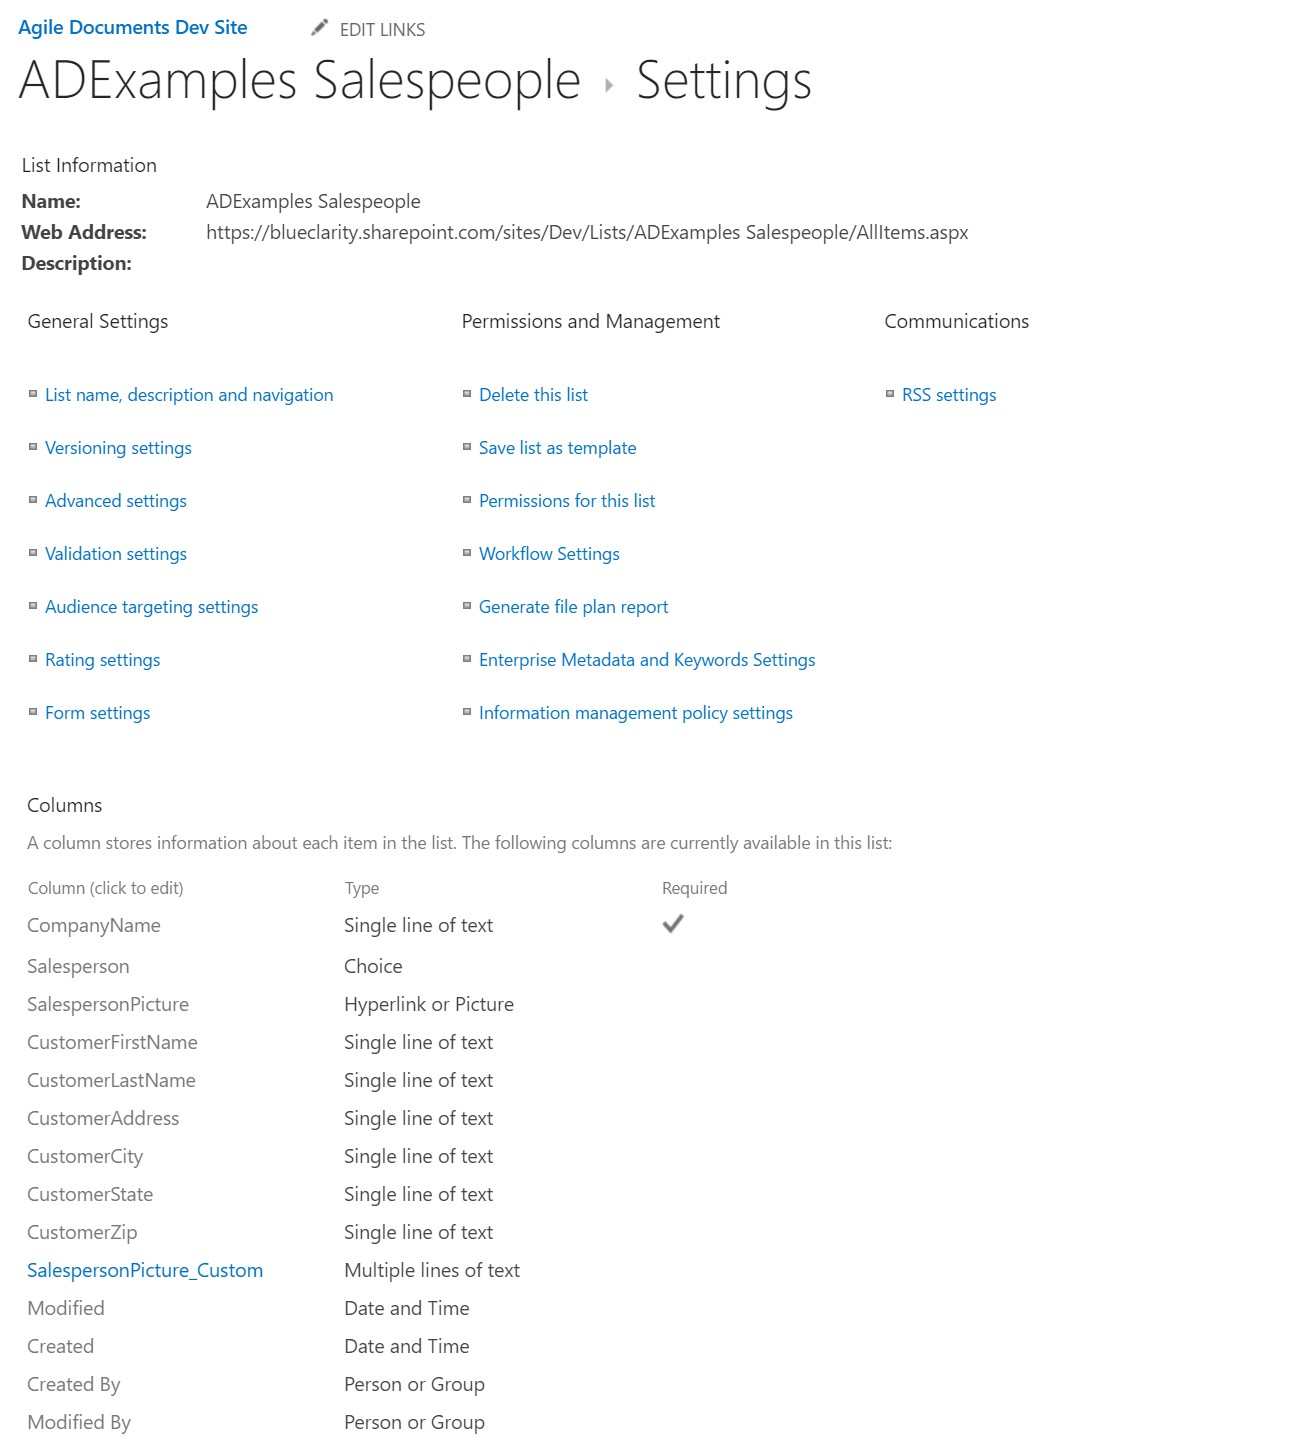
Figure 3: List Column Settings
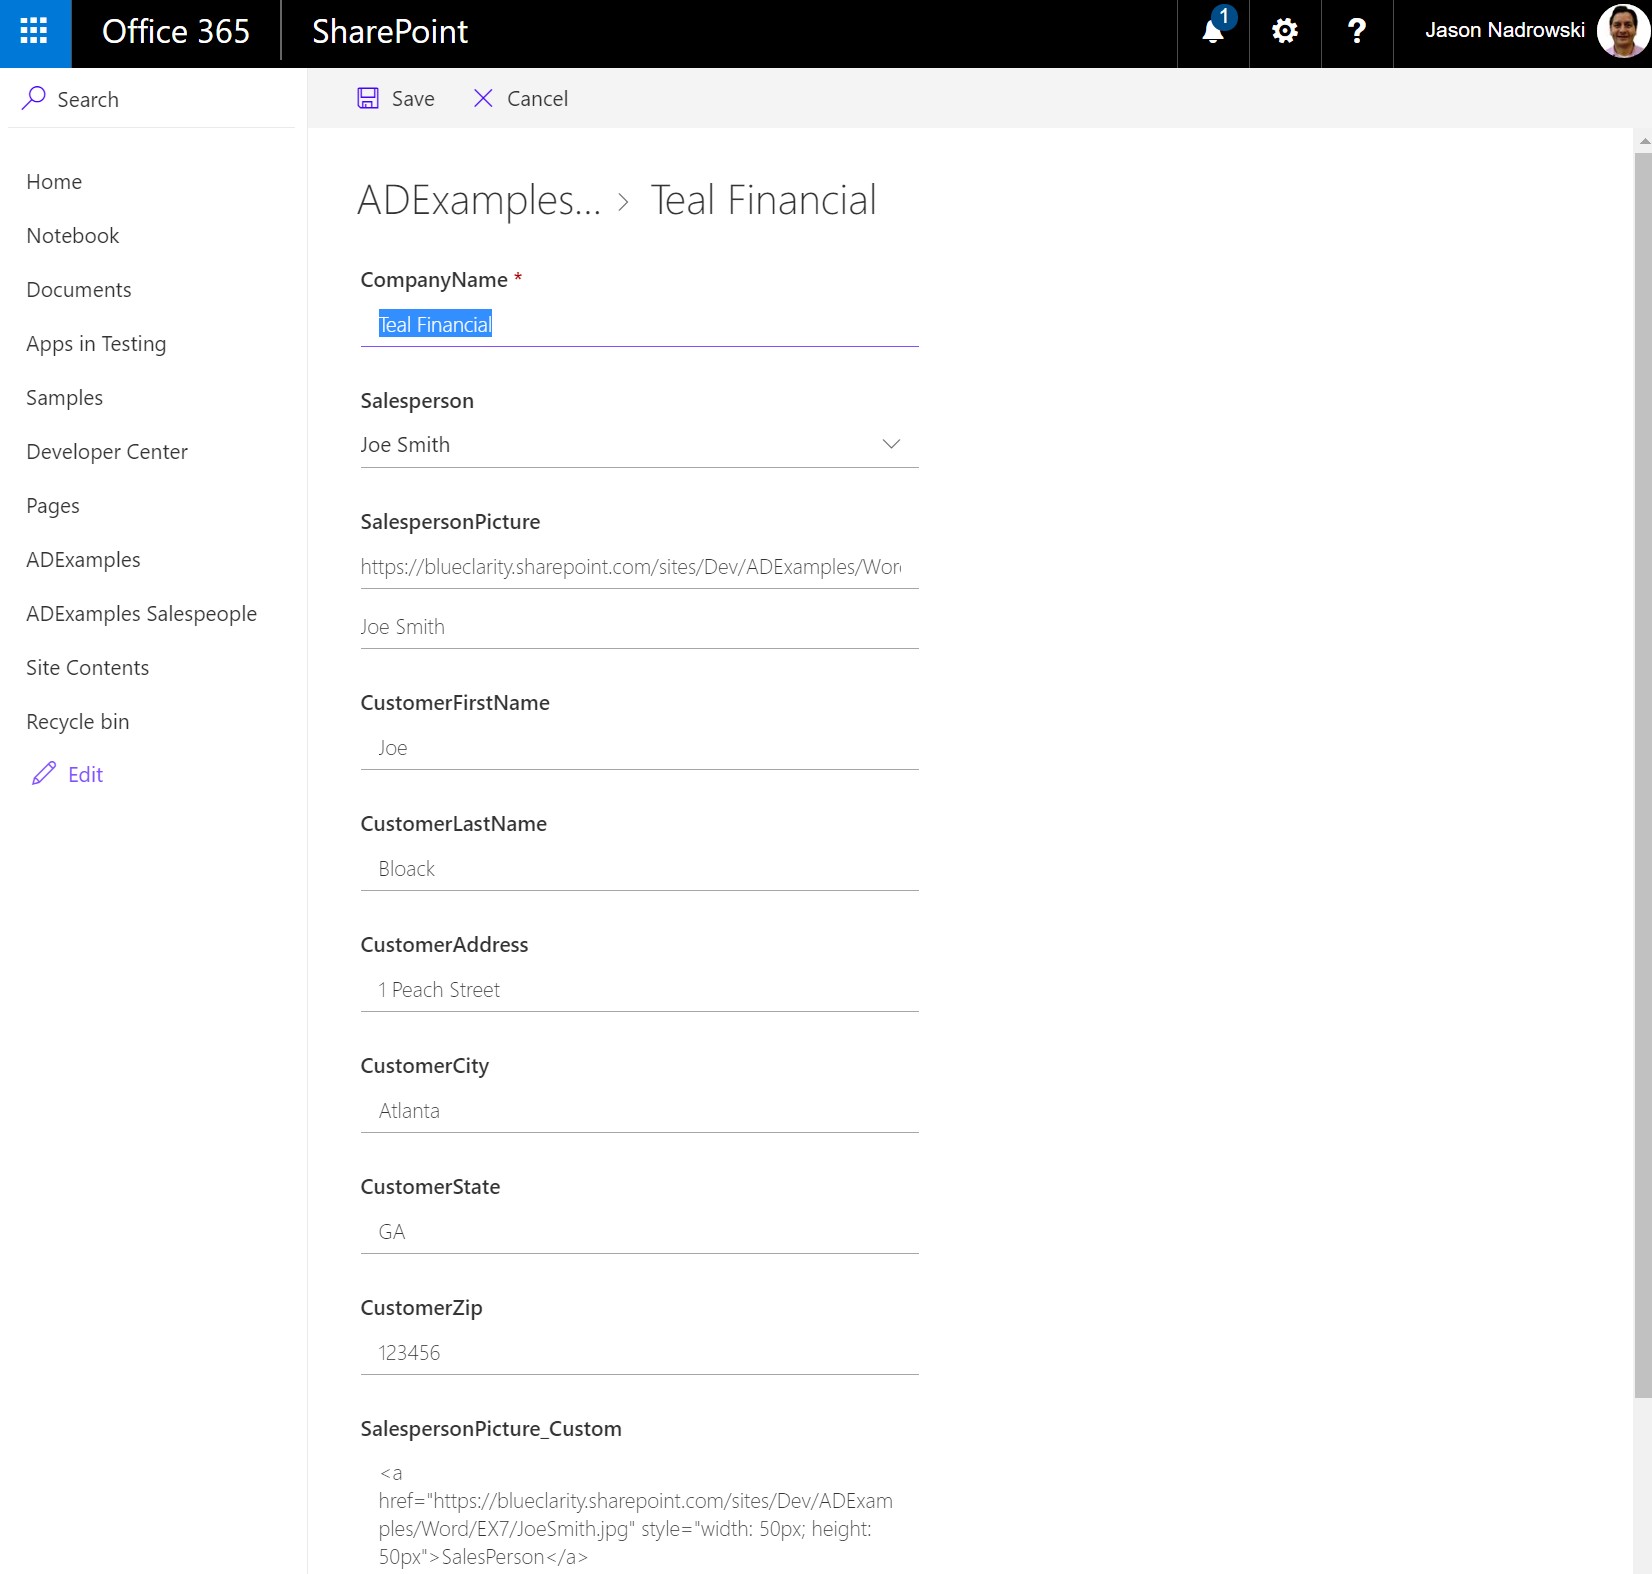
Figure 4: List Item
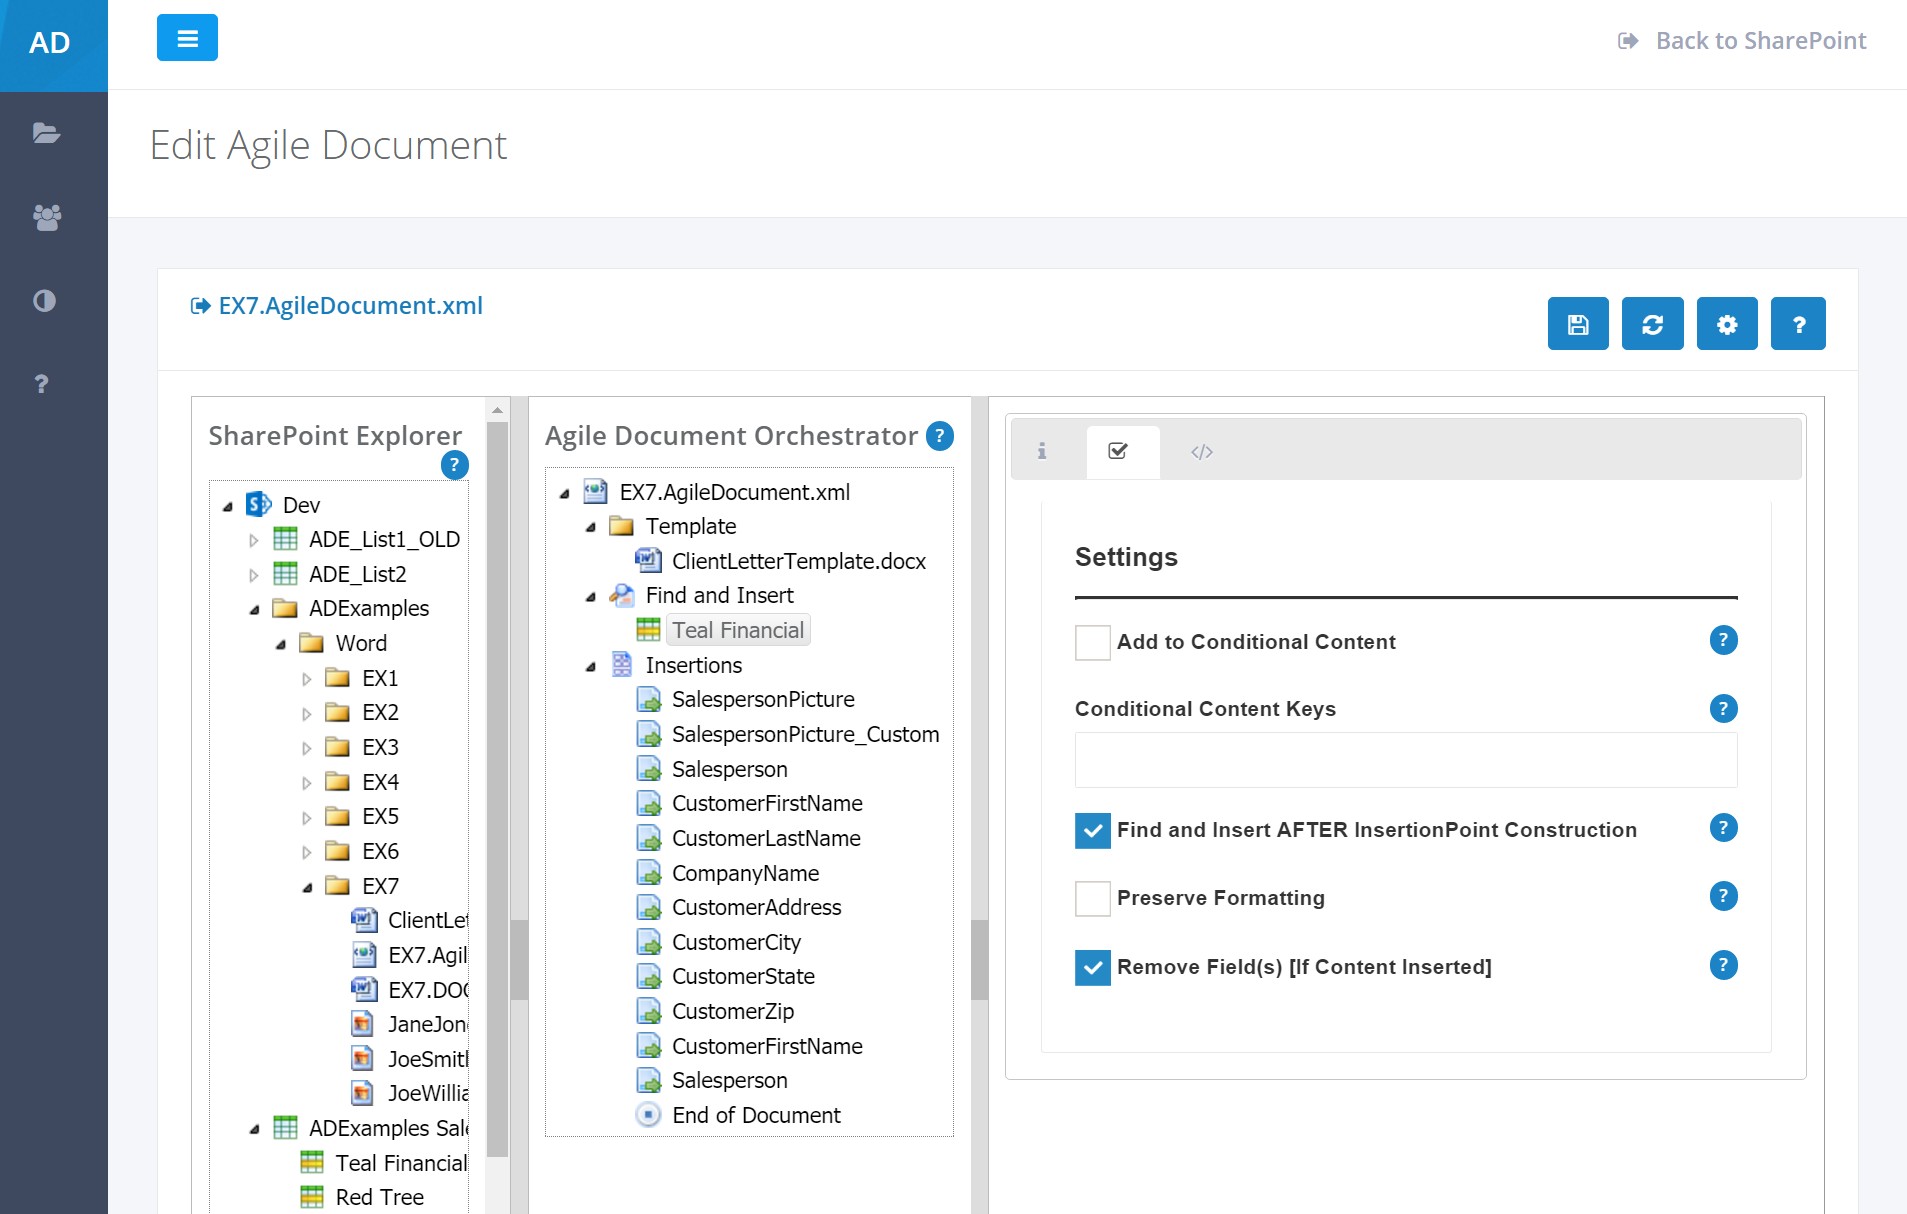
Figure 5: Editing the Agile Document
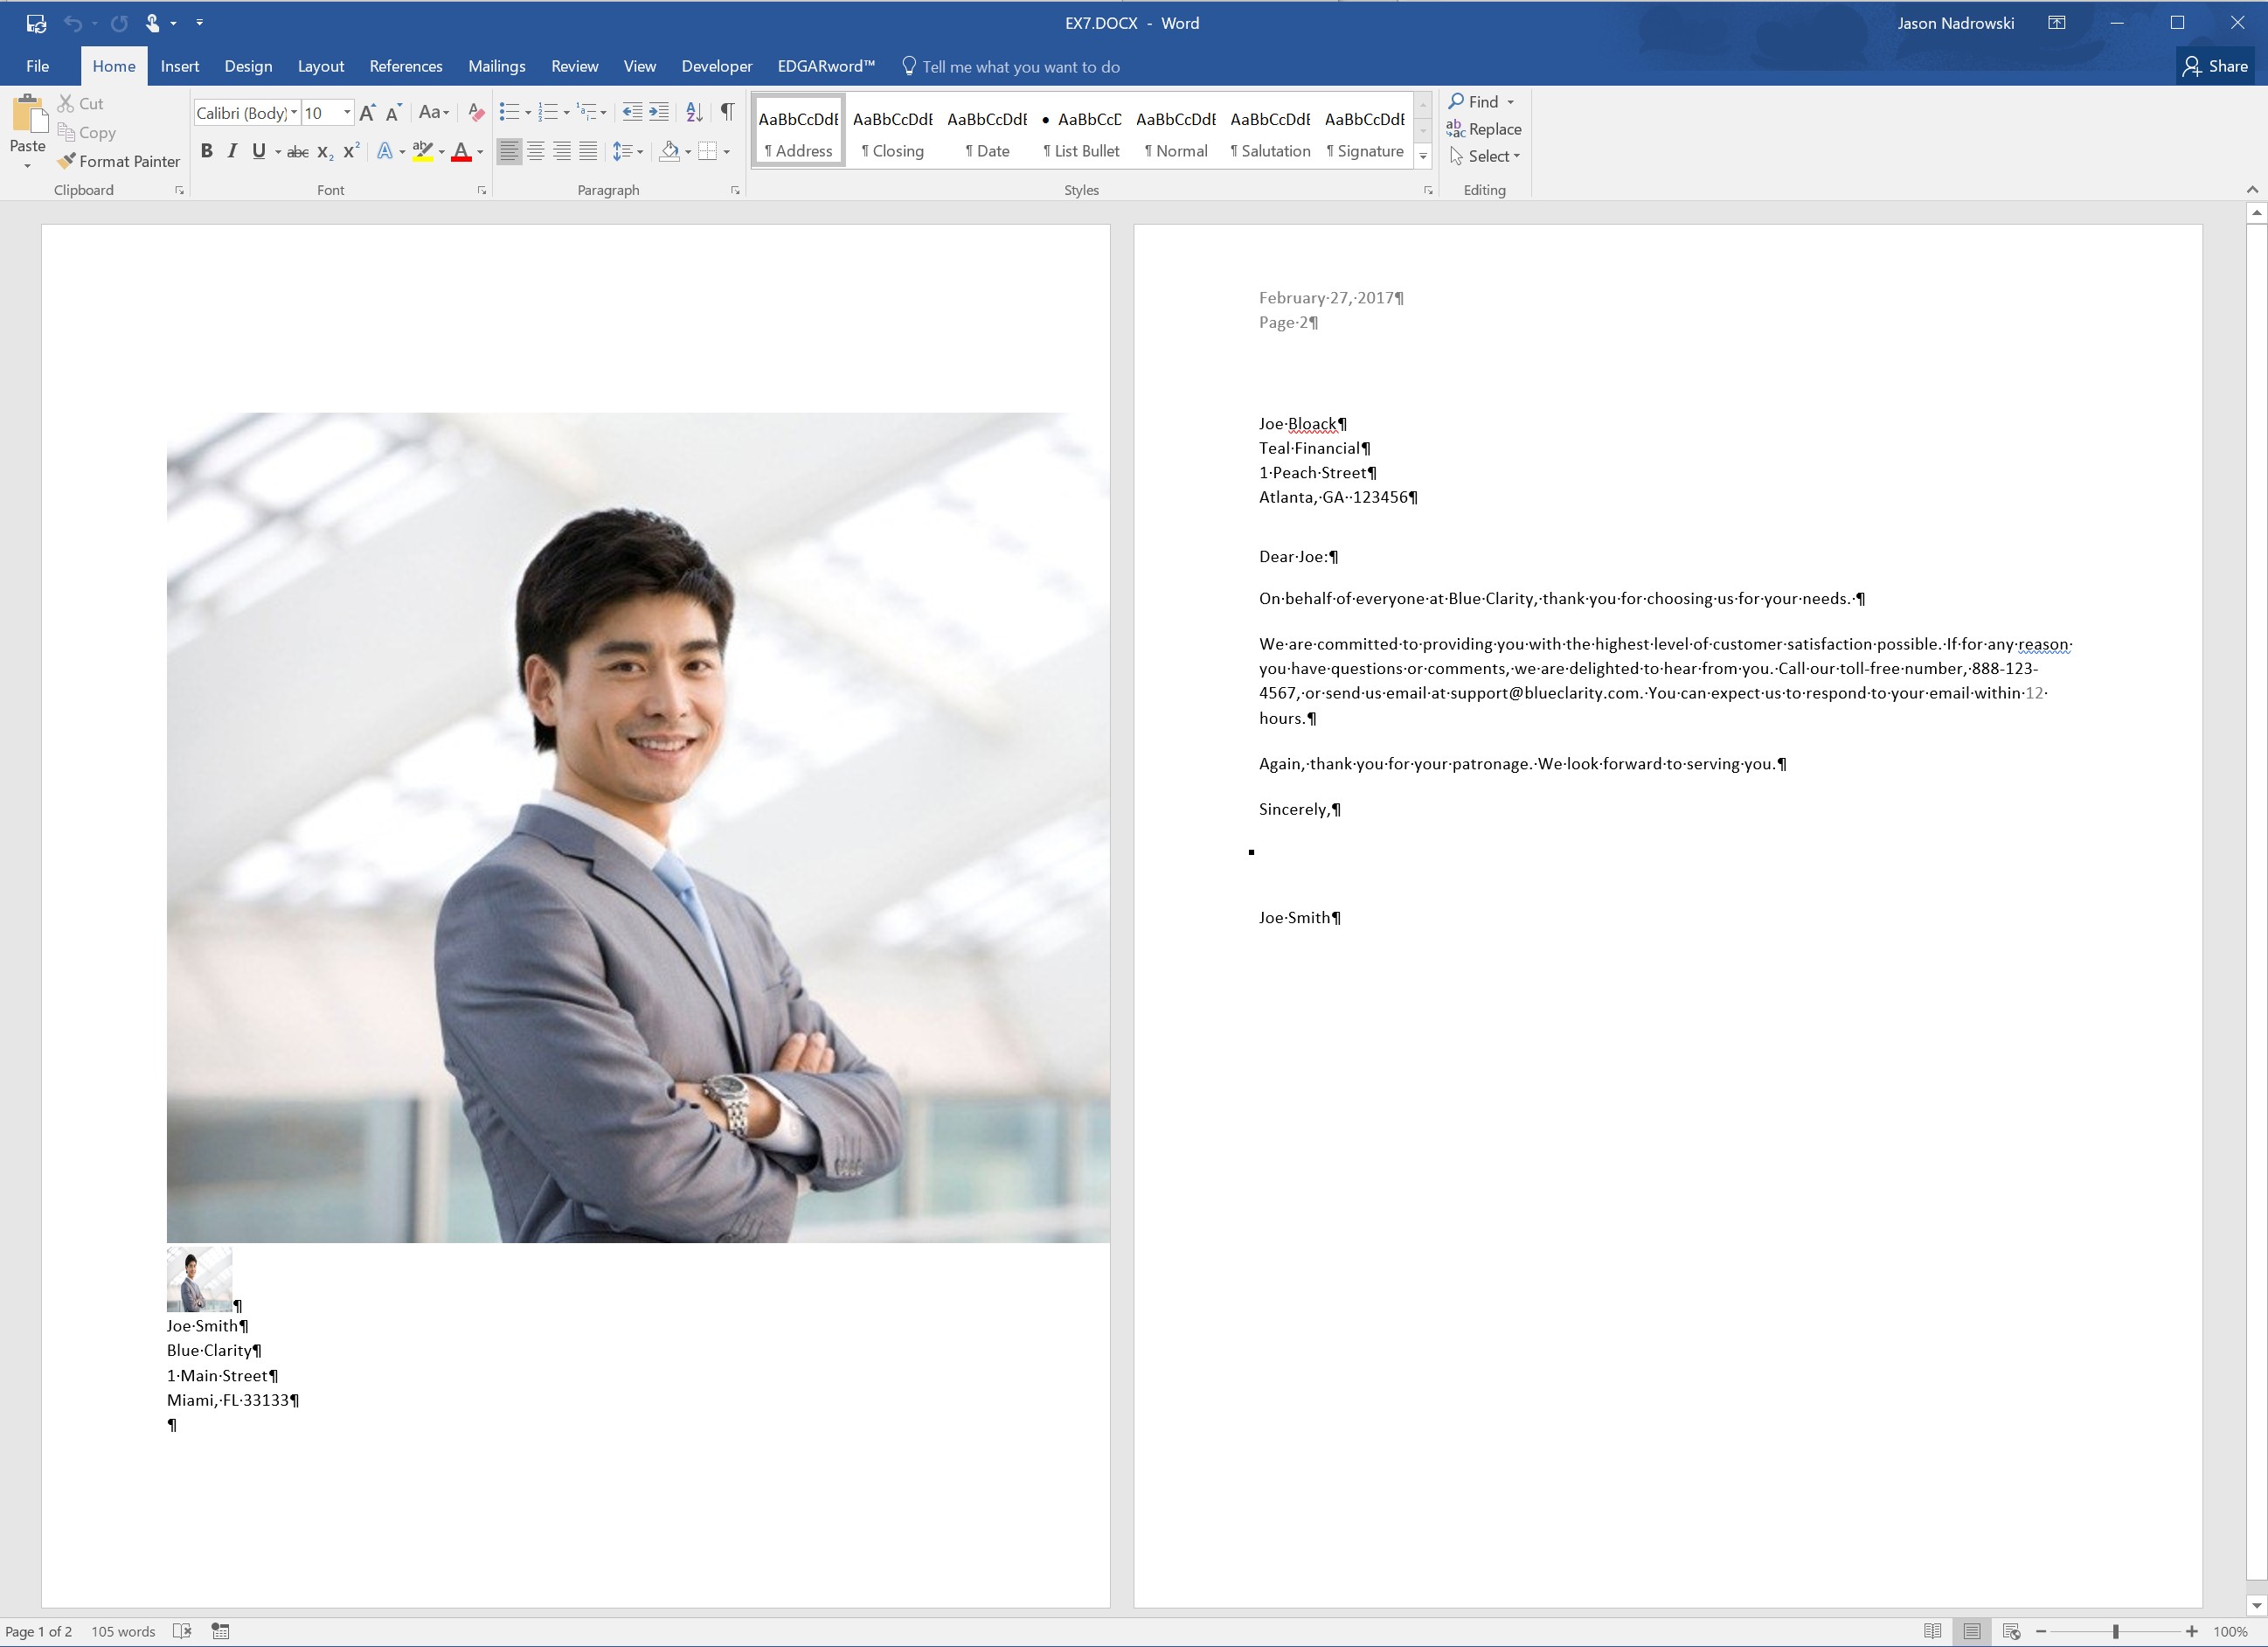
Figure 6: Output
As you compare the output to the template and list item everything is mostly straight-forward.
What is noteworthy are the images. If you provide an HTML A tag link to an image on your SharePoint site, Agile Documents will insert that image into the document. From Figure 3 and 4 you can see that SalespersonPicture is an Hyperlink colmn. When the image referenced by the SalespersonPicture column is placed in our Word document we see that it retains the original image size. In real life, its unfortunately a little too large for a client letter. However, its great for an example.
As a means to specify the inserted image's width and height, we need to leverage another column type that supports text. We chose to create a SalespersonPicture_Custom column as a Multiple lines of text type in our list. However, there are a number of types you could have chosen that support text. Look closely at the HTML A tag in the SalespersonPicture_Custom list item shown in Figure 4. It has a style attribute that specifies the width and height. These parameters are used to size the image in the document and that is why that inserted image is inserted as a different size than the first image.
As you think about how you can use Find and Insert, you may not realize that you can use find and insert in content you inserted into insertion points...and not just templates. This includes inserted content from Word files and Child Agile Documents that have mail merge fields. Its also possilbe that those child Agile Document's could have their own Find and Insert applied. In addition, Find and Insert for the root Agile Document could be applied to content from Child Agile Documents.
Example 8: Find and Insert with Acrobat (PDF) and Excel files
In addition to SharePoint list items, Find and Insert can also leverage Acrobat (PDF) and Excel files. What's more, you can control the order of when the find and insert item is acted upon. That order is defined by the order of the item placed within the find and insert grouping as well as weather the find insert is completed before or after content is inserted into insertion points.
For simplicity, lets use the template we created in Example 7 (Figure 2 above). However, instead of using a SharePoint list item let's use a PDF form and an Excel file.
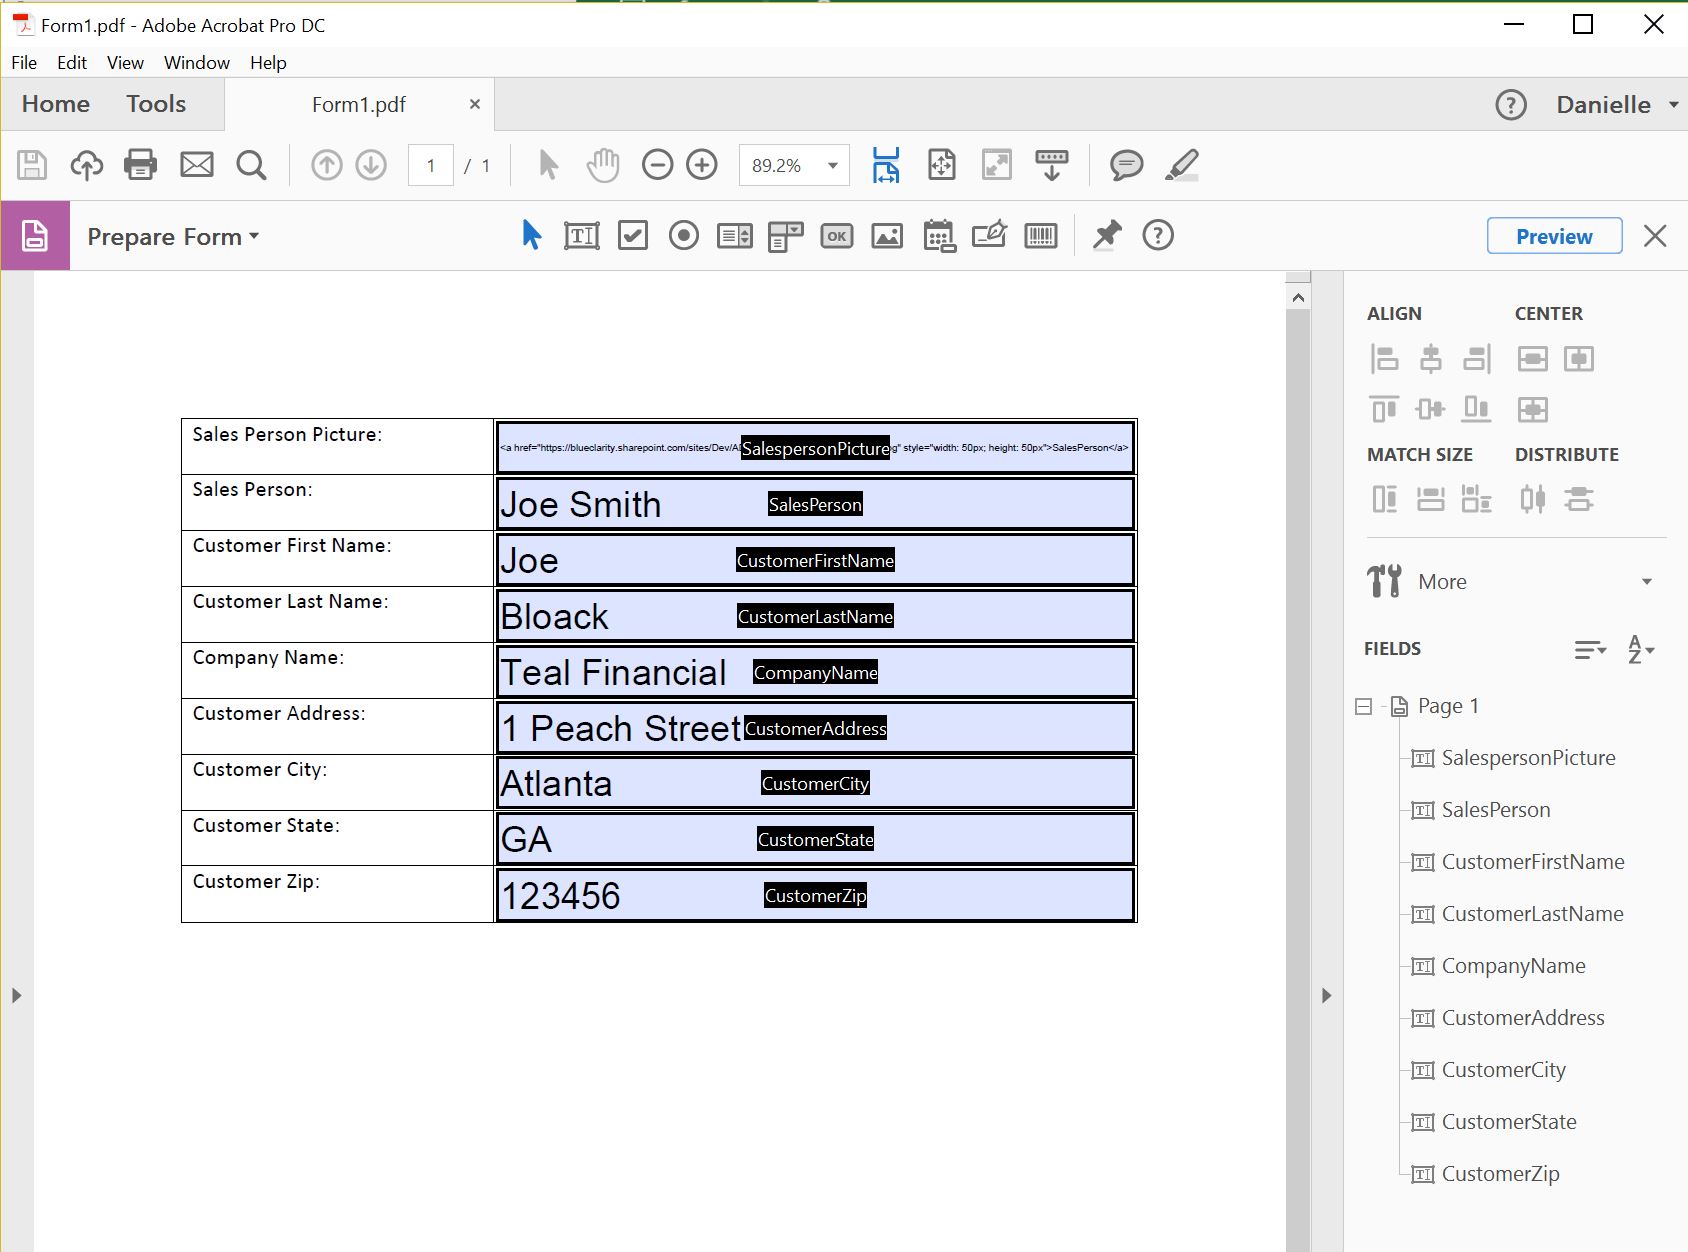
In case you were unaware, PDF forms have a fill in the blank text box. You can create these forms in Acrobat Standard or Professional (the pay version) and fill them out in the Acrobat Reader (the free version). These Acrobat Forms are designed with a text box that the user is to type in a response. Those textboxes are typically named with a unique identifer. The Acrobat Form shown in Figure 7 is in the Acrobat Designer view and shows both the name and value for the text box. In Acrobat Reader the name of the text box is hidden from you. In Agile Documents, when the Adobe Form text box name is matched with the Word Mail Merge field name, the text box's value is inserted into the document. Create a similar file as shown in Figure 7. NOTE: The URL provided in the Adobe Form will need to be changed to one that points to your SharePoint site.
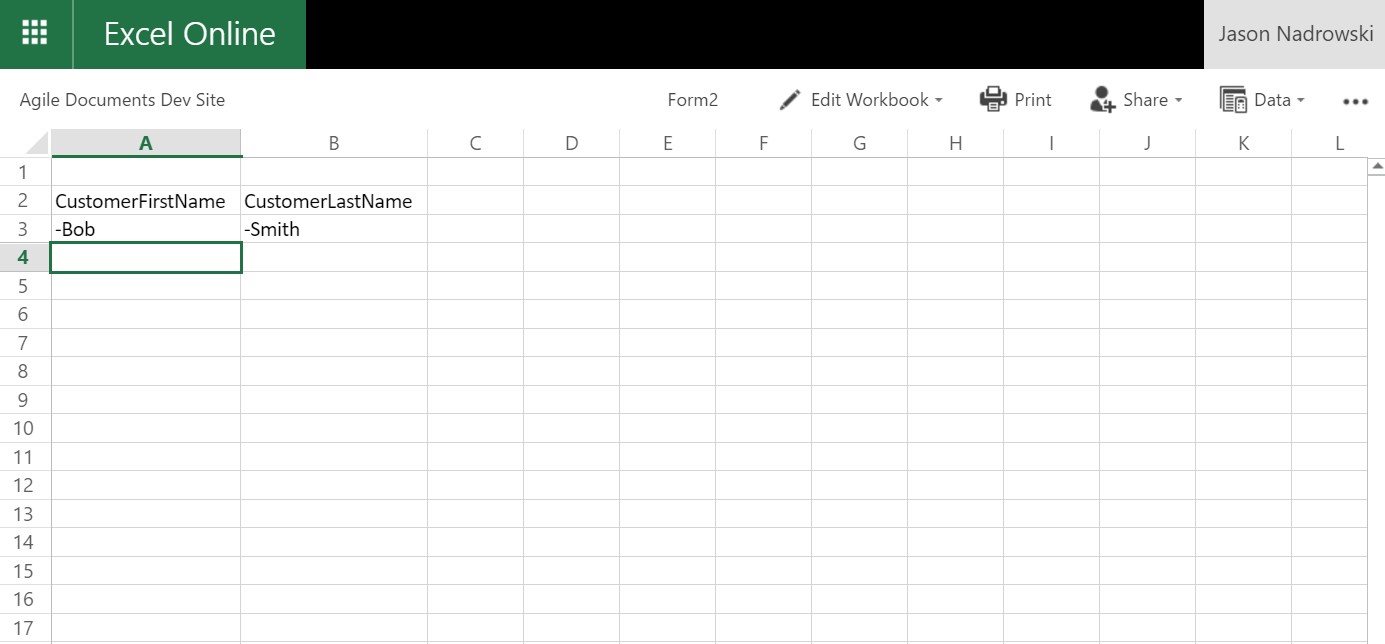
In Excel, Agile Document's relies on a special column structure to perform the insertion. As you can see in Figure 8, the header is defined in row 2 and their corresponding values are in row 3. Create a similar file as shown in Figure 8.
Just like the previous examples, ensure that the folder Word/EX8 exists within your document library. Then create a new Agile Document through SharePoint Explorer. Go back into SharePoint and rename it EX8.AgileDocument.xml. Copy the Acrobat and Excel files you created above (Figures 7 and 8) to the EX8 folder. Edit the Agile Document so that it looks like Figure 9. Also, ensure you've specified a DOCX output for the Agile Document. Save, build and then review Figure 10.
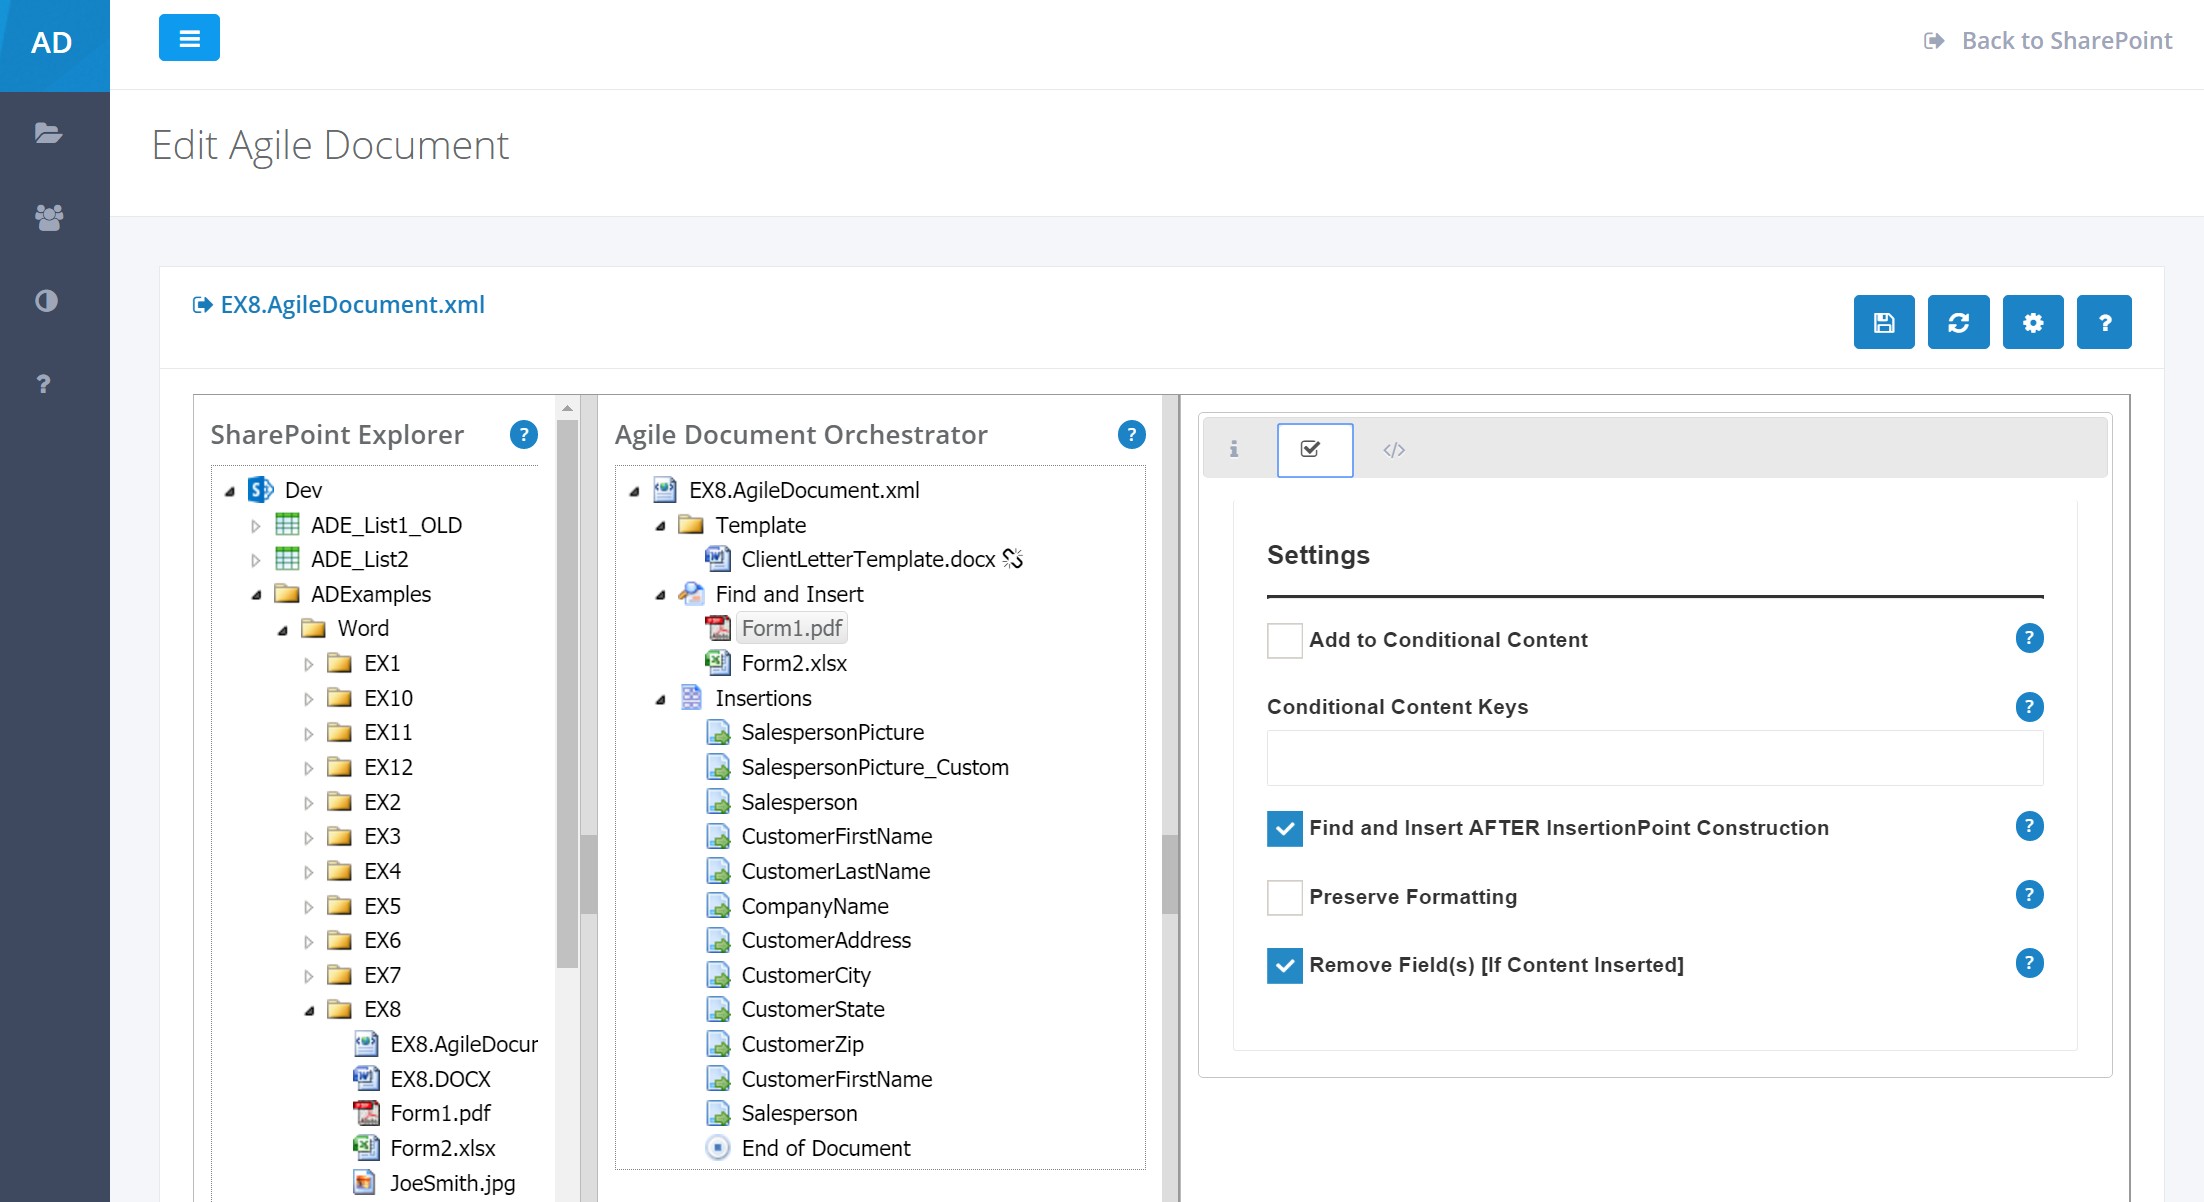
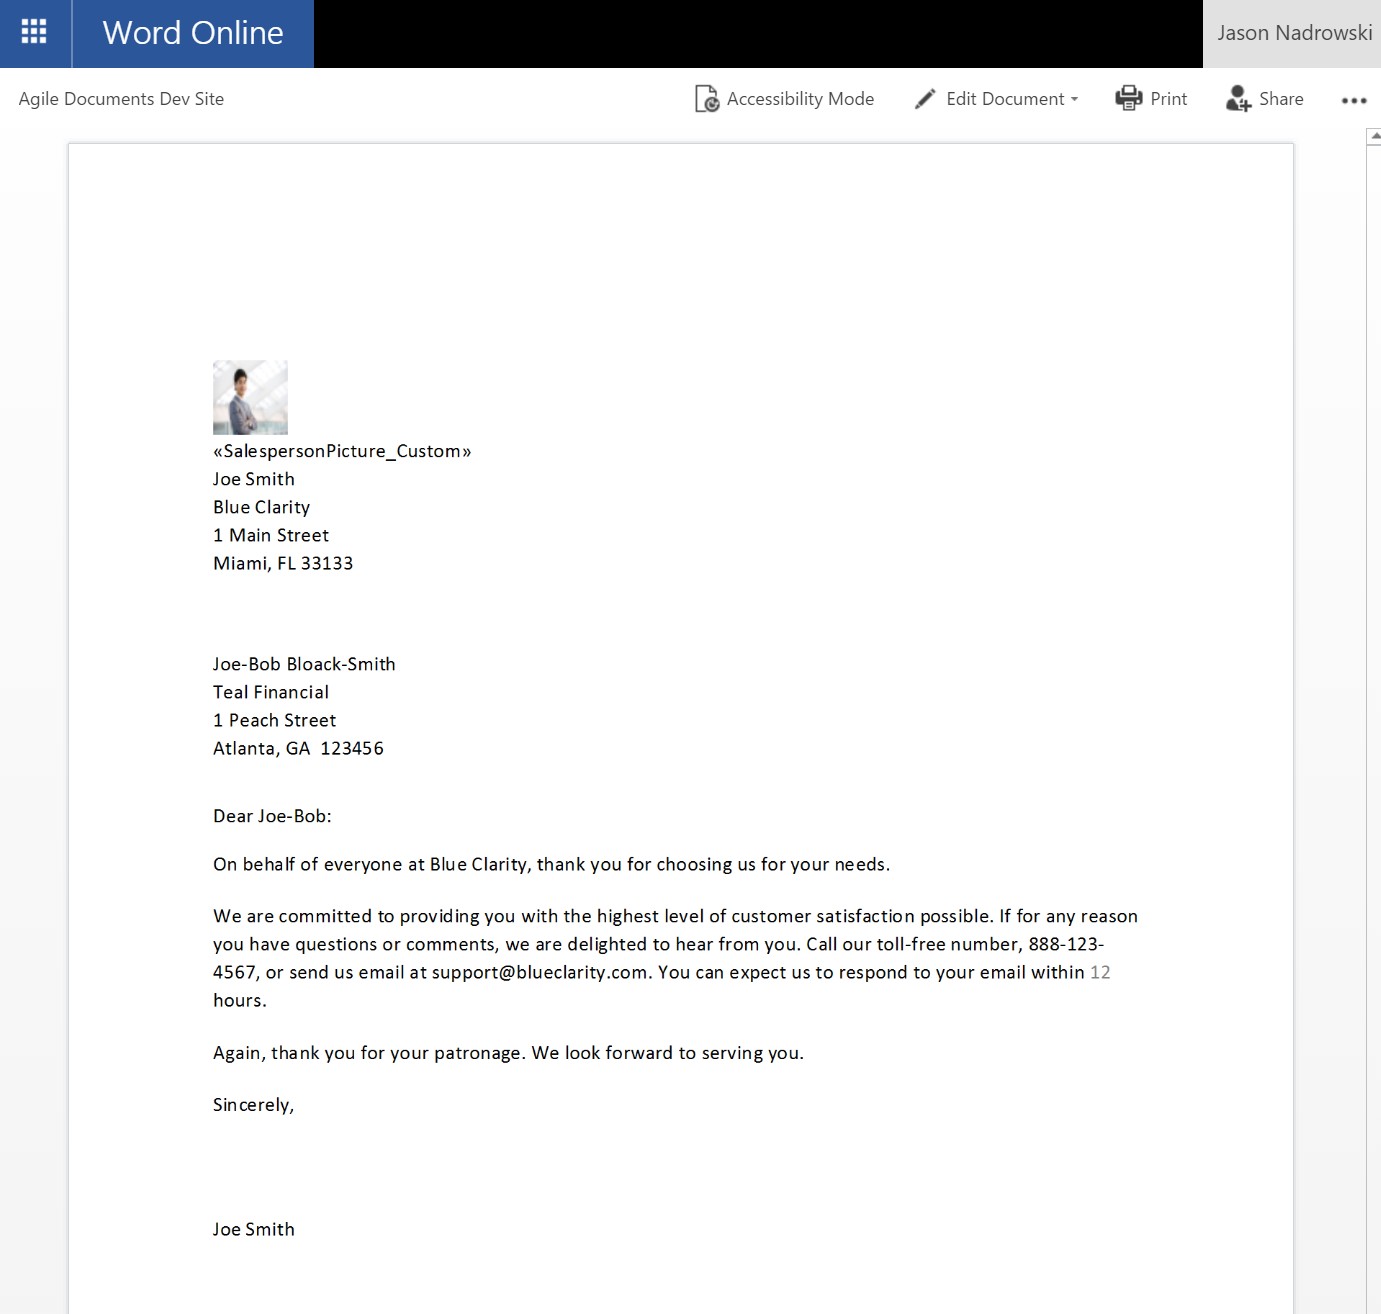
When you review the output, two things stand out. One, SalespersonPicture_Custom is not filled in. Two, CustomerFirstName and CustomerLastName are a combination of values from the PDF and Excel document.
The reason that SalespersonPicture_Custom is not populated is because neither of the Find and Insert items have a matching key for that Word Mail Merge field. As such, neither a value is inserted in front of the Mail Merge Field nor was the Mail Merge Field removed. Recall that Mail Merge fields can be removed from configuration settings in the Agile Document or the Find and Insert Item. Since Remove Field(s) [Always] wasn't selected the field remains. It is usually a good idea to not enable that option so you can see where content isn't inserted into a field. Don't forget that Remove Field(s) [If Content Inserted] can be configured globally at the root Agile Document level or more specifically at the Find and Insert item (Figure 9).
Since CustomerFirstName and CustomerLastName appear both in PDF and Excel documents, you probably expected the result to be combination of the two. The reason that the values in the PDF occur before the values in the Excel file is because of Form1.pdf and Form2.xlsx's placement as Find and Insert items. More specifically, we configured the Agile Document to place Form1.pdf first and then Form2.xlsx second. Of course, if we wished the reverse order we could reverse their placement in the Agile Document.
Although we didn't use it Find and Insert AFTER InsertionPoint Construction also controls the order of execution for Find and Insert items (Figure 9). What this defines is wether you wish a Find and Insert after or before all the content was inserted into the insertion points. This can be useful to insert one set of key-values for the template and another set of key-values for inserted content in cases where some of the keys may be the same but their values differ. For cases where you want to effect only the Mail Merge Fields in the template, you would uncheck Find and Insert AFTER InsertionPoint Construction for that Find and Insert Item. Conversely, when you want to effect the Mail Merge Fields in both the template and inserted content, you would check Find and Insert AFTER InsertionPoint Construction for that Find and Insert Item.
Example 9: Find and Insert for Agile Document properties
In the previous example, we have seen how Find and Insert can inject content into our document. Find and Insert can also be used to impact Agile Document properties. In this example, we focus on using Find and Insert to specify the output URL.
Please be aware that Find and Insert can also be used to specify Conditional Content Keys. An example detailing Find and Insert with Conditional Content Keys is shown in Example 12.
Please see the table in Find and Insert which details the various keys (ie Column name for a SharePoint list item) and how it is used. Simply add any of those reserved columns to a SharePoint list item and the Agile Document's properties will be augmented per the table descriptions.
Just like the previous examples, ensure that the folder Word/EX9 exists within your document library. Then create a new Agile Document through SharePoint Explorer. Go back into SharePoint and rename it EX9.AgileDocument.xml. Copy the client letter template we used in Example 8 above (Figures 8) to the EX9 folder. Add the SharePoint list item specified in Figure 11. Edit the Agile Document so that it looks like Figure 12. Also, ensure you've specified a DOCX output for the Agile Document. Save, build and then review Figures 13 and 14.
As expected, the output file is named FindInsertModified_Output2 and place in the same output folder. Keep in mind, that you can specify relative paths [that are relative to the output folder] or you may specify an absolute URL that may be place anywhere in your site collection you have access to.

Figure 11: List Item with AD_OutputFileUri Column
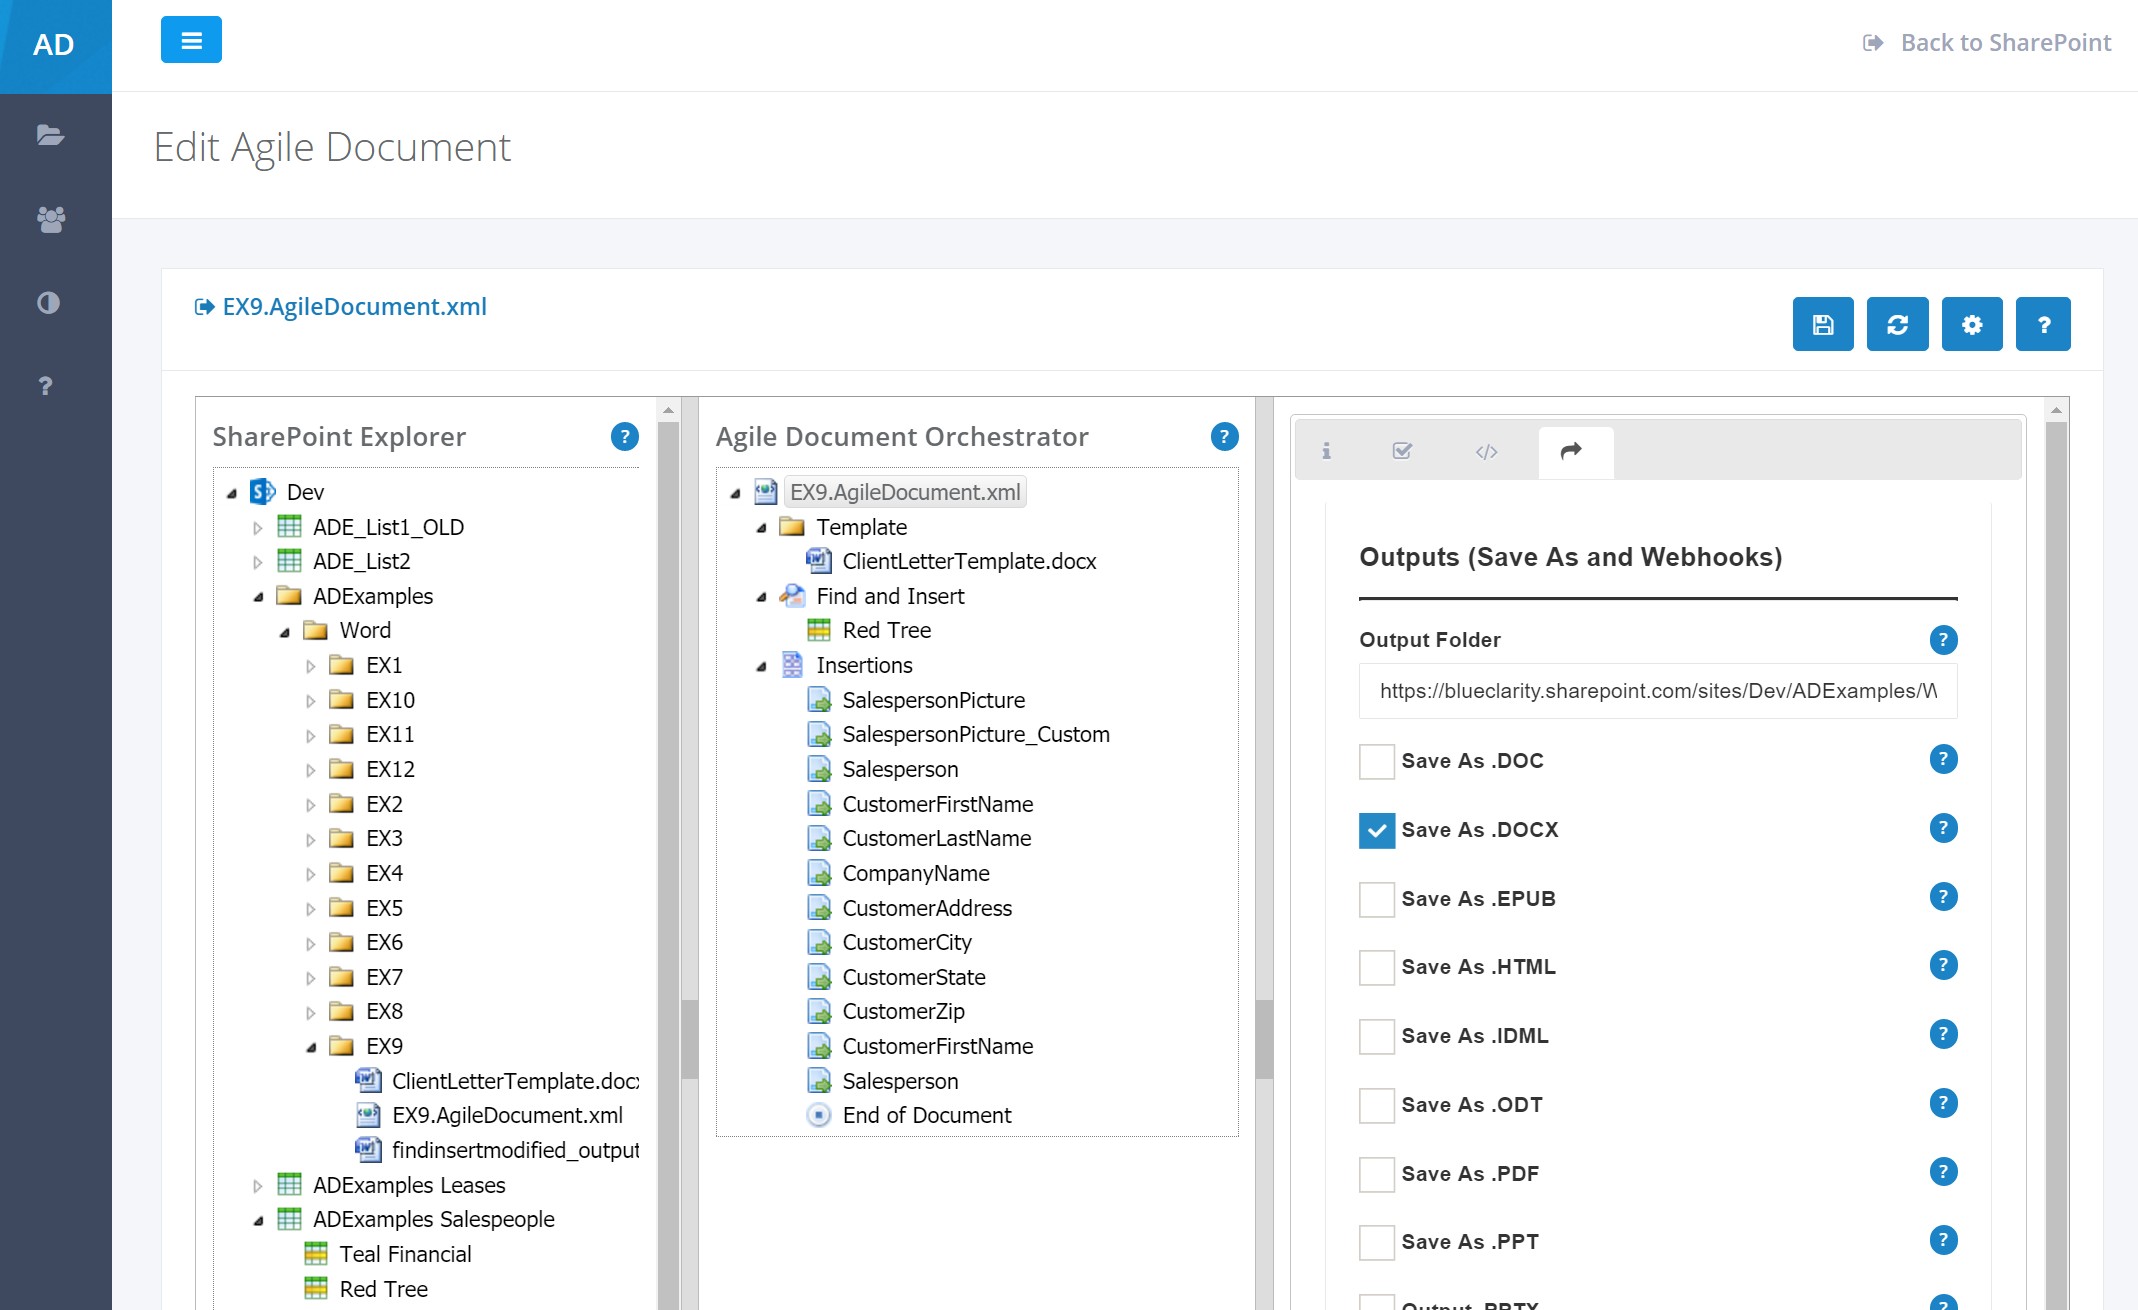
Figure 12: Agile Document Editor
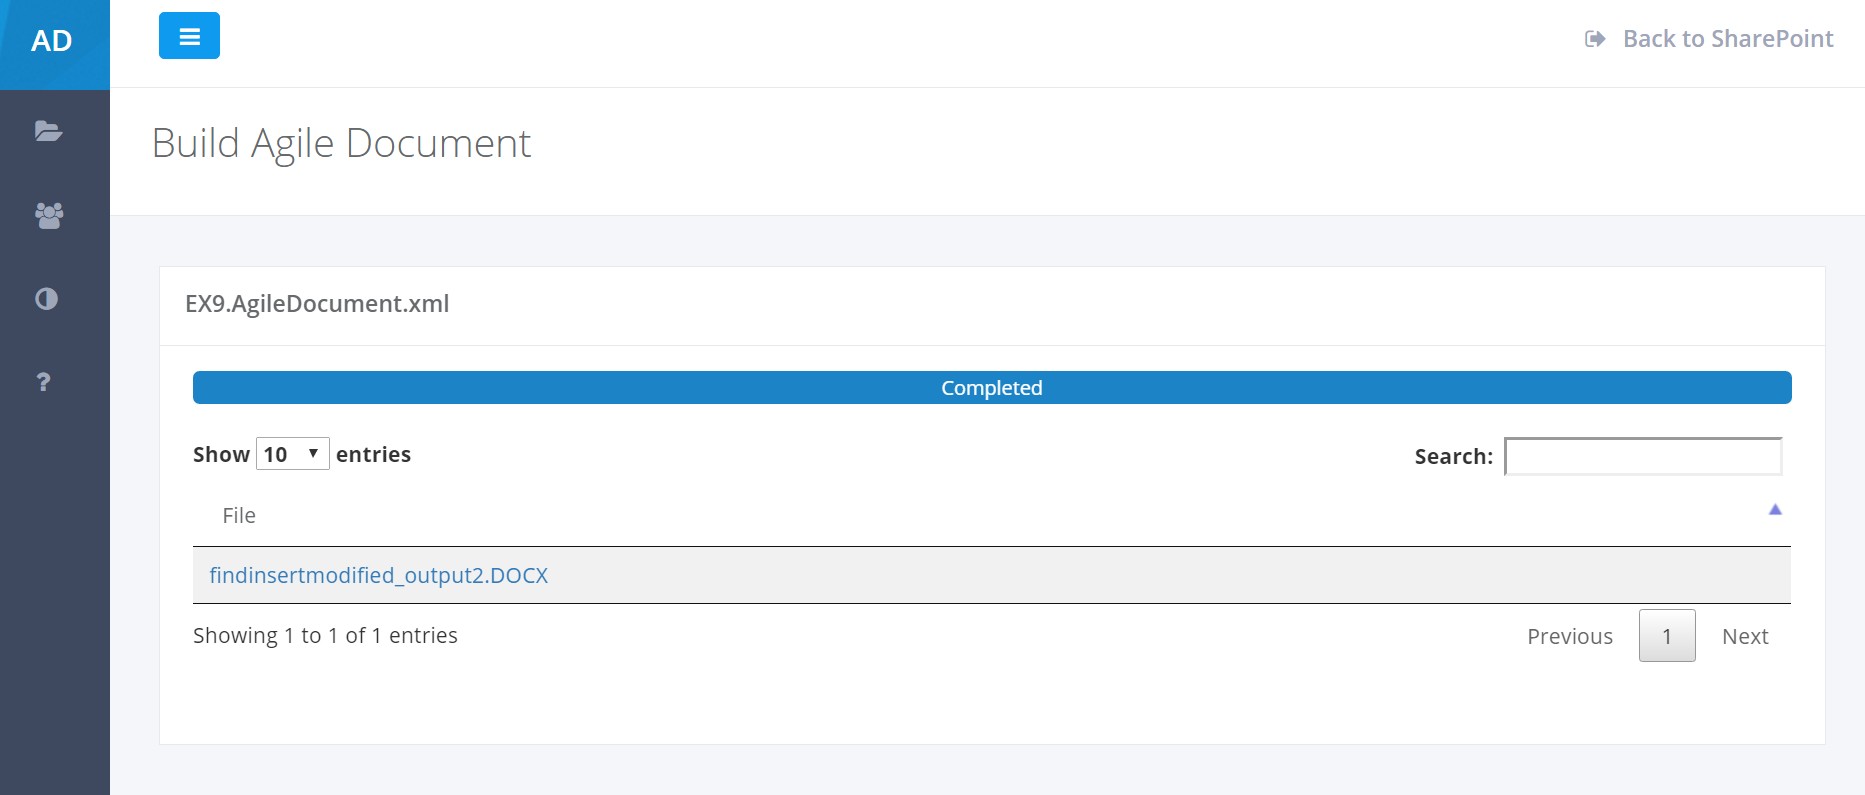
Figure 13: Build
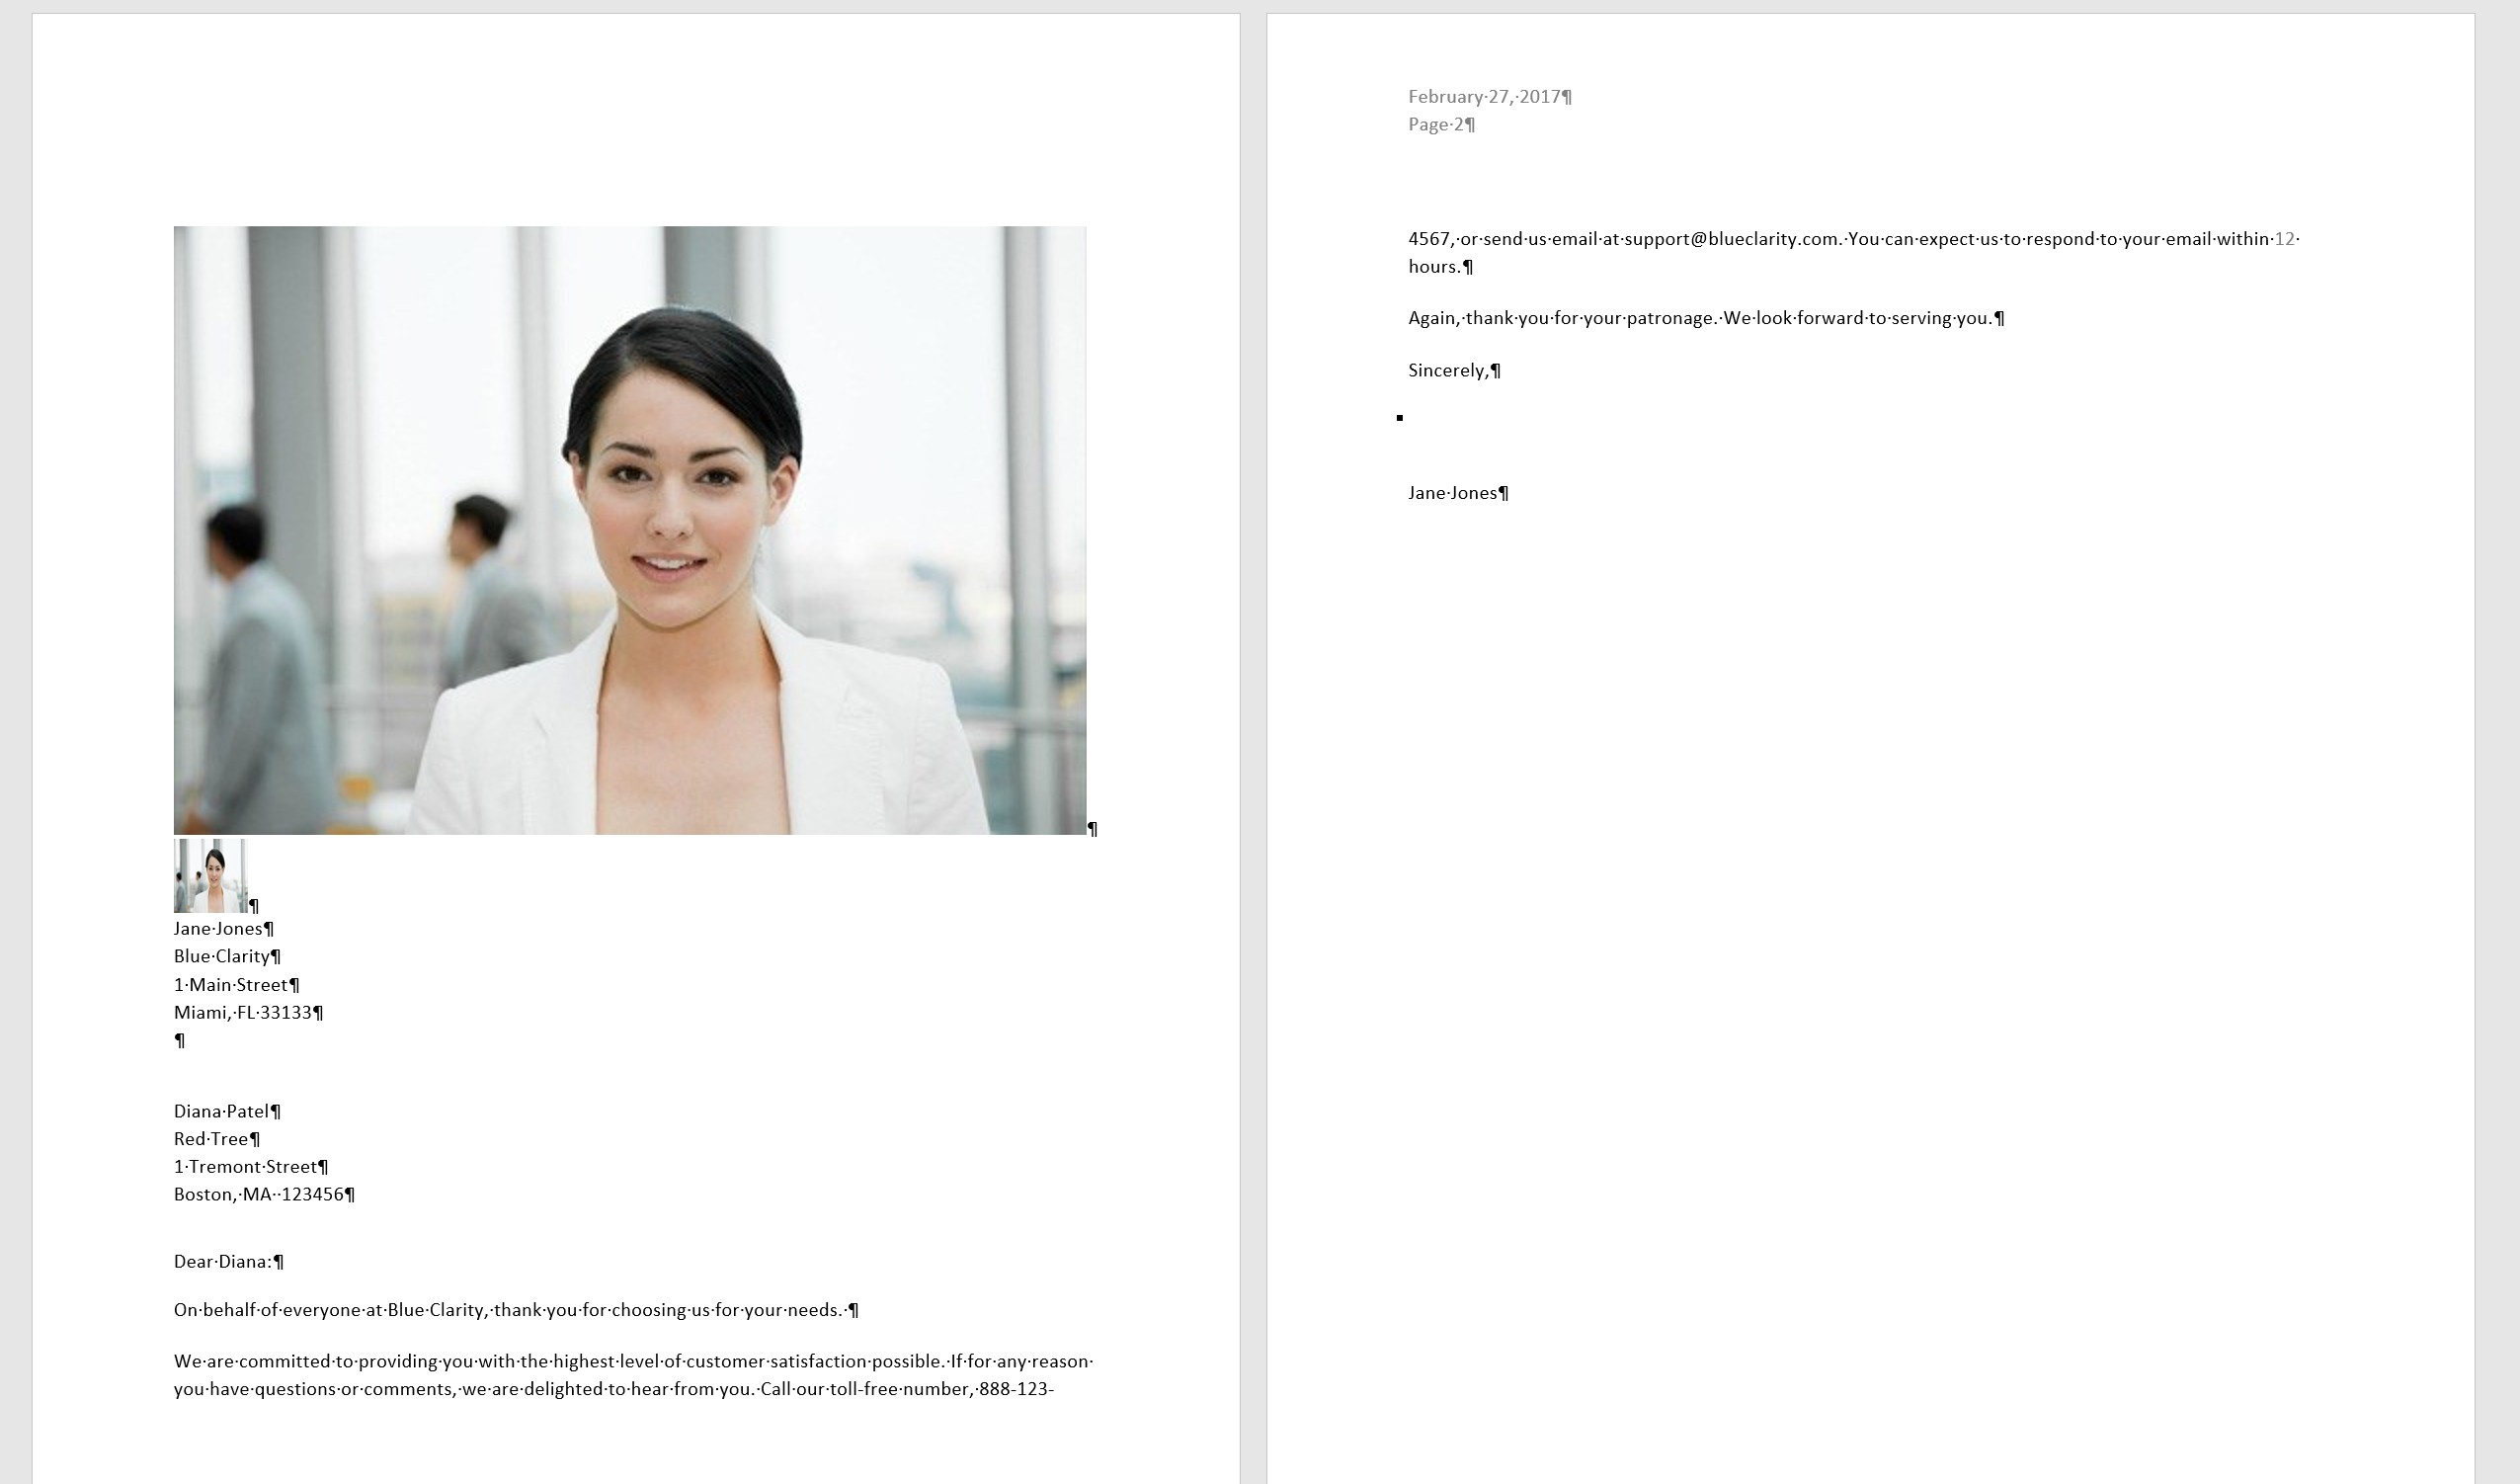
Figure 14: Output
Example 10: Dyamically merging Find and Insert items with Agile Document Favorites
In Examples 8 and 9, we saw how Find and Insert items can be used within an Agile Document. In those examples, we saved the Find and Insert specifics within the Agile Document. This works best when you want Find and Insert items closely tied to an Agile Document.
However, what happens if you have one Agile Document that you want to individually associate with many Find and Insert items. For instance, let's say you have a SharePoint list of mall tennants and you want to use one master Agile Document to define the mall leases. It's a little arduous to create a separate Agile Document for each tennant and then marry it to a master lease Agile Document.
Agile Documents has a feature called Favorites that can be used to more efficiently create these lease agreements. Specifically, in SharePoint Explorer, you can add various Agile Documents to your favorites. Then, you can build one of your favorite Agile Documents with the addition of a selected Find and Insert item.
Just like the previous examples, ensure that the folder Word/EX10 exists within your document library. Then create a new Agile Document through SharePoint Explorer. Go back into SharePoint and rename it EX10.AgileDocument.xml. Copy the client letter template and Adobe Acrobat PDF form we used in Example 8 to the EX10 folder. NOTE: The URL provided in the Adobe Form will need to be changed to one that points to your SharePoint site. Edit the Agile Document so that it looks like Figure 15. Also, ensure you've specified a DOCX output for the Agile Document. BUT, don't build it yet!
As shown in Figure 16, go into SharePoint Explorer and right-click on EX10.AgileDocument.xml and add it to your Favorites. Then, right-click on the Adobe Acrobat PDF form to build it with your EX10.AgileDocument.xml favorite as shown in Figure 17. This will launch the build in a new tab and the results will be shown in Figure 18. As you can see the results of the Build shown in Figure 19 are very similar to Figure 10. The difference is that in this example we didn't include the additional Excel data that we did in Example 8.
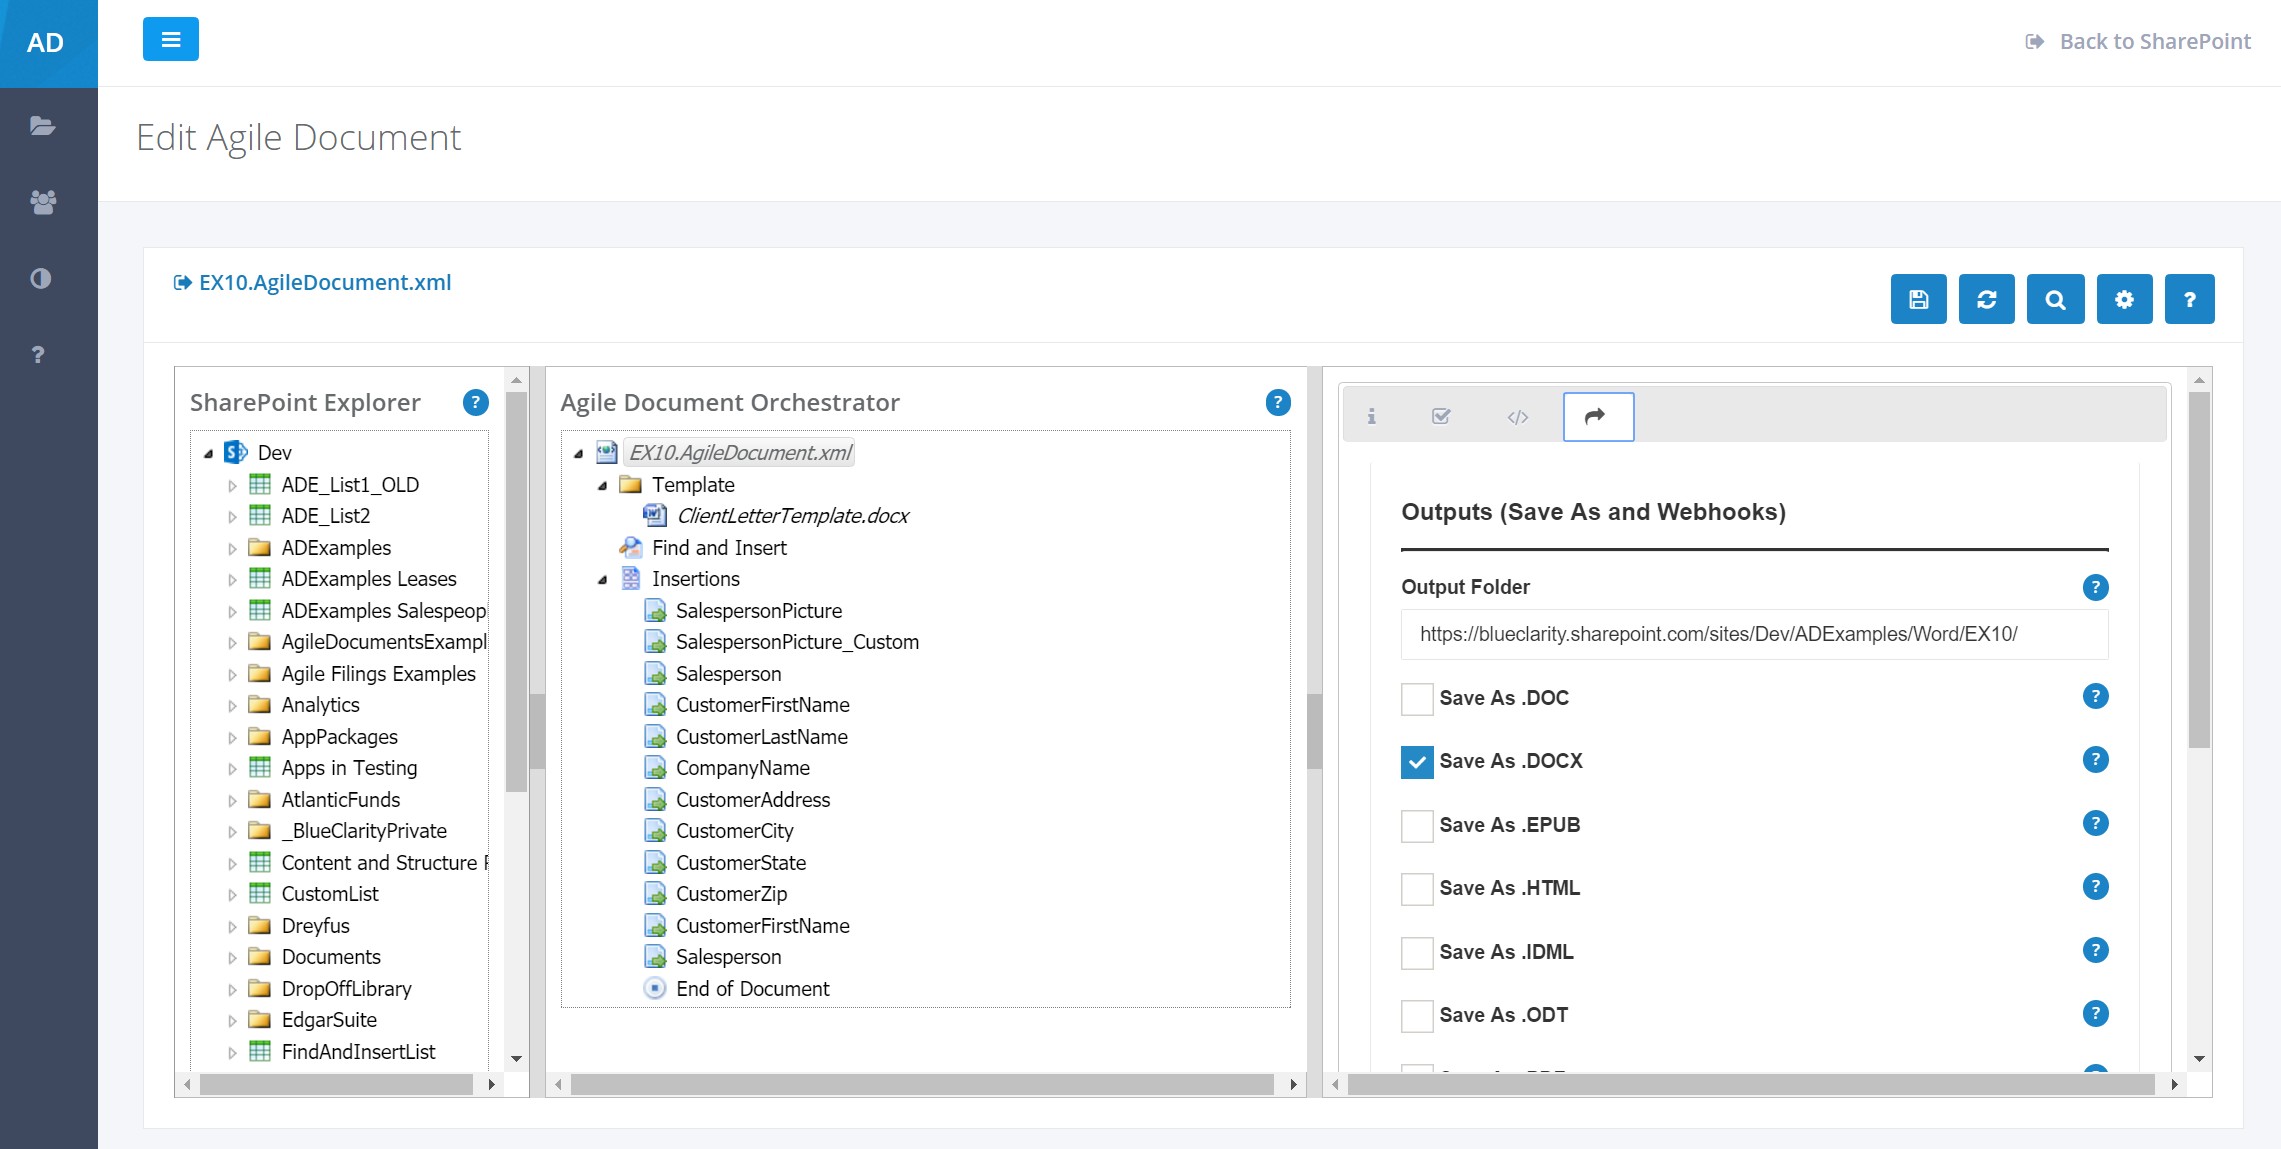
Figure 15: Agile Document Editor
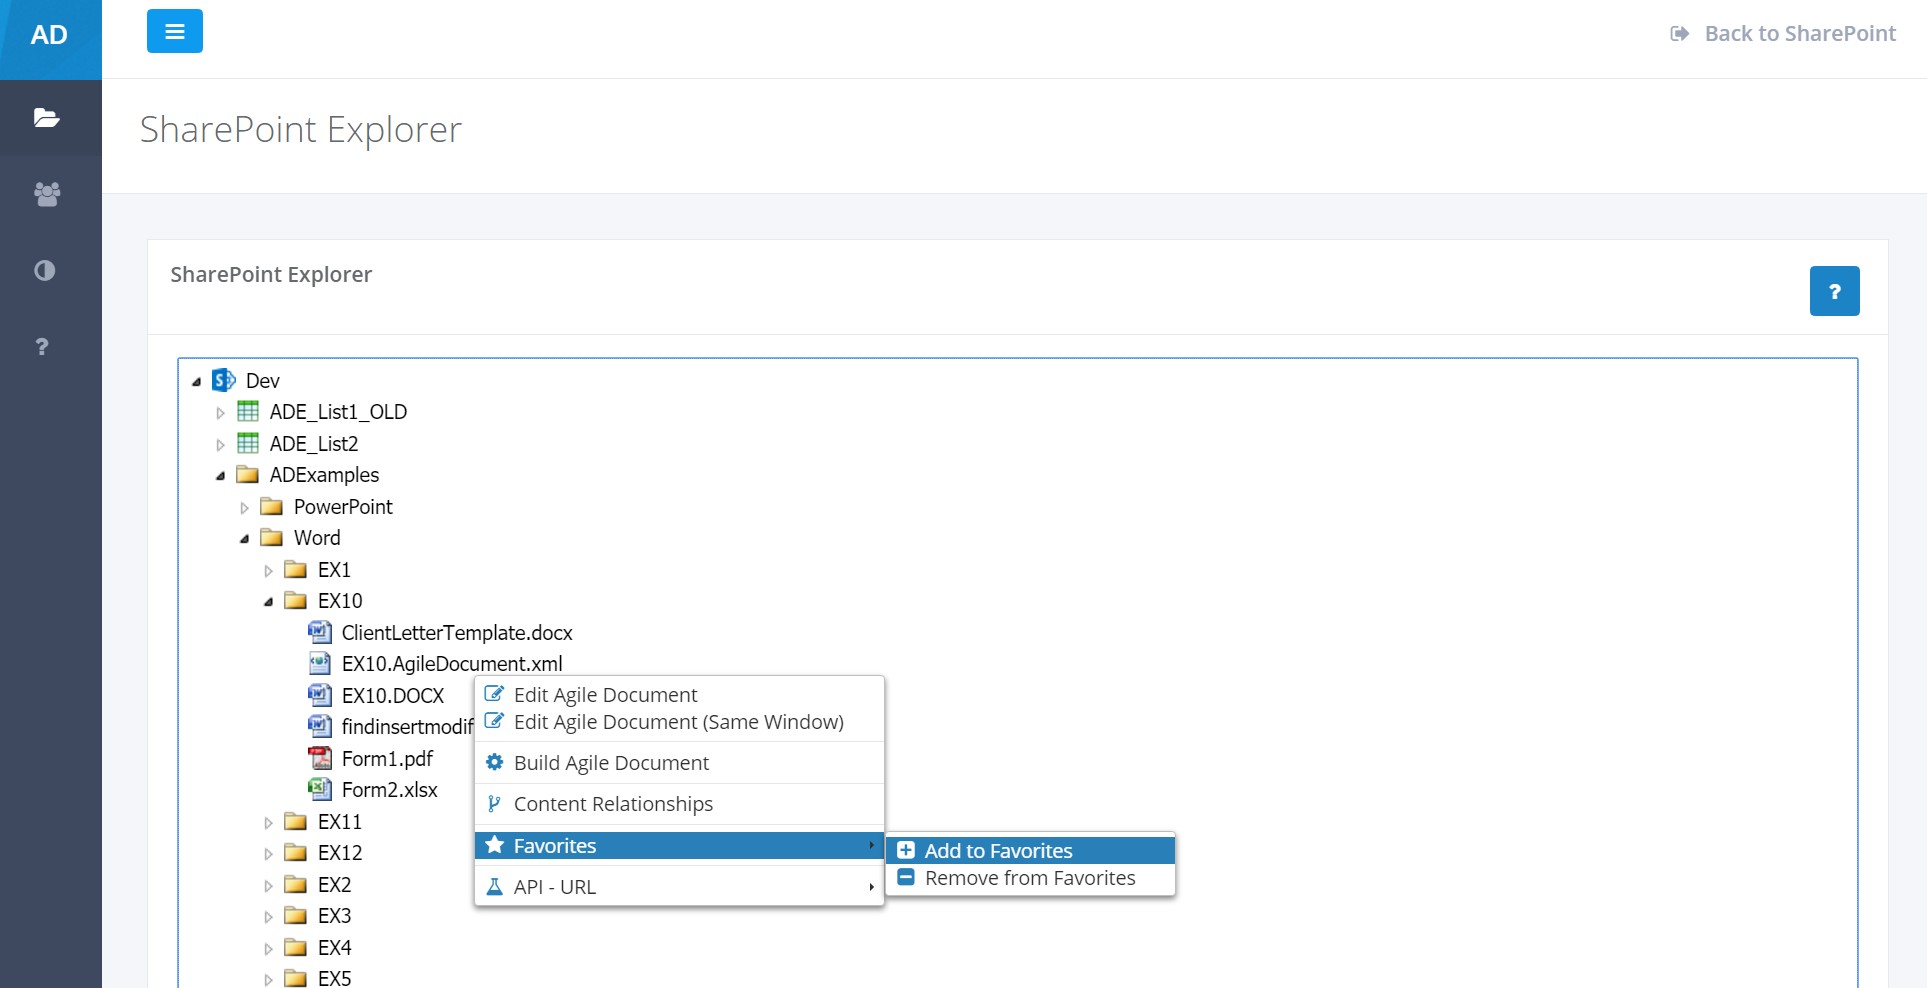
Figure 16: Add To Favorites
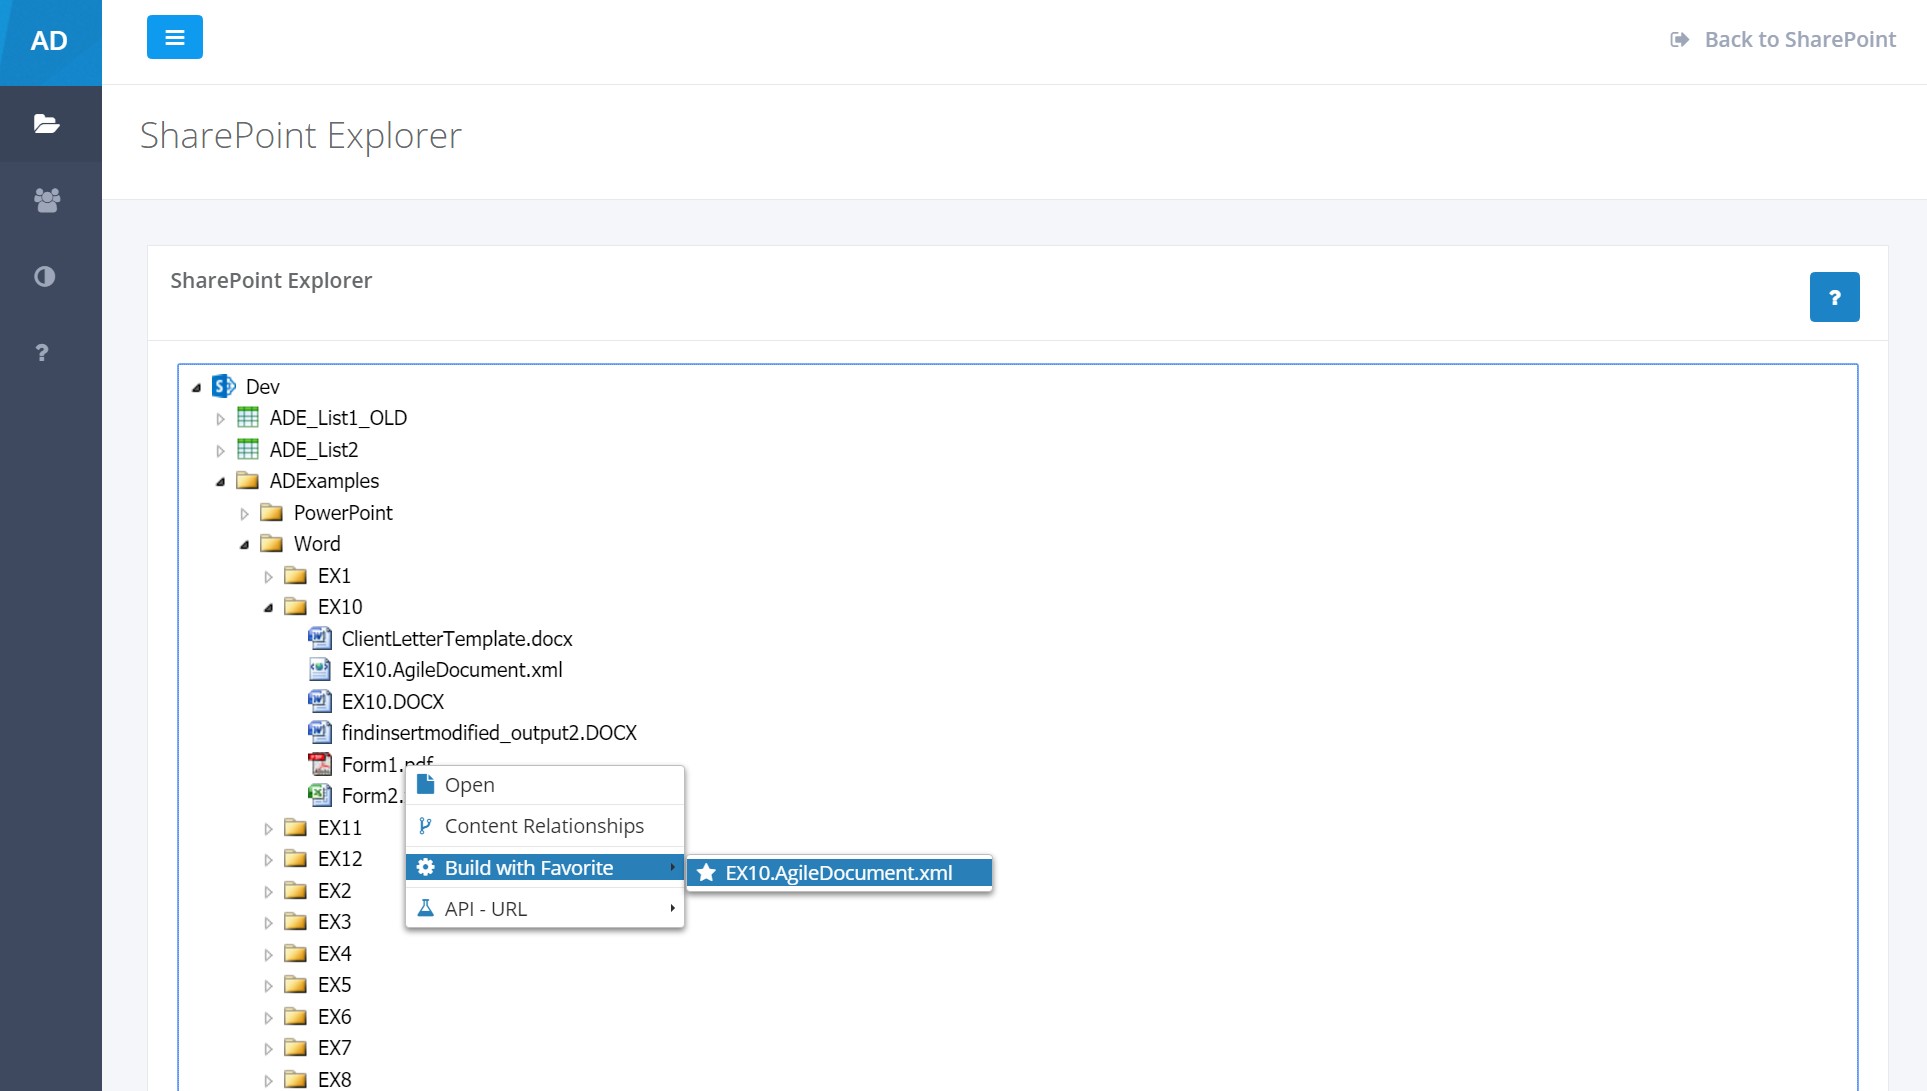
Figure 17: Build With Favorite - Acrobat PDF Document
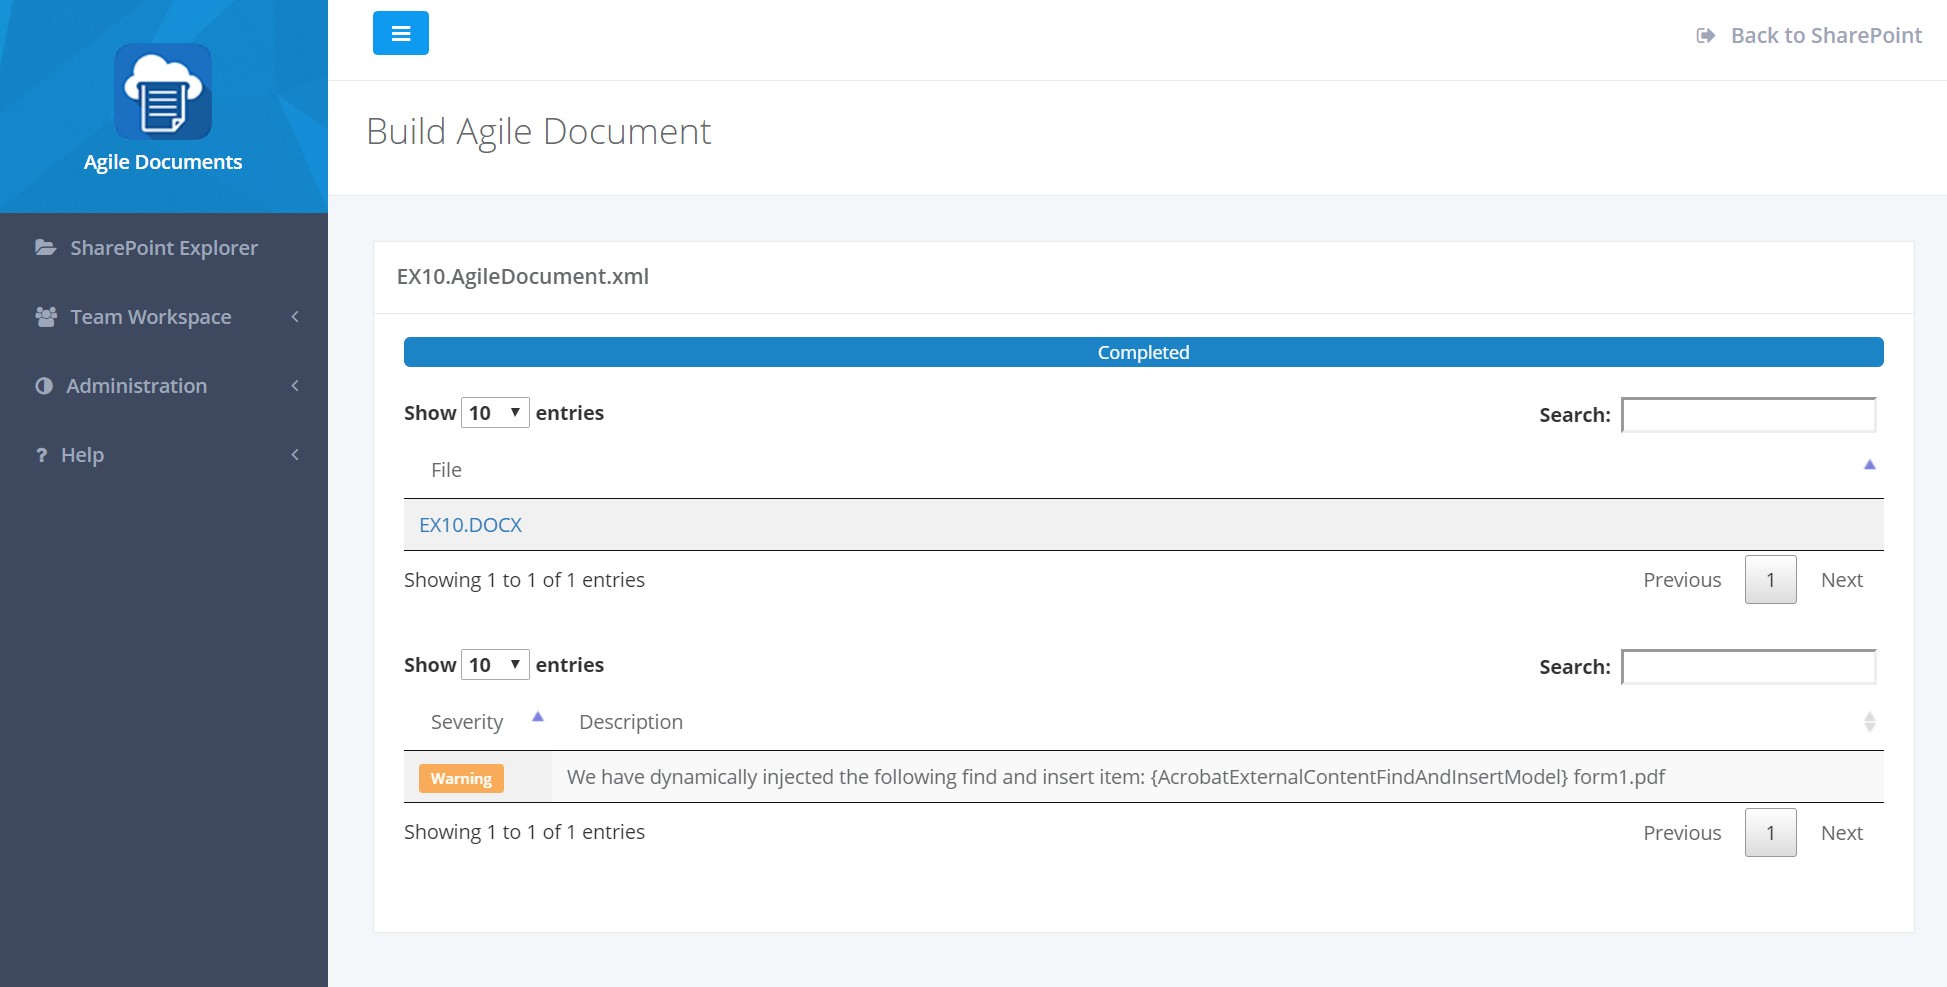
Figure 18: Build Summary - Acrobat PDF Document
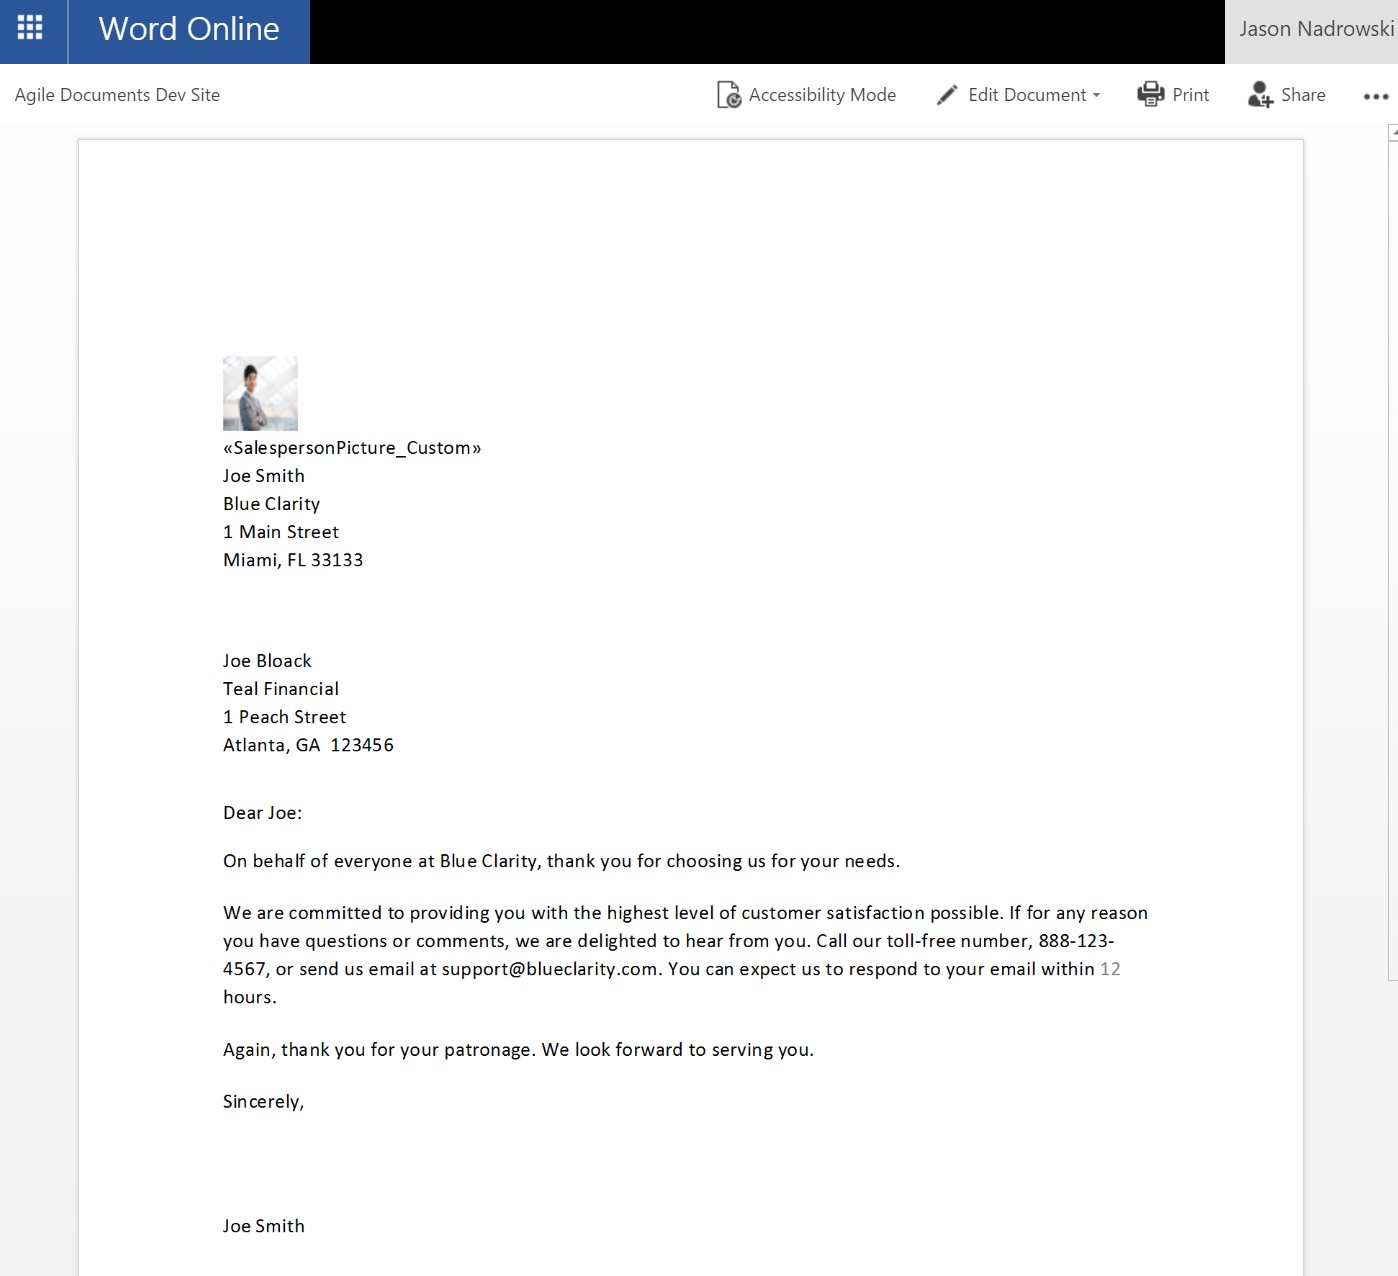
Figure 19: Output - Acrobat PDF Document
Next, lets do the same thing with the SharePoint list item we used in Example 9. As shown in Figure 20, right-click on the SharePoint list item to build it with your EX10.AgileDocument.xml favorite. This will launch the build in a new tab and the results will be shown in Figure 21. As you can see the results of the Build shown in Figure 22, including its custom output file name, are exactly the same as Figure 14.
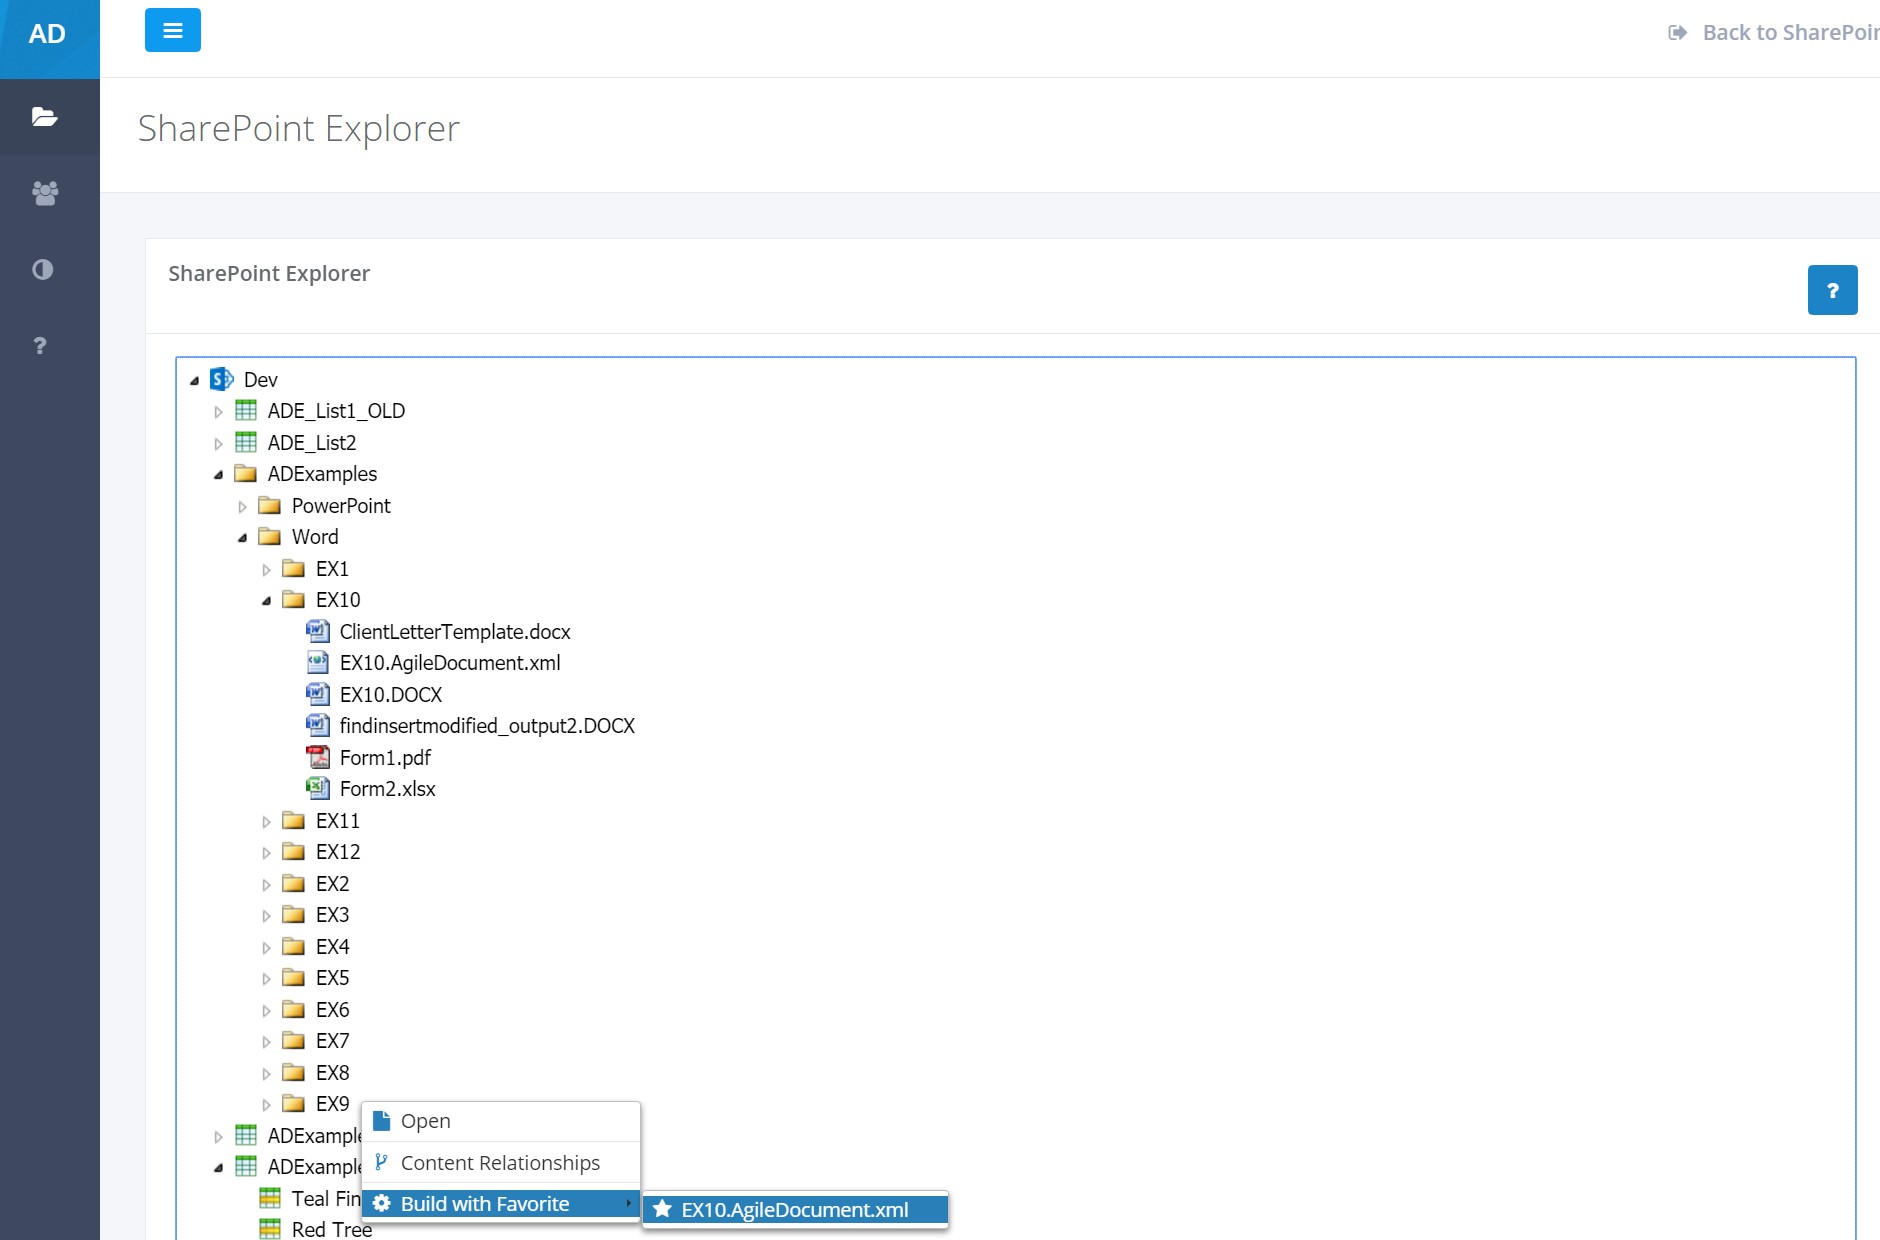
Figure 20: Build With Favorite - SharePoint List Item
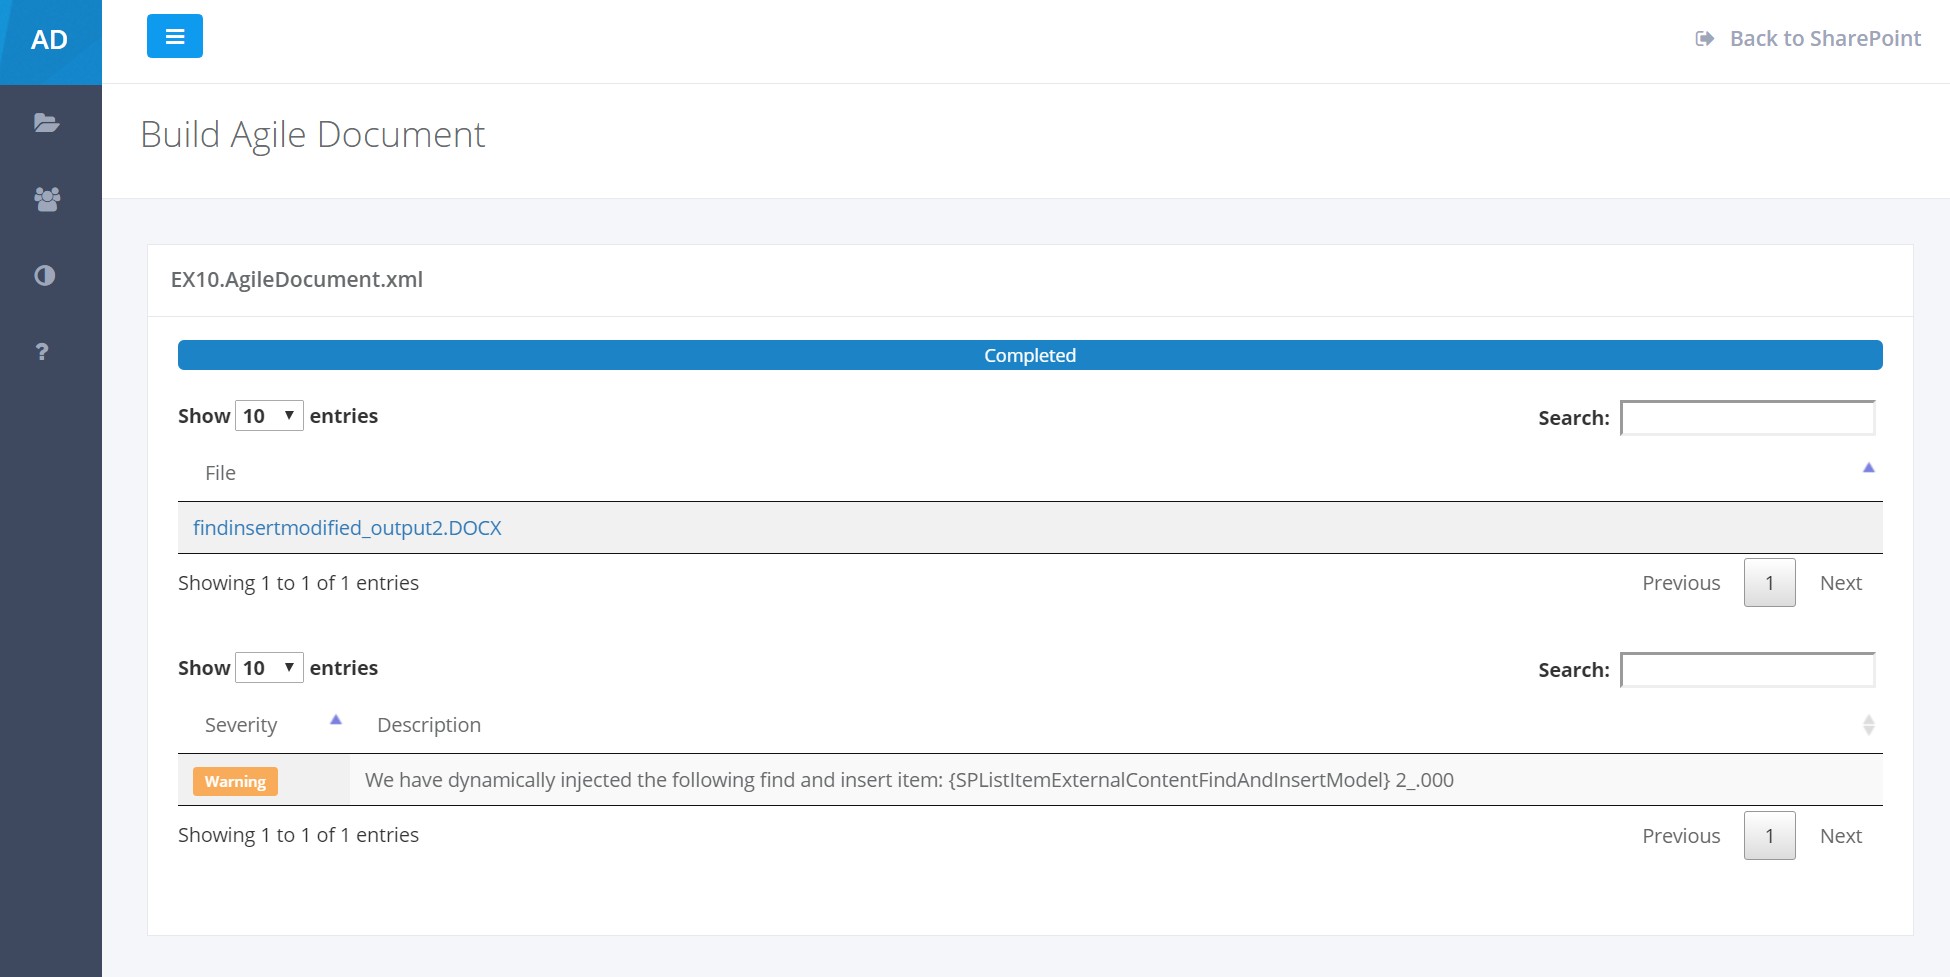
Figure 21: Build Summary - SharePoint List Item
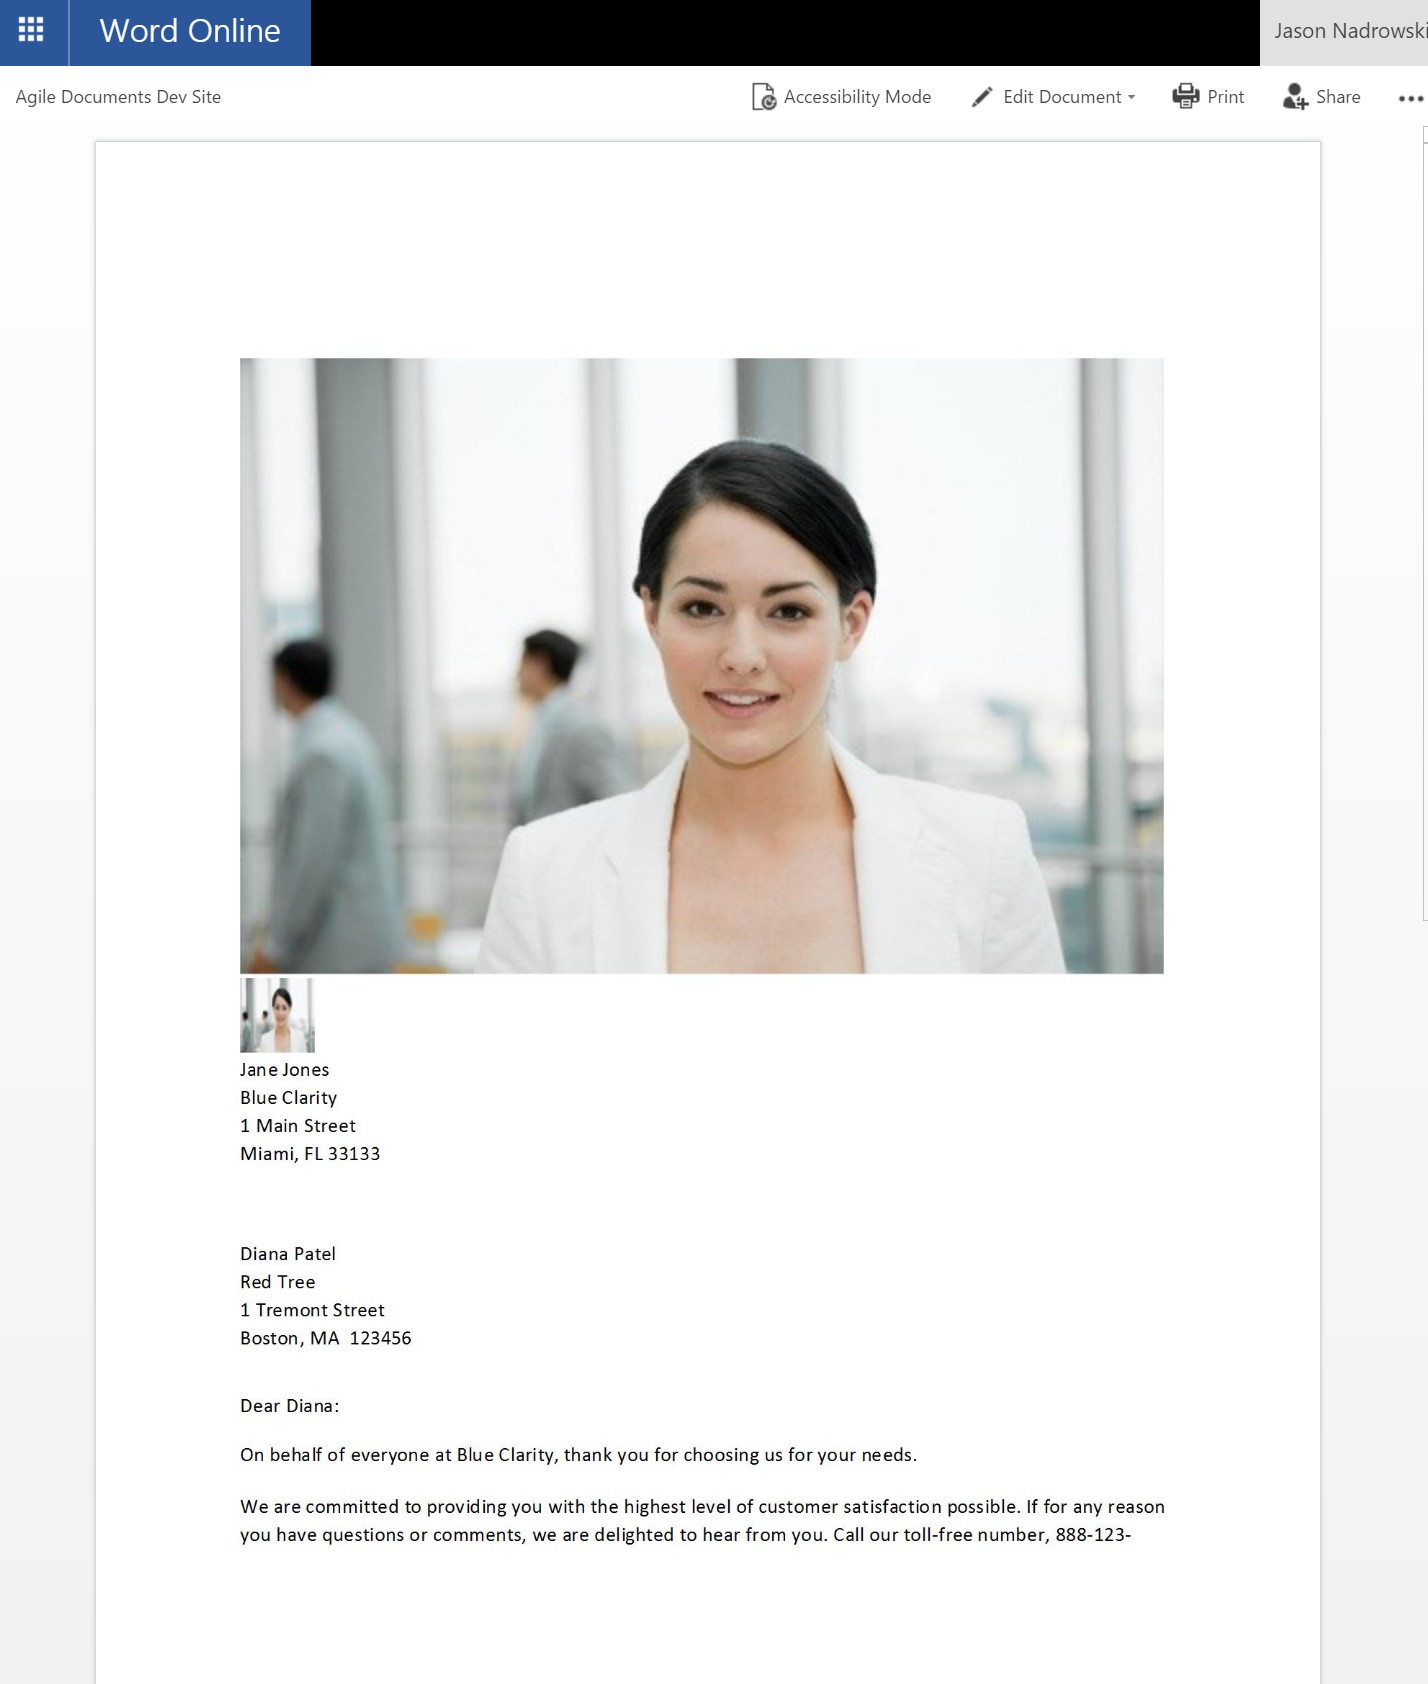
Figure 22: Output - SharePoint List Item
As you have seen in Figure 5, Agile Document's allows you to customize the use of Find and Insert items. When you build with a favorite, the user is not prompted to provide this information. However, Agile Documents does provide a mechanism to customize the settings of a dynamically added Find and Insert item. Per the Find and Insert documentation, your dynamically included item can use the reserved fields to control these individual settings.
It should also be noted that the dynamically added Find and Inserted is added to the end of the Find and Insert item. Thus, if you have any specified list items, they will be processed first and then the dynamically added item.